Project Structure
The folder structure of your Paragraph project defines what integrations are available. The src/integrations/ folder from your project root (the location of your paragon.json file) defines what integrations are available: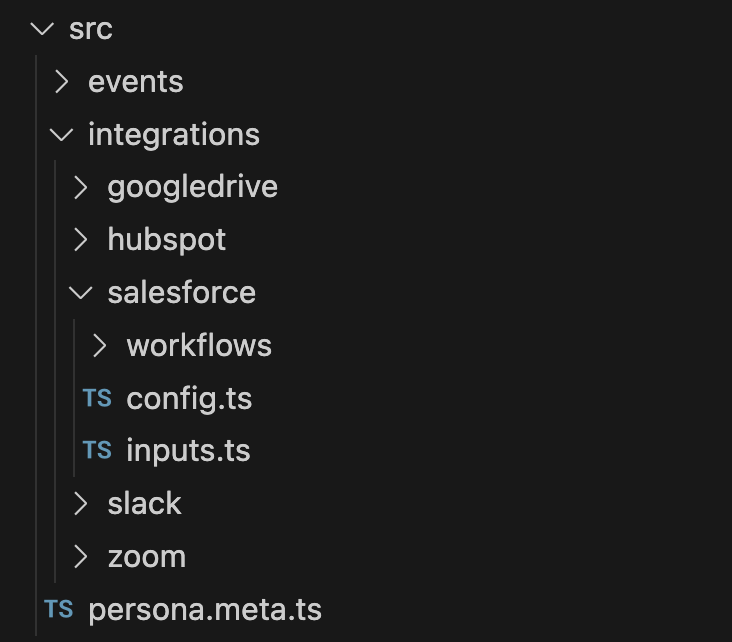
workflows/subfolder for each workflow for the integration.config.tsconfigures the display settings for the Connect Portal used for this integration, including the description and overview text. See more below in Configuring an Integration.inputs.tsconfigures integration-level User Settings exposed to your customers in the Connect Portal. For example, if you need to prompt your users to select a Field Mapping for Salesforce or a Destination Folder for Google Drive, you can define a User Setting. See more below in Configuring User Settings.
Adding an Integration
To add an integration, you can use the CLI wizard:Configuring an Integration
The config.ts file in any integration folder describes the Connect Portal configuration. Example:- Short description of the integration
- An overview of the integration, as a string of Markdown-formatted text
Configuring User Settings
The inputs.ts file in any integration folder defines integration-level User Settings exposed to your customers in the Connect Portal. For example, if you need to prompt your users to select a Field Mapping for Salesforce or a Destination Folder for Google Drive, you can expose these options in the Connect Portal. Example:createInputs function.
-
The key (
"fieldMapping") is how you will reference this input in other Paragraph workflows. -
The
idproperty of the object is how you will reference the value of this User Setting in the SDK or API and must be a stable identifier. Changing this property will result in existing selections for this setting losing their values in your customers’ Connect Portal. -
The
typeproperty of the object refers to the type of User Setting that is shown. Standard options include"text","boolean","number", and"password".- Integration-specific options like
"field_mapping"are defined in the integration-specific types and can be found with your editor autocomplete (e.g. Ctrl-space in VS Code).
- Integration-specific options like
-
The
titleproperty of the object is what will be displayed in the Connect Portal for your customers, to explain usage for this User Setting. -
Optionally, include:
-
required: Specify if this User Setting will be required for input by your customers. -
tooltip: Specify a tooltip that will explain usage of this input for your customers.
-
inputs property of the workflow file.
Custom Integrations
To define a Custom Integration in your project, create a subfolder with the namecustom.[integrationName], where integrationName is the lowercased, alphanumeric name of the integration (for example: “GitHub Enterprise” -> custom.githubenterprise).
Any changes to the
name property of your Custom Integration will affect the subfolder name and string used in paragon.connect.config.ts file to configure the Custom Integration and its authentication and display settings:
ICustomIntegration from the core library to get started:
Custom Request Options
For OAuth, Client Credentials, and ROPC integrations, you can override the default behavior of each authentication request usingrequestOptions. This is useful when an API deviates from standard OAuth conventions.
The credentials object exposed in @useparagon/core/integration provides access to values at each stage of the auth flow:
Example