Setup Guide
This guide walks you through creating a Salesforce External Client App (ECA) and packaging it as a Second-Generation Managed Package (2GP) for distribution to your users.If you are currently using a Connected App, see Migrating from a Connected App for instructions on adapting to Salesforce’s packaging requirements enforced starting in September 2025.
Setting Up Your Salesforce Environment
Before creating your app, you’ll need to set up the required Salesforce orgs and enable packaging features.- Partner Business Org (PBO, also referred to as the Dev Hub Org): This is a Salesforce org that is created when you sign up as a Salesforce Partner.
- You will use this org to create your External Client App, link your Namespace, and publish your Package.
- Developer Edition Org (also called a Partner Developer Edition / PDE org if created from the Partner Business Org): This is a Salesforce org for development / testing purposes created from the Salesforce Developer Edition signup or the Environment Hub of your Partner Business Org.
- You will use this org to create your Namespace only.
Already have a Partner Business Org with Dev Hub enabled? Skip to Creating an External Client App.
1. Create a Partner Business Org
Sign up for a trial Partner Business Org. Within a few minutes of signing up, you will receive an email to set your Salesforce login (note that this is separate from the Partner Community page atpartners.salesforce.com).
2. Enable Dev Hub and Second-Generation Packaging
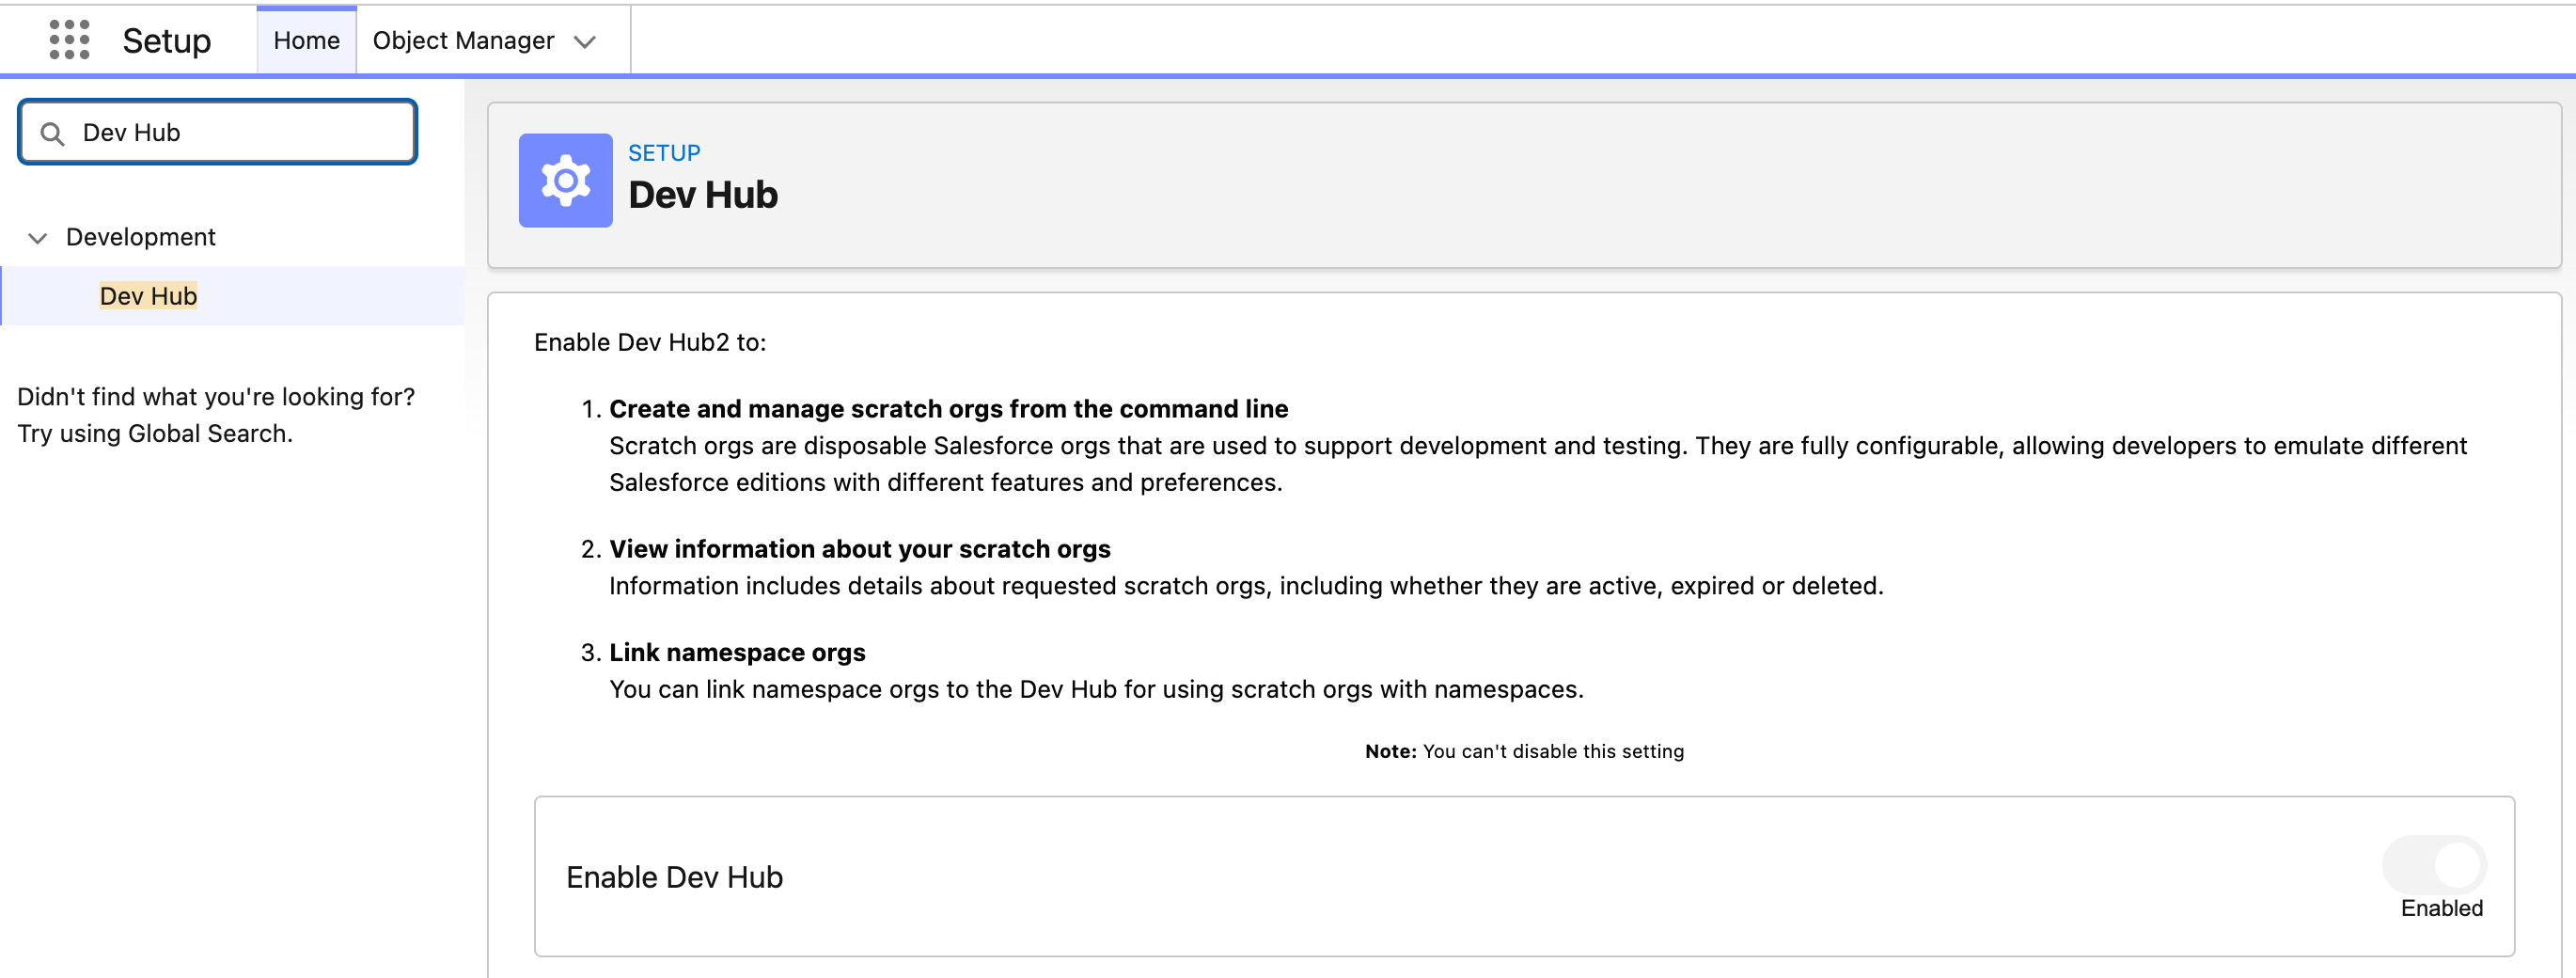
In your Partner Business Org:- Go to Setup and search for Dev Hub in the Quick Find box.
- Enable the following settings:
- Enable Dev Hub
- Enable Unlocked Packages and Second-Generation Managed Packages
3. Create and Link a Namespace
Namespaces uniquely identify your package components in Salesforce. You’ll create the namespace in a Developer Edition Org, then link it to your Partner Business Org.1
Create a Developer Edition Org
If you don’t already have a Developer Edition Org, you can create one from your Partner Business Org:
- Open the App Launcher and search for Environment Hub.
- From the Environment Hub, click Create Org and set the following details:
- Purpose: Development
- Edition: Partner Developer
2
Create a Namespace
In your Developer Edition Org: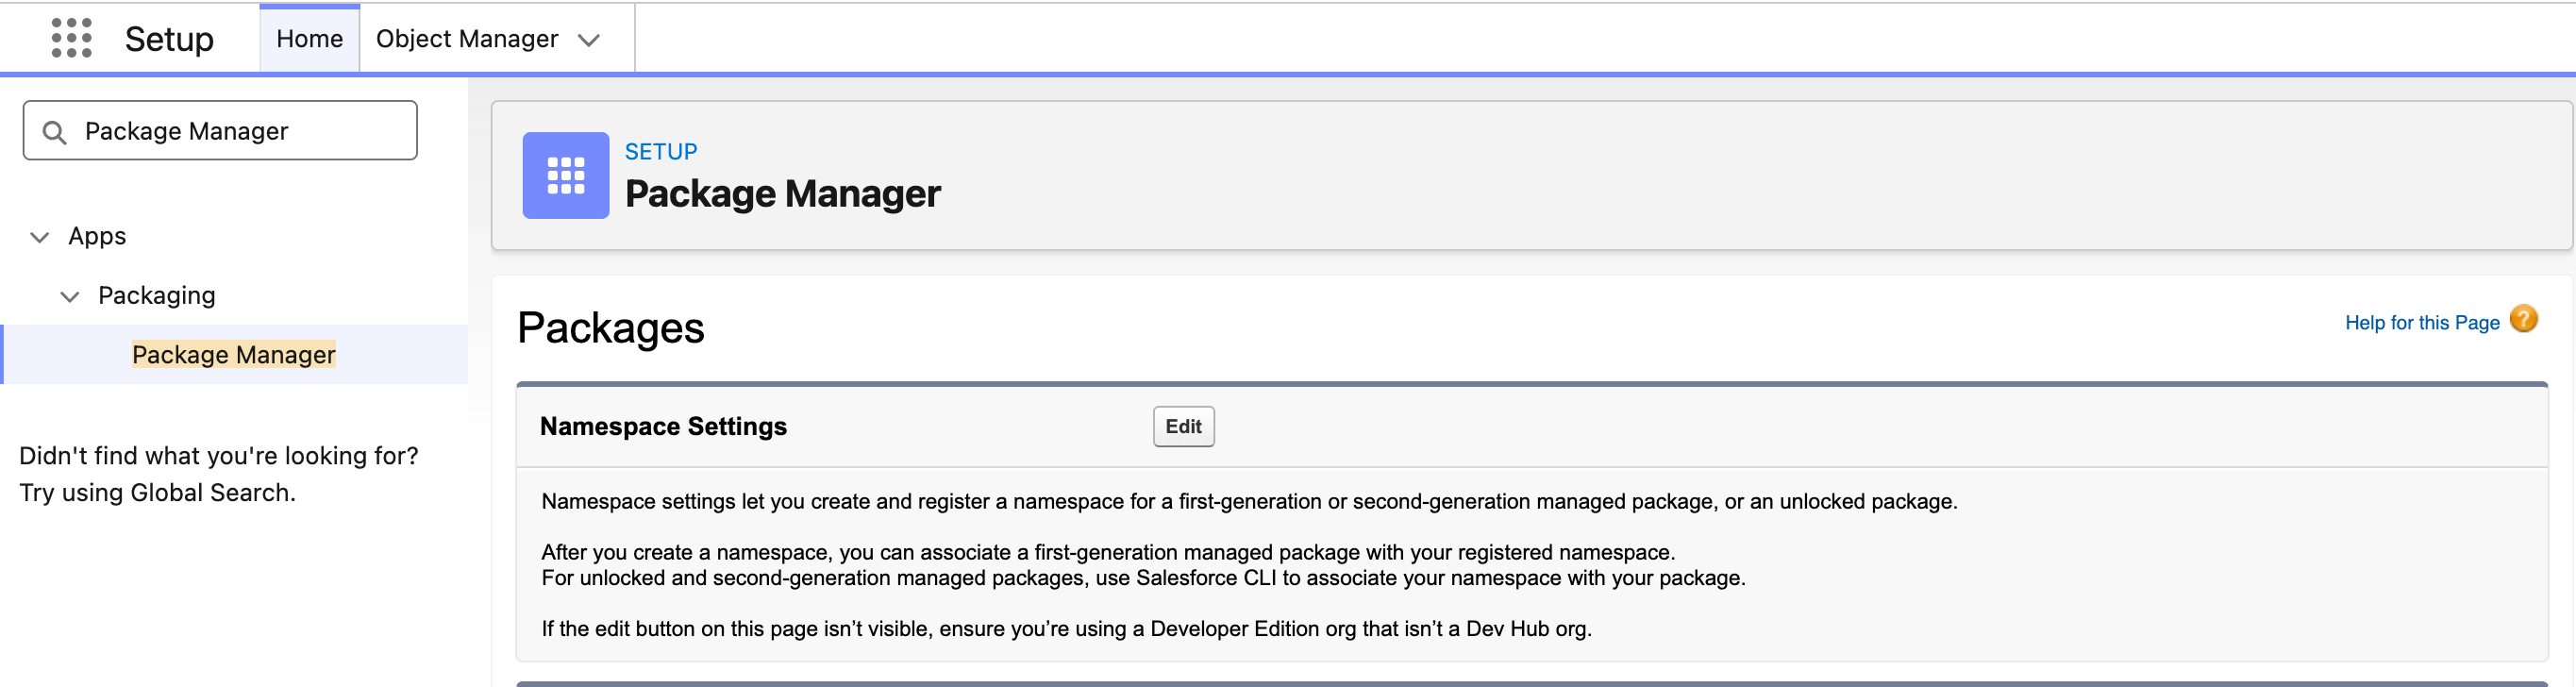
- Go to Setup > Apps > Packaging > Package Manager.
- Click Edit next to the Namespace Prefix field.
- Enter your desired namespace and click Check Availability, then Review.
- Click Save.
3
Link the Namespace to Your Dev Hub
In your Partner Business Org (make sure to switch back to this login after creating the namespace):
- Open the App Launcher and search for Namespace Registries.
- Click Link Namespace.
- When prompted, log in with the Developer Edition Org credentials that created the namespace. The namespace you configured will be displayed after you log in and approve access.
Creating an External Client App
With your environment set up, you can now create the External Client App (ECA) that will handle OAuth authentication for your integration.1
In your Partner Business Org, go to Setup and navigate to Platform Tools > Apps > External Client Apps > External Client App Manager.Click New External Client App.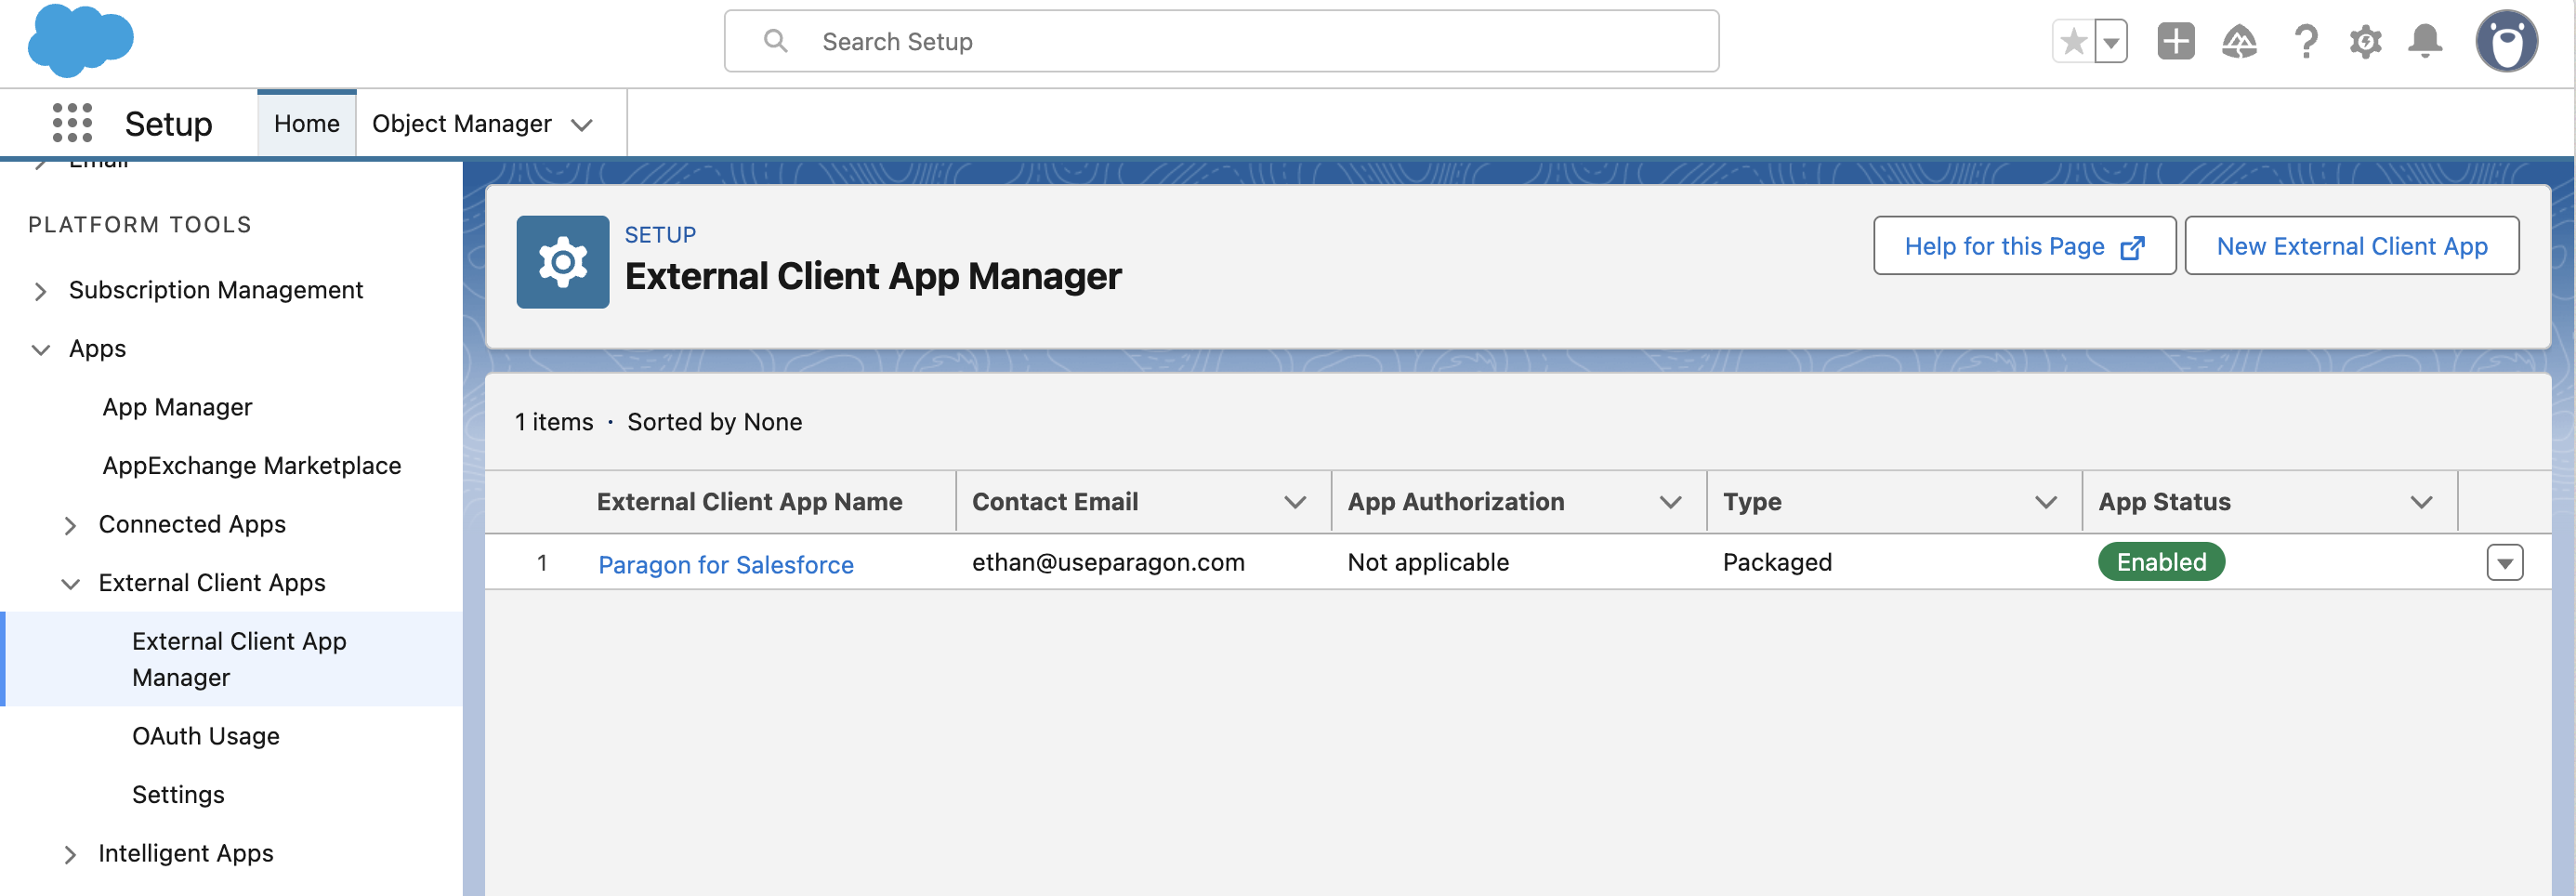
2
Fill out the details for your app’s name as it will appear to your users during the connection process.Make sure to configure the following settings:
3
Under OAuth Settings, configure:Callback URL:OAuth Scopes: Select the scopes required for your integration. By default, Paragon requests:
For on-premise installations, use
https://passport.[Your Base URL]/oauth- Access the identity URL service
- Manage user data via APIs
- Perform requests at any time
4
Click Save to create your External Client App.See the next section to get your Consumer Key and Consumer Secret from the External Client App and add them to Paragon.
Add Your Salesforce App to Paragon
After creating your External Client App, you’ll need to enter it Consumer Key and Consumer Secret of your External Client App into Paragon.1
Get Your Consumer Key and Consumer Secret from Salesforce
In your Partner Business Org, go to Setup > Platform Tools > Apps > External Client Apps > External Client App Manager and view your External Client App.
- Expand OAuth Settings.
- Click Consumer Key and Secret.
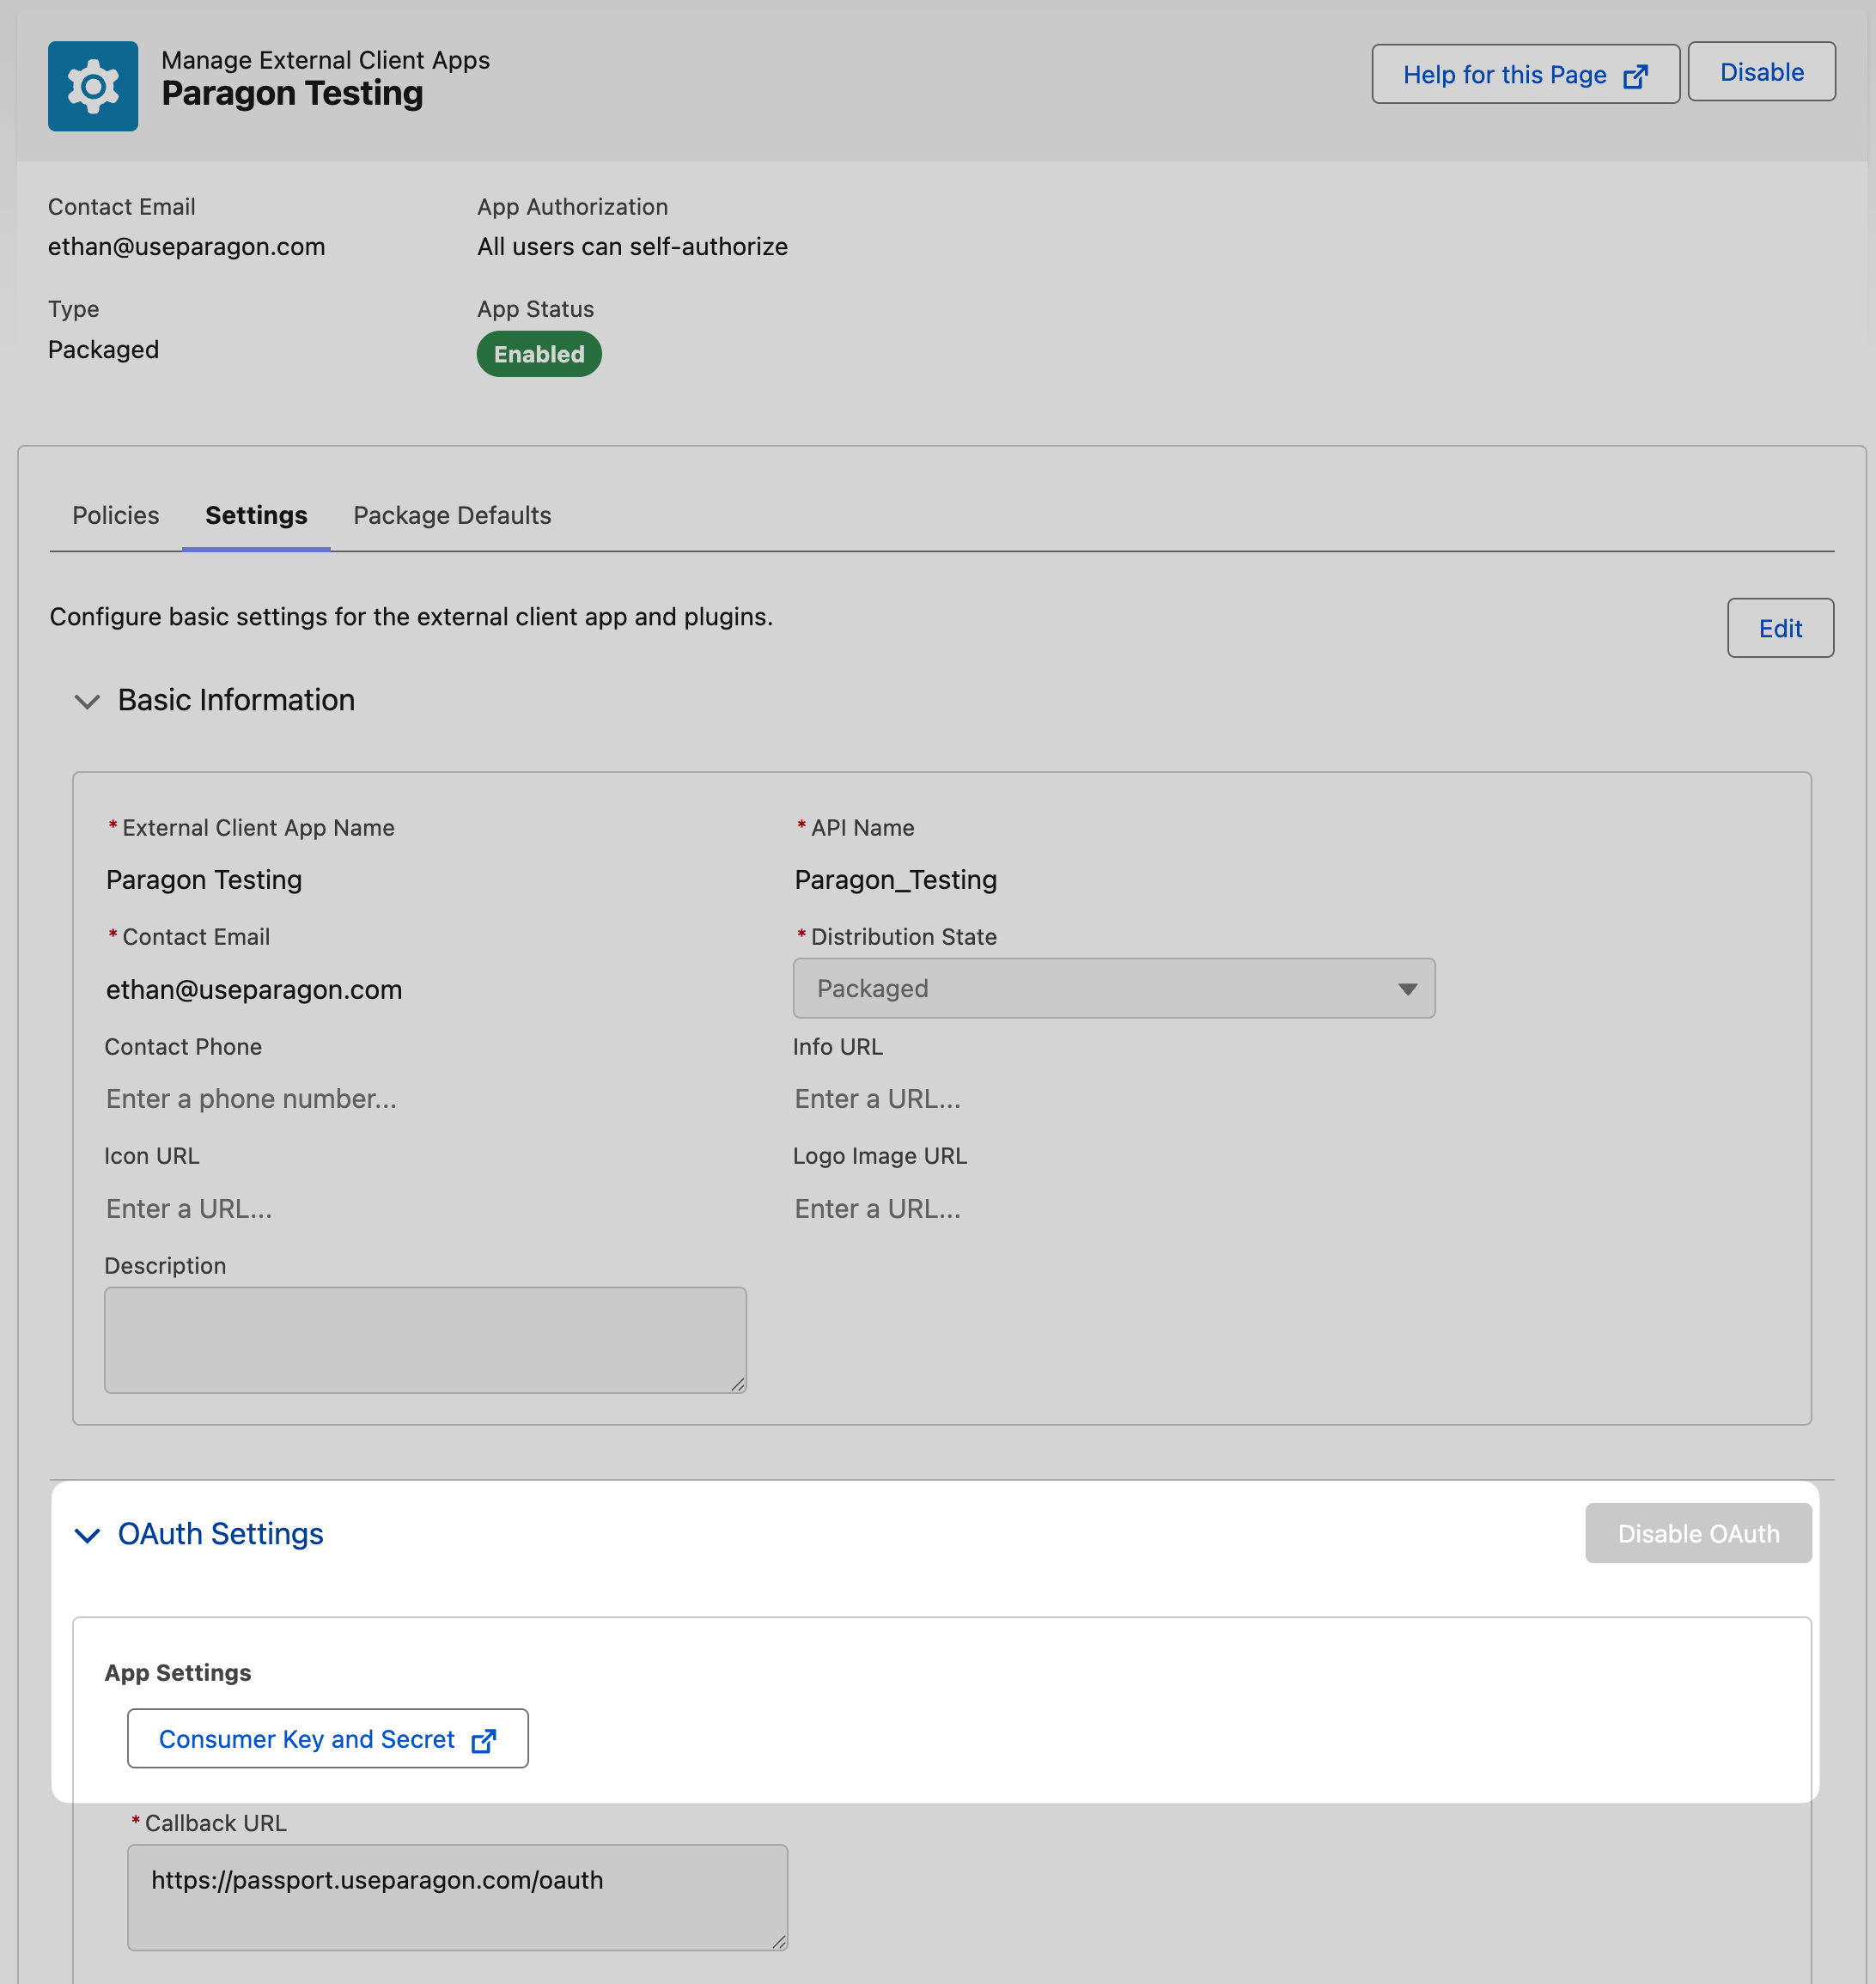
- Copy the Consumer Key and Consumer Secret.
2
Add your Consumer Key and Consumer Secret to Paragon
Now, go to the Paragon dashboard to add the Consumer Key and Secret:
- Navigate to your Salesforce integration and click Configure under the App Configuration section.
-
Fill in your credentials:
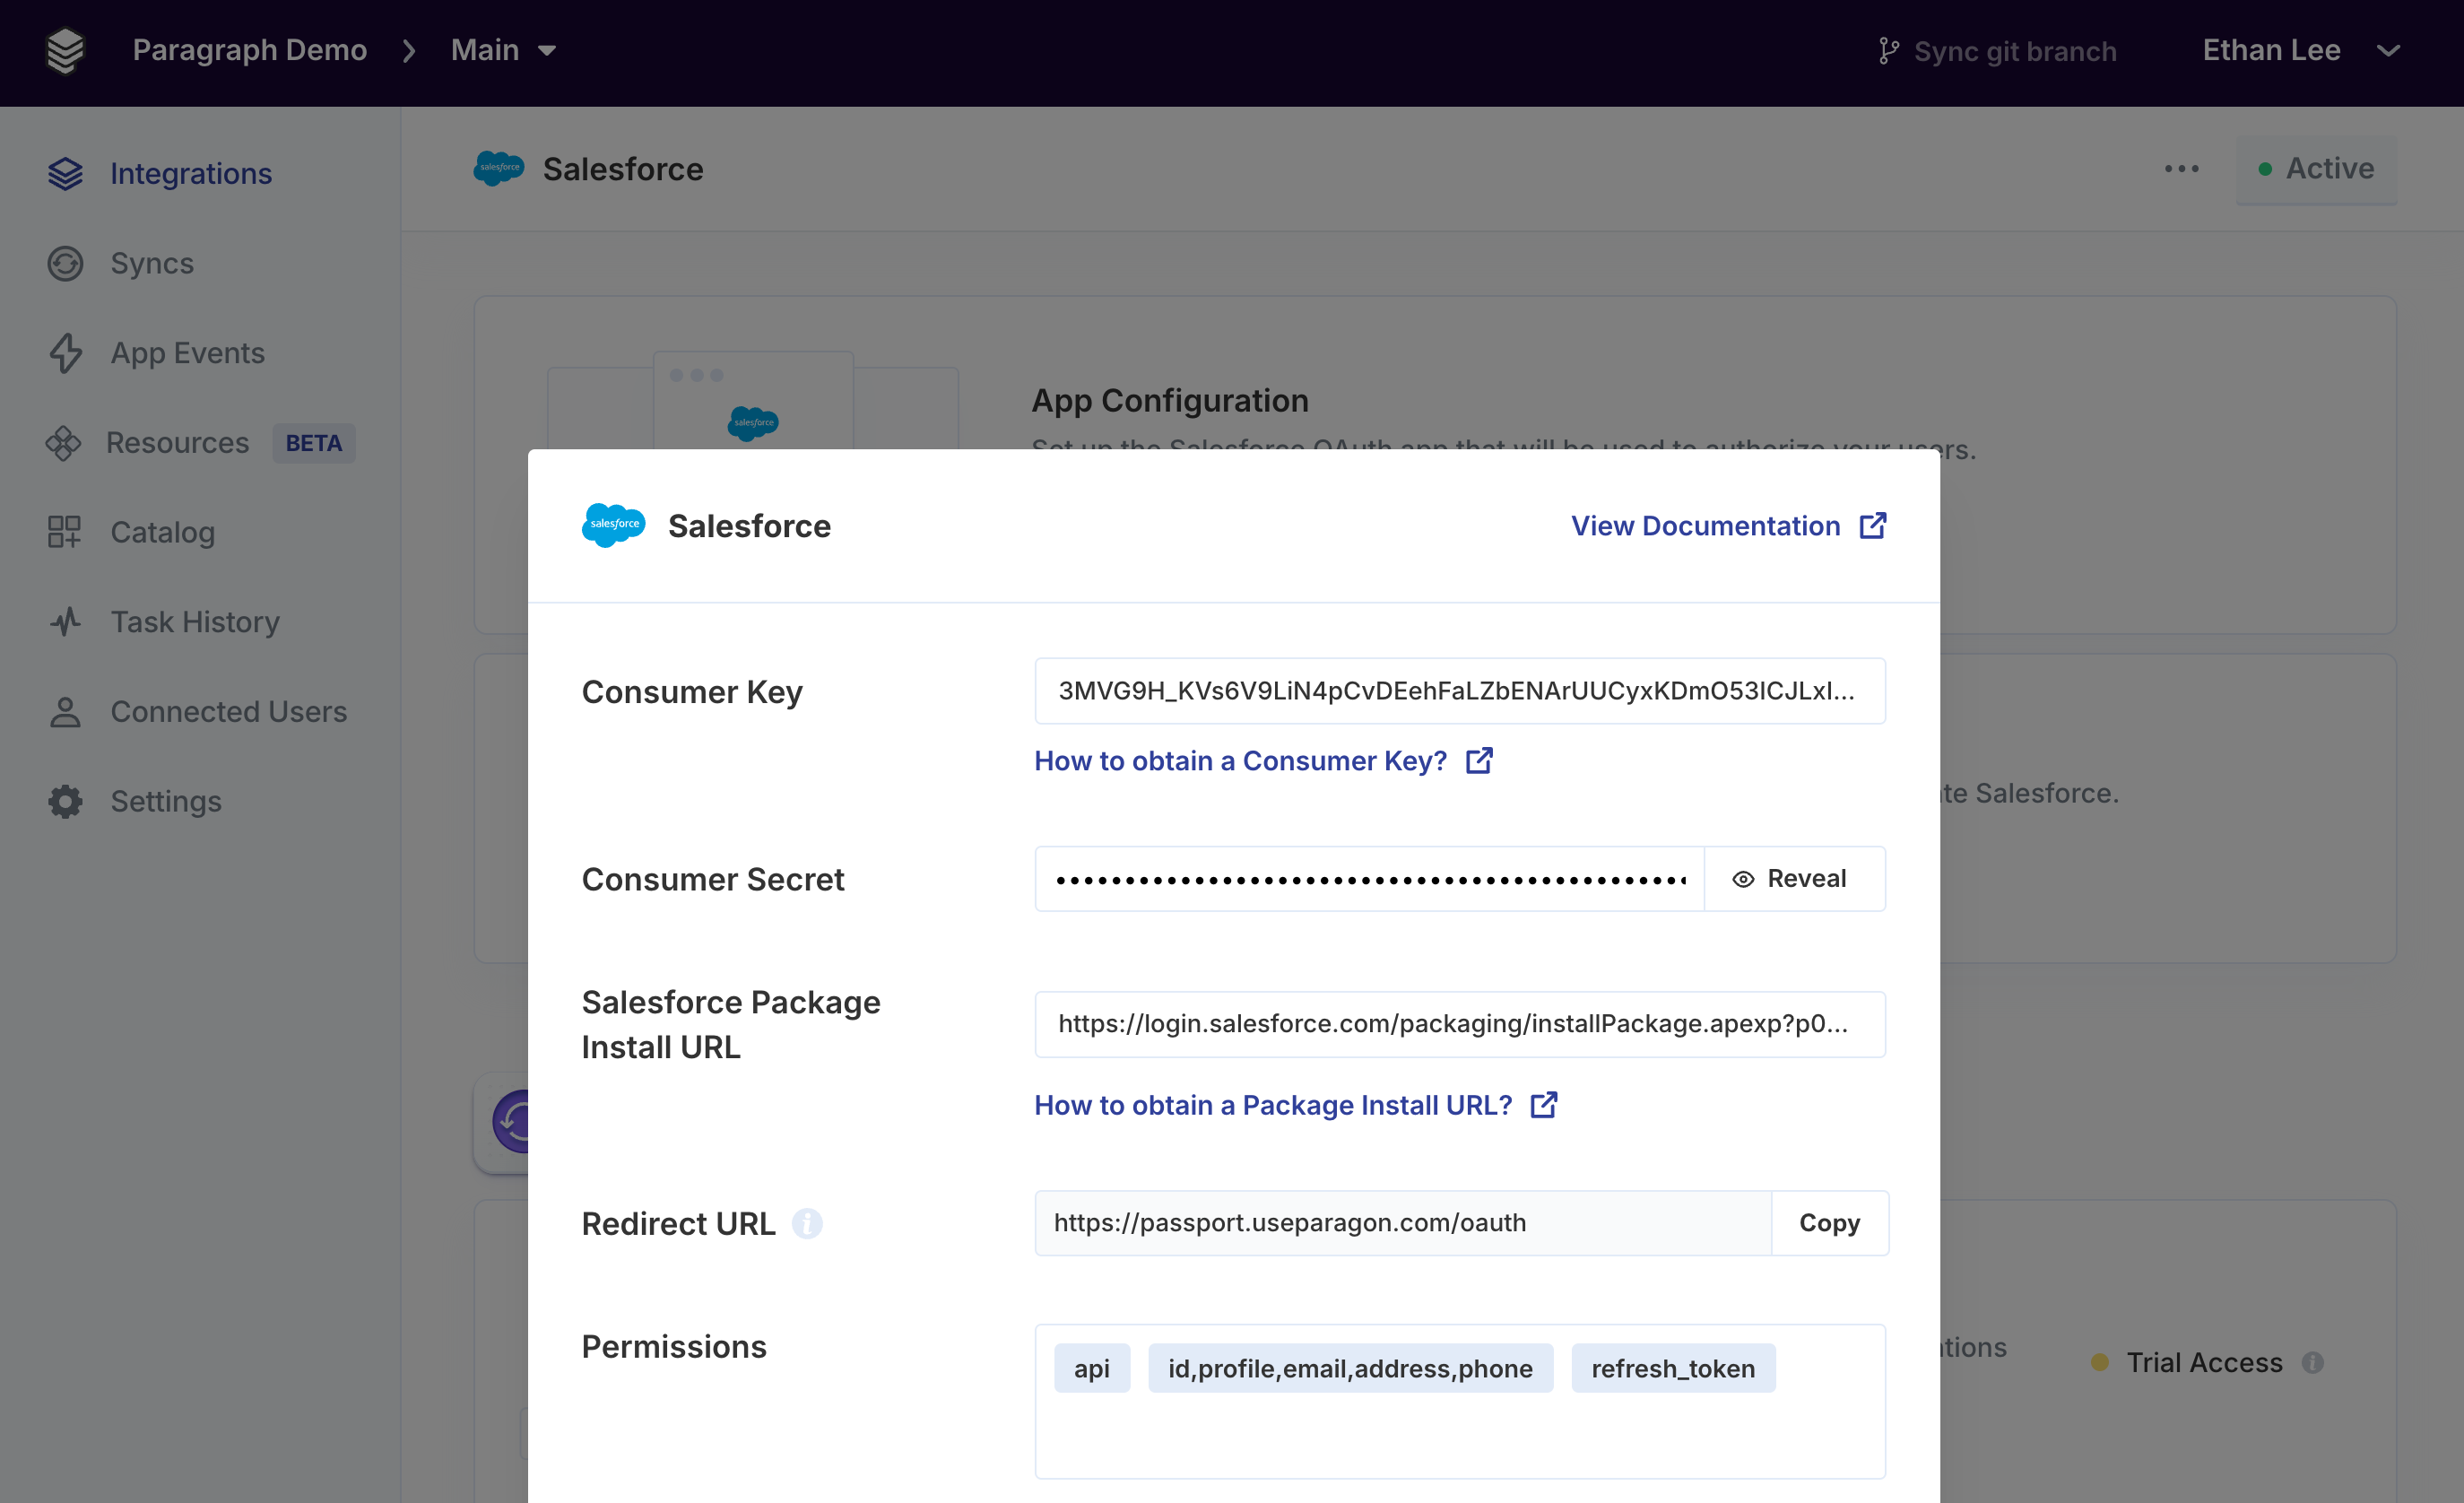
The Salesforce Package Install URL is required to save this configuration, so you can’t submit it yet. Keep this Configure panel open and don’t click Save until you’ve generated your Install URL in the next section, then return here to complete and save it.
Packaging Your App
To distribute your External Client App to users, you’ll create a Second-Generation Managed Package (2GP) using the Salesforce CLI.1
Install the Salesforce CLI
Install the Salesforce CLI using npm:Or see Salesforce’s CLI installation guide for other installation methods.
2
Create a Salesforce Project
Create a new Salesforce DX project:
3
Authorize Your Dev Hub
From your project directory, authenticate with your Partner Business Org:This will open a browser window for you to log in.
4
Configure the Namespace
Open
sfdx-project.json in your project and set the namespace field to the namespace you created in the previous step:5
Create the Package
Create a managed package for your app:
6
Retrieve External Client App Metadata
Pull your ECA configuration into the project:After running these commands, you’ll see new files in:
force-app/main/default/externalClientApps/force-app/main/default/extlClntAppOauthSettings/
If you have multiple External Client Apps and only want to package specific ones, delete the XML files for apps you don’t want to include.
7
Create and Promote a Package Version
Create a new package version:This command will take a few minutes. Once complete, you’ll receive a Subscriber Package Version ID. Save this ID for later use.Promote the version to released status:
Replace YOUR_SUBSCRIBER_PACKAGE_VERSION_ID with your Subscriber Package Version ID:
8
Get Your Installation Link
Using the Subscriber Package Version ID, you can now construct the installation URL for your package at the version you promoted in the last step.The installation URL is constructed as follows (for Sandbox accounts, replace The Connect Portal can automatically guide users through the package installation process prior to connecting their Salesforce account.Now, return to the Configure panel you left open earlier and paste this URL into the Salesforce Package Install URL field. With all three fields (Consumer Key, Consumer Secret, and Install URL) filled in, click Save to submit the configuration.
login.salesforce.com with test.salesforce.com):Replace YOUR_SUBSCRIBER_PACKAGE_VERSION_ID with your Subscriber Package Version ID:
Testing Your Setup
To validate your setup, ensure that all details are correctly configured in the App Configuration section of your Salesforce integration: Then, open the Connect Portal for Salesforce inside of your app (or click Test Connect Portal in the Salesforce integration) to try a connection flow.-
The Connect Portal will first prompt you to select a Salesforce Account Type.
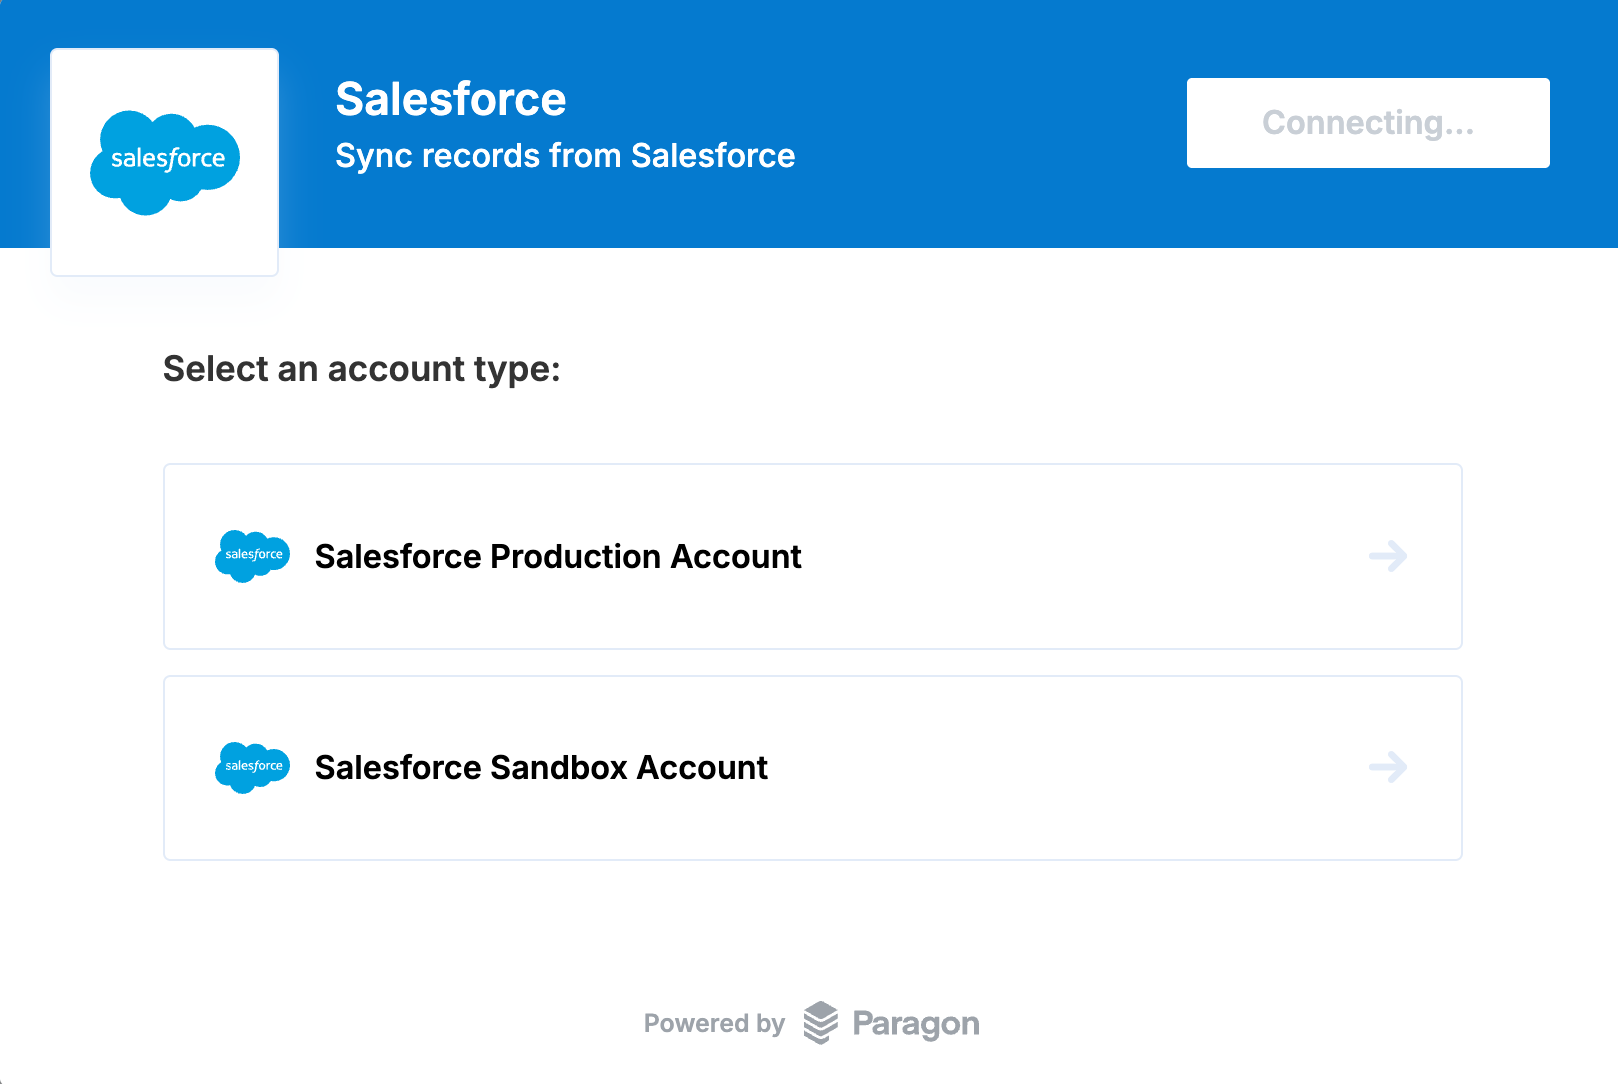
- If you are using a Developer Edition Org, select Production option. You can only select Sandbox for orgs that login with
test.salesforce.cominstead oflogin.salesforce.com.
- If you are using a Developer Edition Org, select Production option. You can only select Sandbox for orgs that login with
-
Next, the Connect Portal will provide instructions for installing your package. Click Install to begin the process.
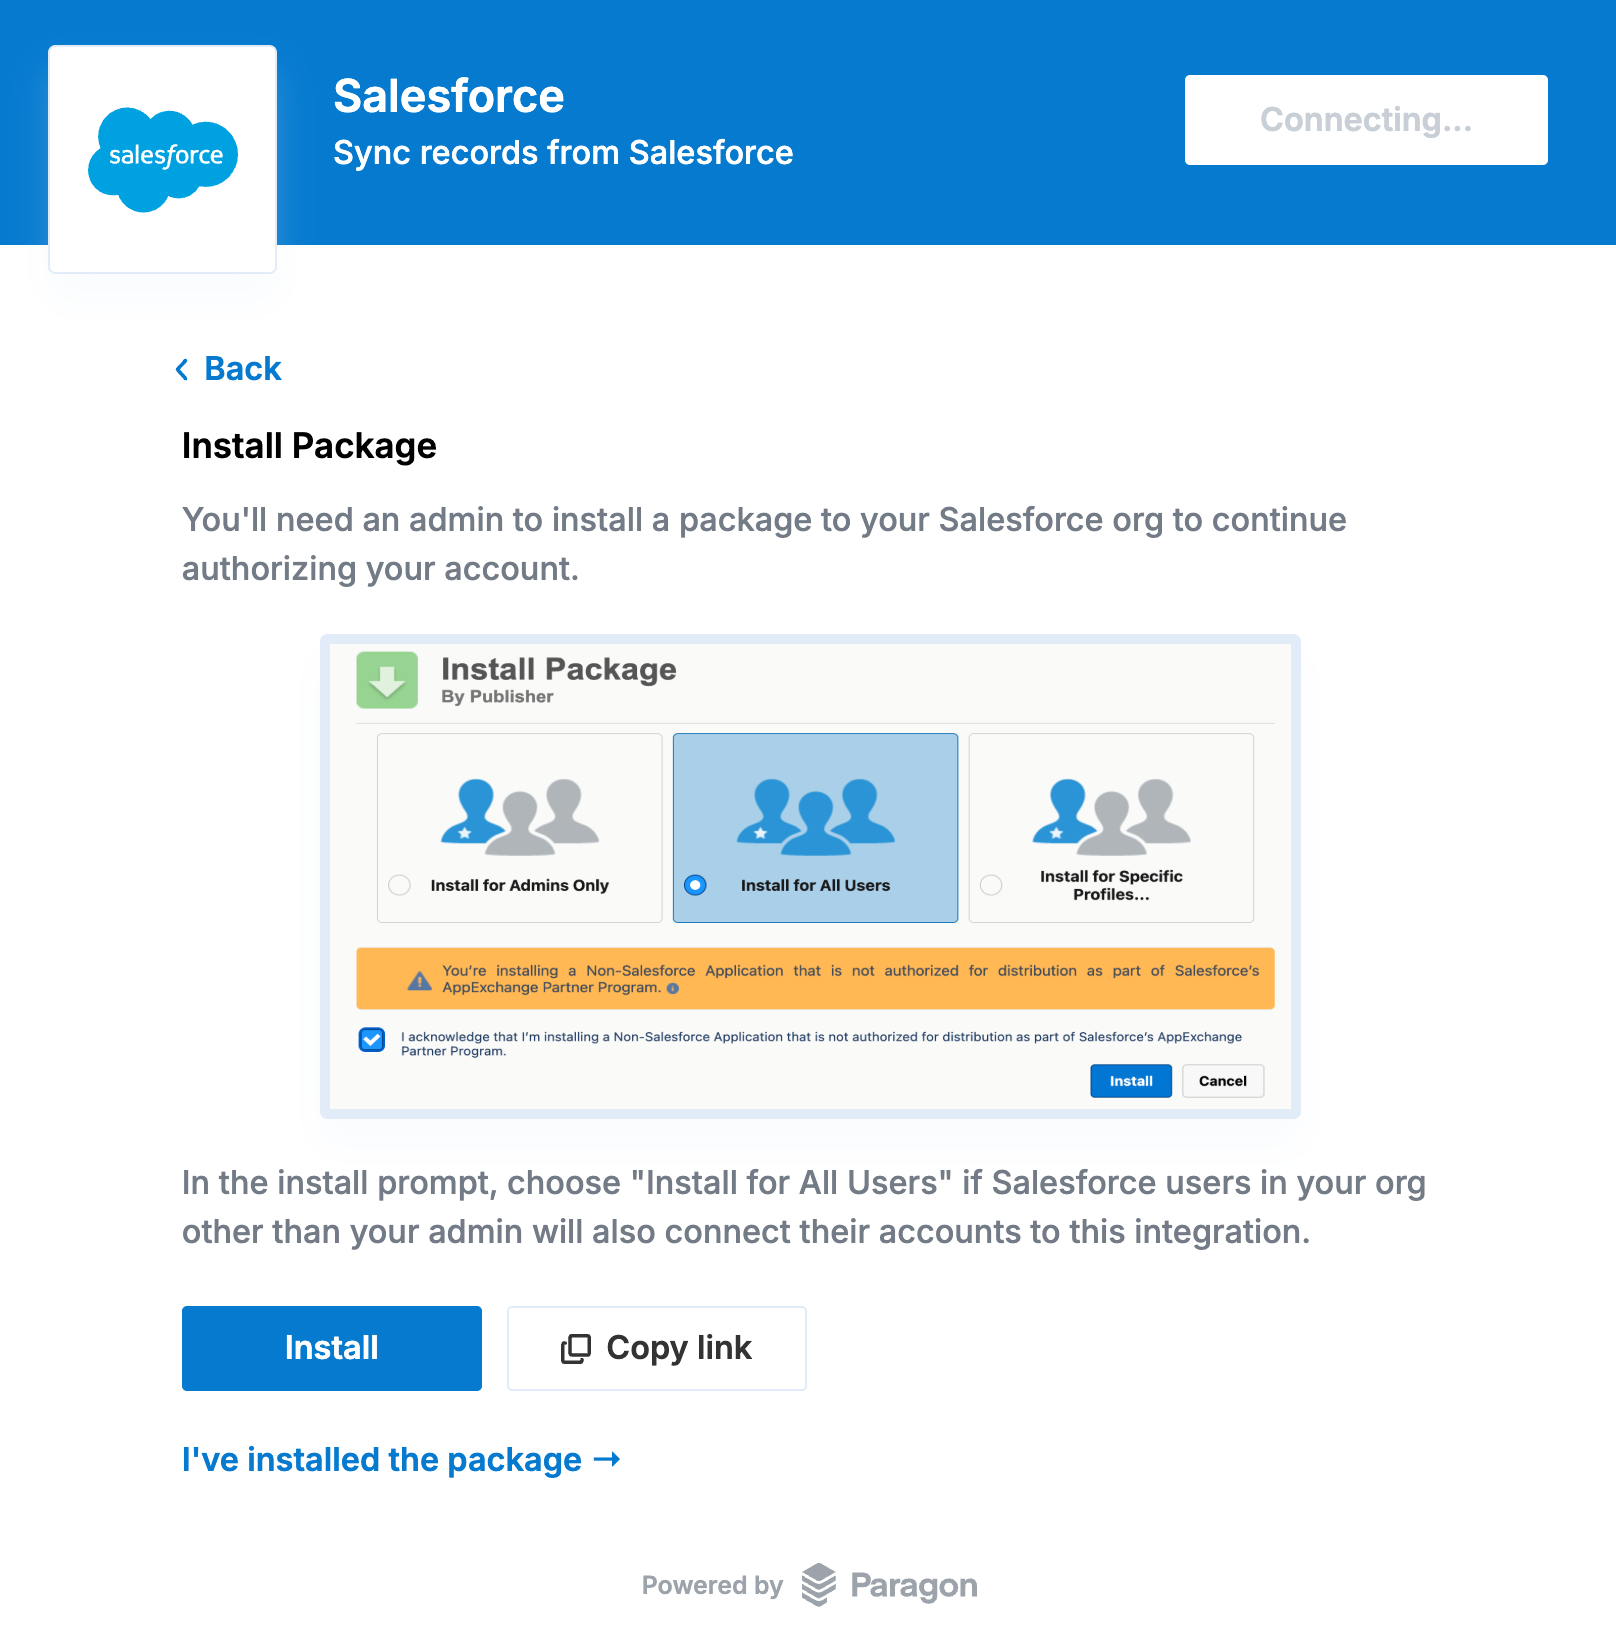
- After following the prompts to install the package, click I’ve installed the package to continue.
- Finally, the Connect Portal will prompt you to connect your Salesforce account. Click Connect to continue and authorize your app via an OAuth flow.
Connecting to Salesforce
Note: Salesforce API access is limited to Enterprise, Unlimited, and Performance Editions of Salesforce, as well as Professional Editions with the paid API add-on. See Salesforce documentation for more information.
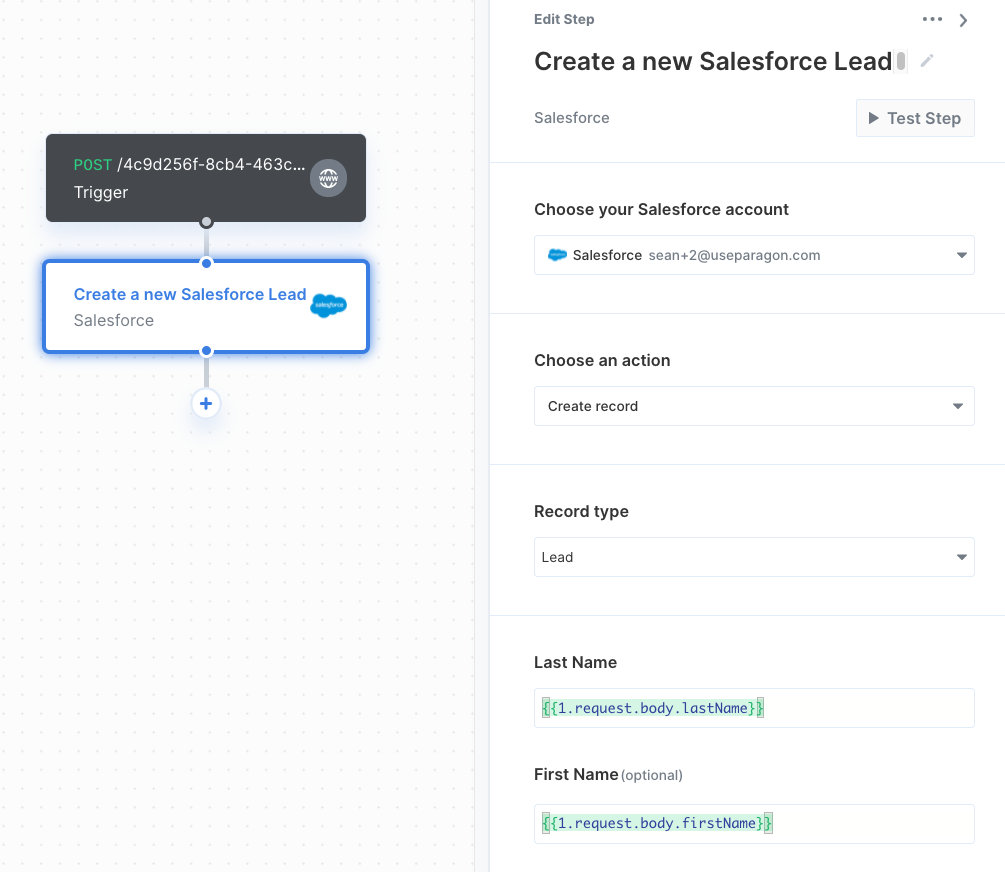
Building Salesforce workflows
Once your Salesforce account is connected, you can add steps to perform the following actions:- Create Record
- Update Record
- Get Record by ID
- Search Records
- Search Records by SOQL Query
- Deploy Custom Field
- Deploy Custom Object
- Get Records by List View
{{ to invoke the variable menu.
Working with Salesforce Custom Objects and Custom Fields
It’s common that different Salesforce instances may be configured with different Custom Objects or Custom Fields. Paragon provides the ability for your users to choose their own Custom Object mapping. You can also deploy Custom Objects or Custom Fields that may be specific to your application to your users’ Salesforce instances.
Custom Object Mapping
To allow your users to choose their own Custom Object Mapping, add the Custom Object Mapping user setting in your Connect Portal Editor. You should give this setting a descriptive user-setting name, for example, if you’re mapping contacts from your app to Salesforce, you might call this “Map Contacts to this object”.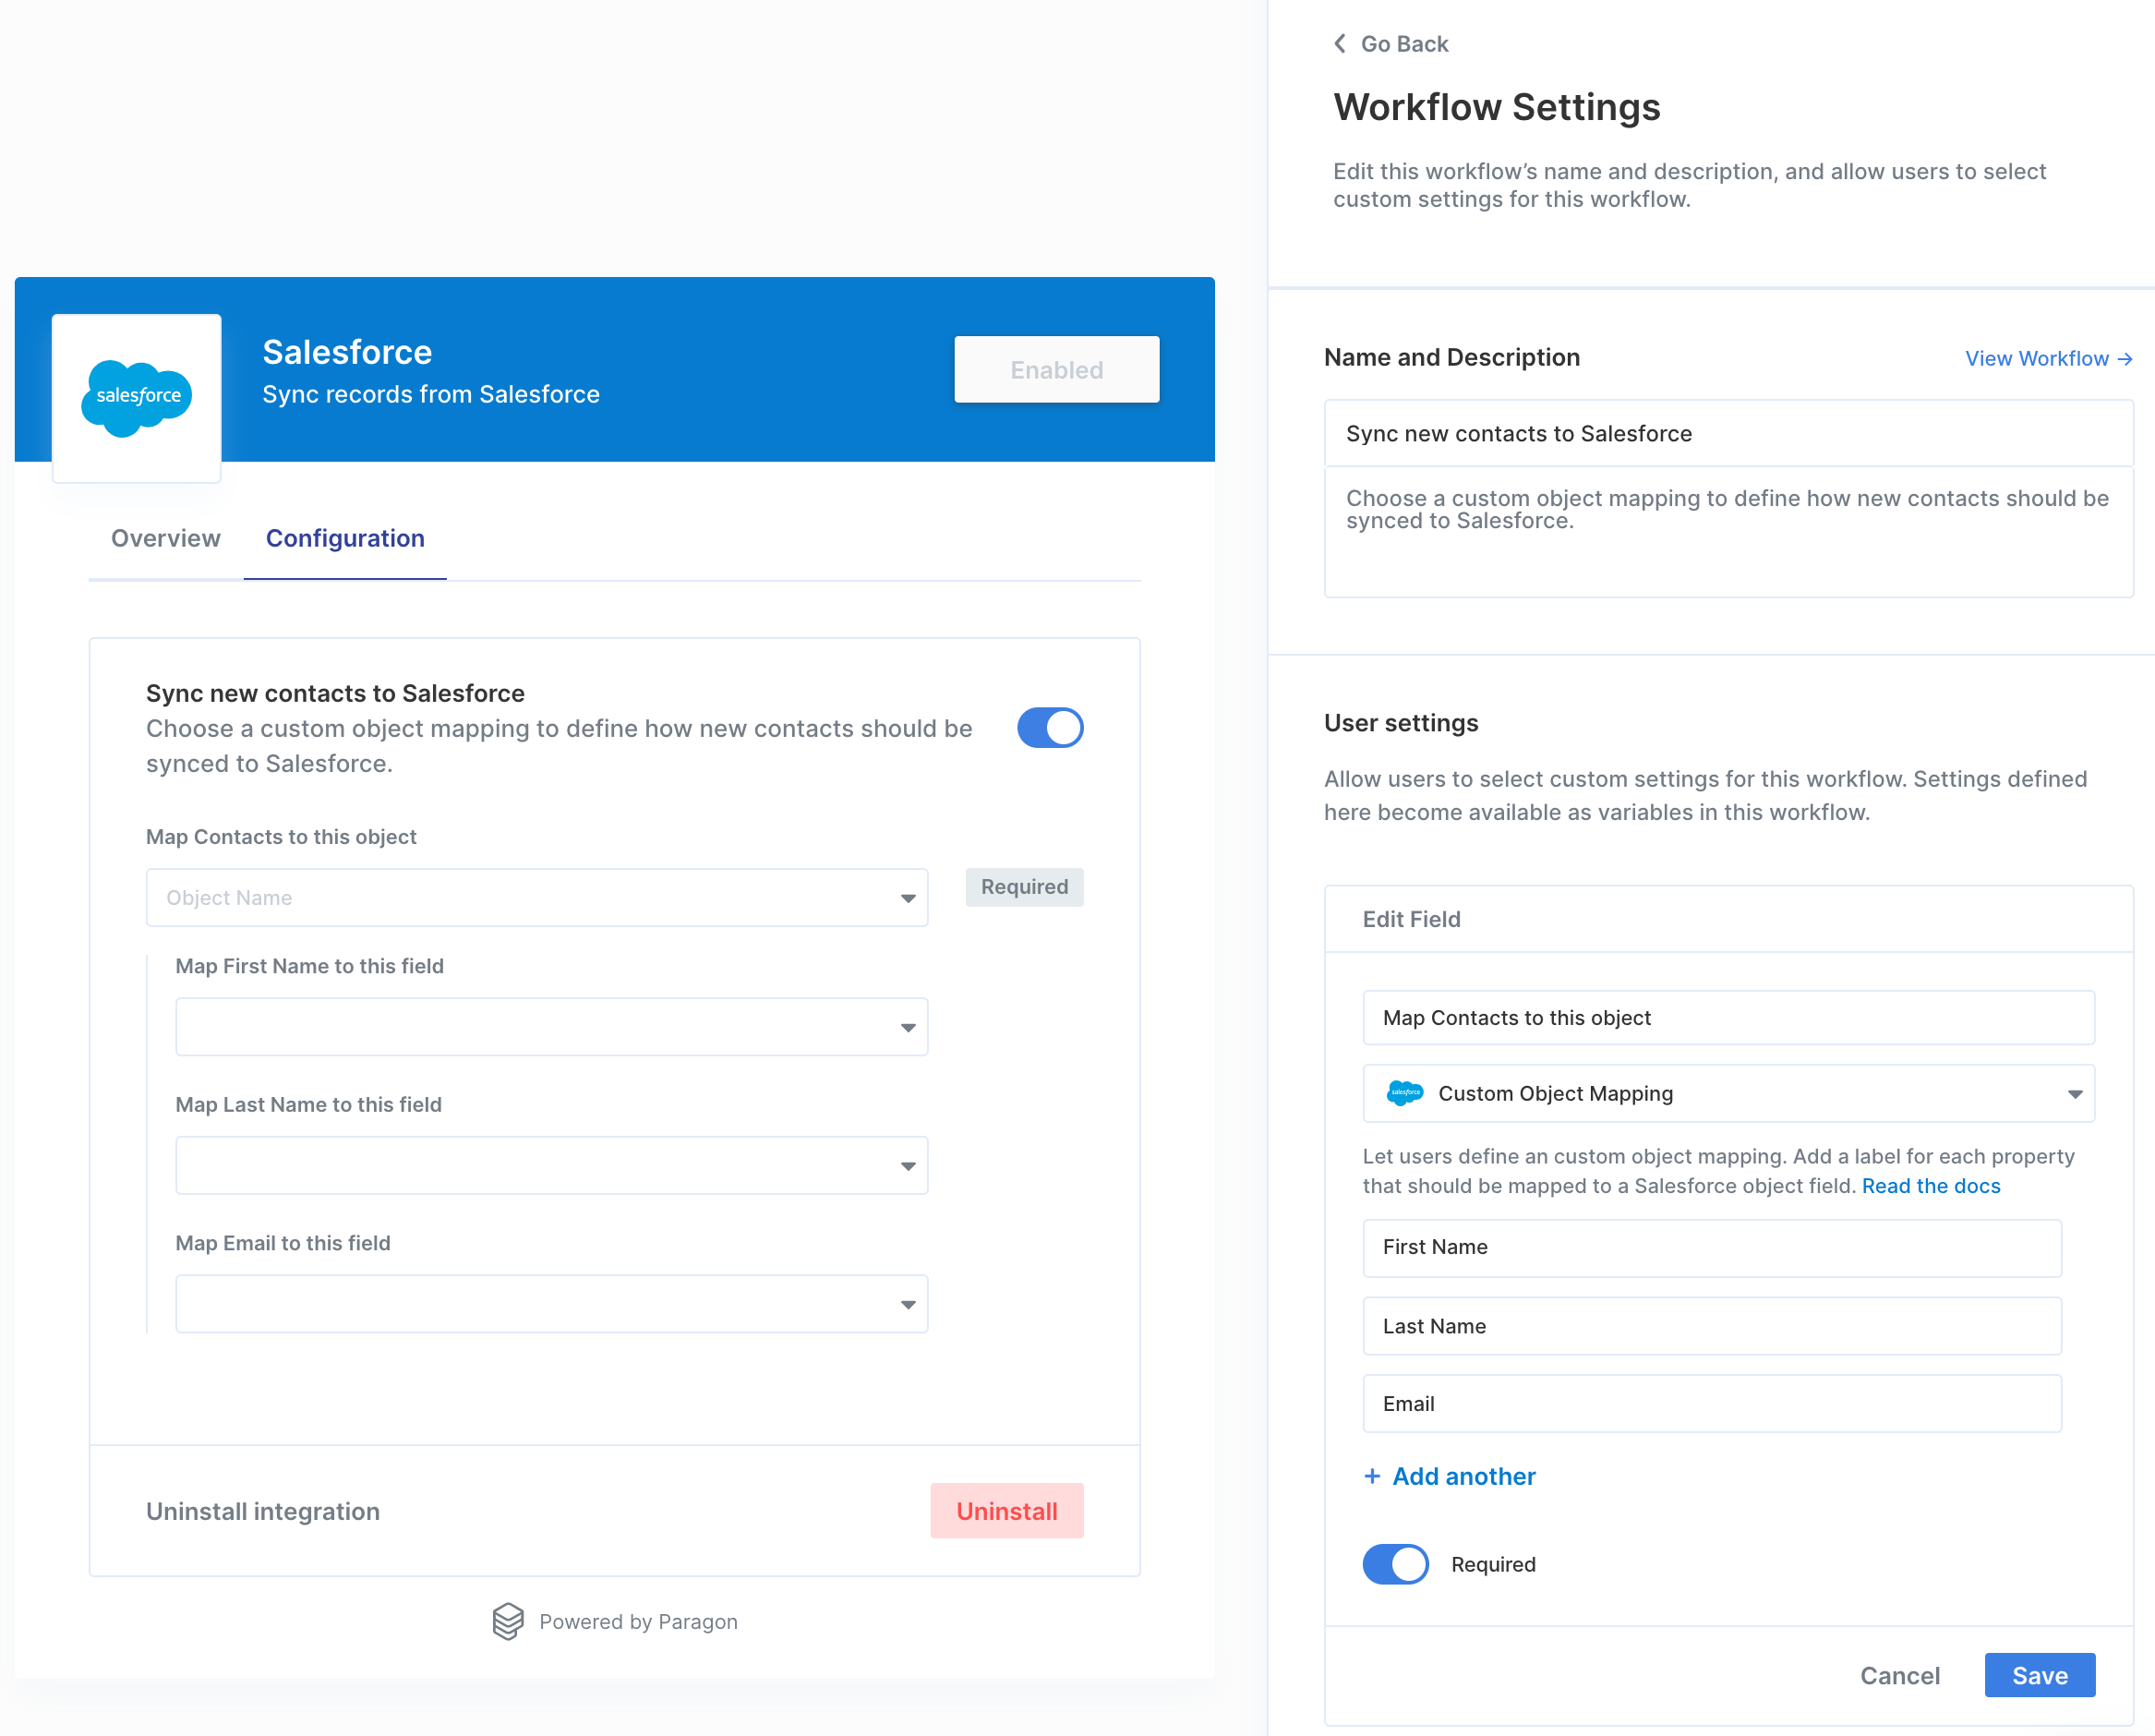
Deploying Custom Objects or Custom Fields
To deploy Custom Objects or Custom Fields to your users’ Salesforce instances, use the Deploy Custom Object or Deploy Custom Field Salesforce workflow actions. Both Deploy Custom Object and Deploy Custom Field will upsert by default, for example, if you run Deploy Custom Field on an existing Custom Field, it will apply any relevant updates to the Custom Field.
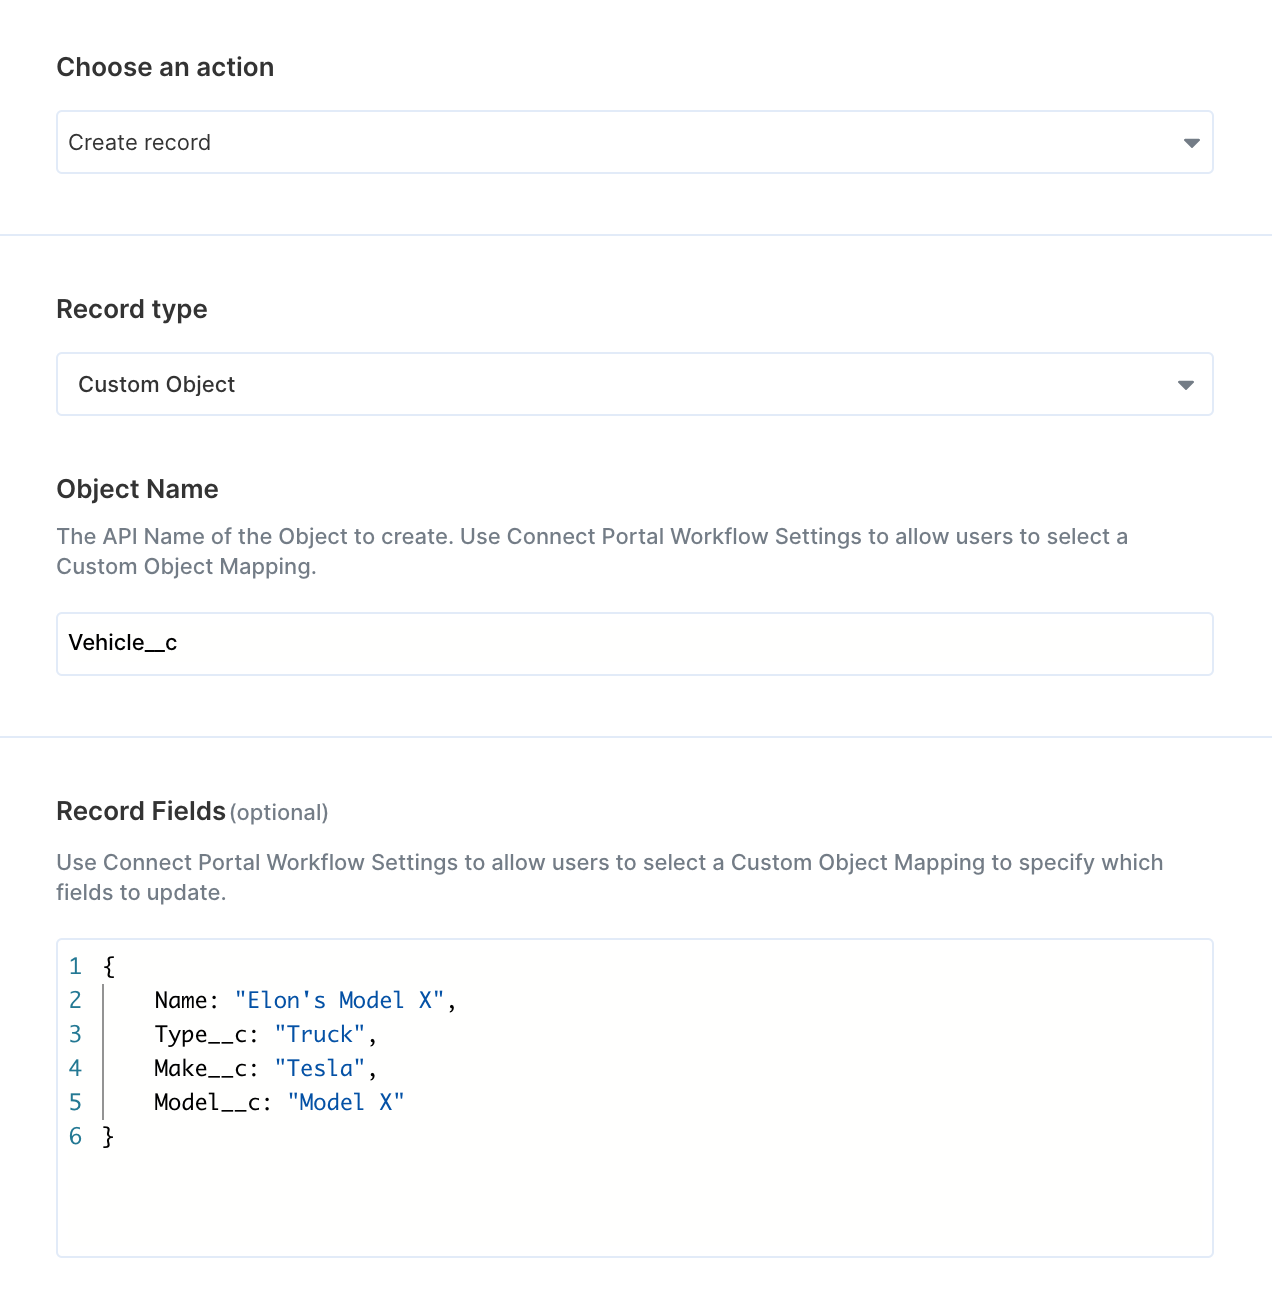
Referencing Custom Objects and Fields
You can reference any Salesforce object (provided that the object exists in your user’s Salesforce instance) when creating, updating, or searching records by selecting Custom Object under Record Type and referencing the Object Name. Similarly, you can reference any Salesforce field (provided that the field exists on the target object) when creating or updating records. The Object Name for Custom Objects and the Field Name for Custom Fields are both suffixed with__c.
Using Webhook Triggers
Webhook triggers can be used to run workflows based on events in your users’ Salesforce account. For example, you might want to trigger a workflow whenever new contacts are created in Salesforce to sync your users’ Salesforce contacts to your application in real-time.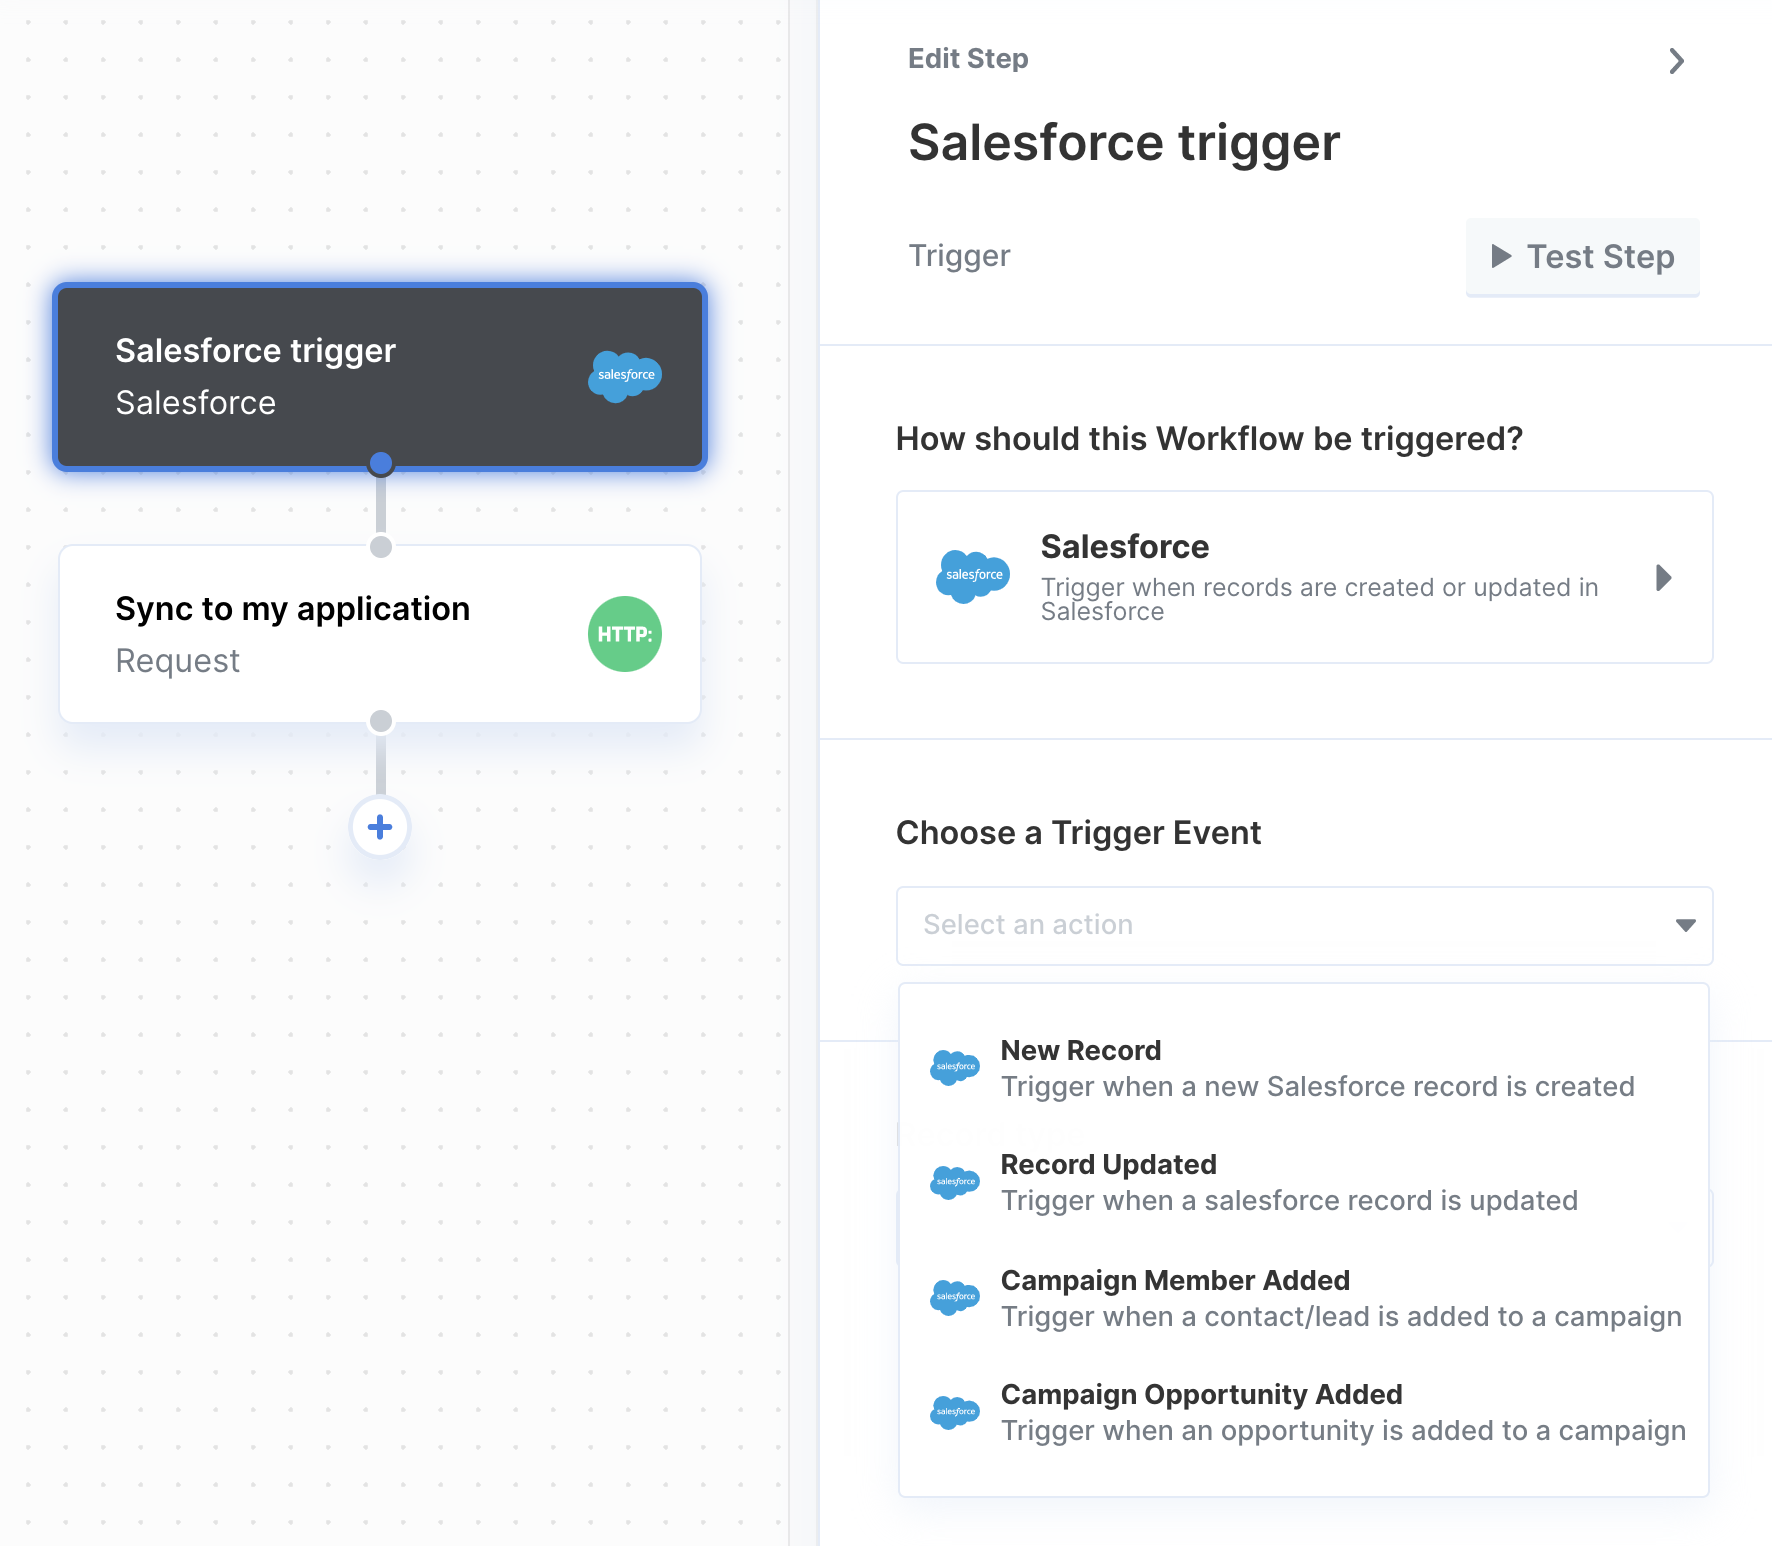
- New Record
- Record Deleted
- Record Updated
- Campaign Member Added
- Campaign Opportunity Added
User-Configured OAuth
supports User-Configured OAuth, which lets your end users connect their own OAuth app instead of the one you’ve configured for your Paragon integration. This is useful when your customers want to use their own OAuth app for security or scope customization. To enable this, pass"user-configured-oauth" as one of the values in the accountType array when launching the install flow:
Deprecation of Connected Apps (September 2025)
Starting in September 2025, Salesforce began restricting Connected Apps that are not installed (via a package) on a Salesforce organization from being authorized. Connected Apps are deprecated and should be replaced with External Client Apps as explained in the Setup Guide. This change can result in errors for new users of your Salesforce integration (or existing users trying to re-authorize). The error appears in the OAuth flow as:OAUTH_APPROVAL_ERROR_GENERIC: An unexpected error has occurred during authentication. Please try again.See the official Salesforce announcement for more details.
For Existing Users of Your Connected App
For existing users of your Salesforce Connected App (users that have connected your before September 2025), connections will continue to work as expected unless they are prompted to re-authorize at some point in the future. If they are prompted to re-authorize, they will see the error referenced above. To prevent this from happening, instruct your users to contact their Salesforce admin to install your app with the following instructions:Installing the Connected App (for existing users)
Installing the Connected App (for existing users)
-
In Salesforce, visit Setup → Apps → Connected Apps → Connected Apps OAuth Usage:
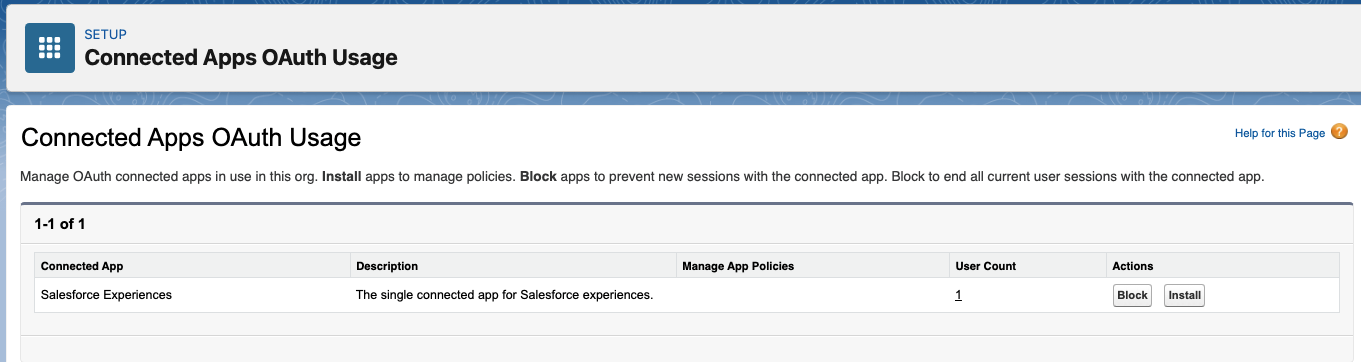
- Click Install next to your app’s name. If the Salesforce admin cannot find your app in the list, they will not be able to use your Connected App. See the next section for more details.
For New Users of Your Connected App
New users of your Salesforce integration will see an error when authorizing your Connected App through the Connect Portal until they have installed your app. Instead, follow the Setup Guide from the beginning to set up a new External Client App and package it in a Second-Generation Managed Package (2GP) for new users to connect. Paragon provides an option to migrate your Connected App credentials to a new External Client App without disrupting existing connections (more in the next section).Alternative: Enable Uninstalled App Permission
As an alternative to packaging, you can instruct Salesforce admins to temporarily bypass the new policy and allow your app to authorize without being installed with a package.How to Enable Uninstalled App Permission
How to Enable Uninstalled App Permission
Provide the following instructions to new users of your Salesforce integration:
-
Create a Permission Set
- Ask an admin of your Salesforce organization to create or edit a permission set for at least one user that should be able to authorize.
- Click Setup → Permission Sets.
- Click New or select an existing permission set.
- Name your permission set (e.g., “[Your App’s Name] Integration Access”).
-
Enable Uninstalled App Permission
- In the permission set, click System Permissions.
- Click Edit.
- Search for and select Approve Uninstalled Connected Apps.
- Click Save.
-
Assign Permission Set to Users
- Click Manage Assignments.
- Click Add Assignments.
- Select at least one user who needs Salesforce integration access.
- Click Assign.
-
Authorize Your Account
- Once created, visit the Salesforce integration settings in your app to connect your Salesforce account (the account that was added to the permission set above).
-
Install the Connected App
-
After authorization, ask your Salesforce admin to visit Setup → Apps → Connected Apps → Connected Apps OAuth Usage:
- Click Install next to your app’s name.
-
After authorization, ask your Salesforce admin to visit Setup → Apps → Connected Apps → Connected Apps OAuth Usage:
-
Remove Permission Set (Optional)
- Once the Connected App is installed, the Permission Set created above can be removed without impact to your connection.
Migrating from a Connected App to an External Client App
To migrate from using a Connected App to using an External Client App, navigate to your Salesforce integration in the Paragon dashboard and click Configure. If you do not have a Package Install URL set, you will see an option to migrate your app: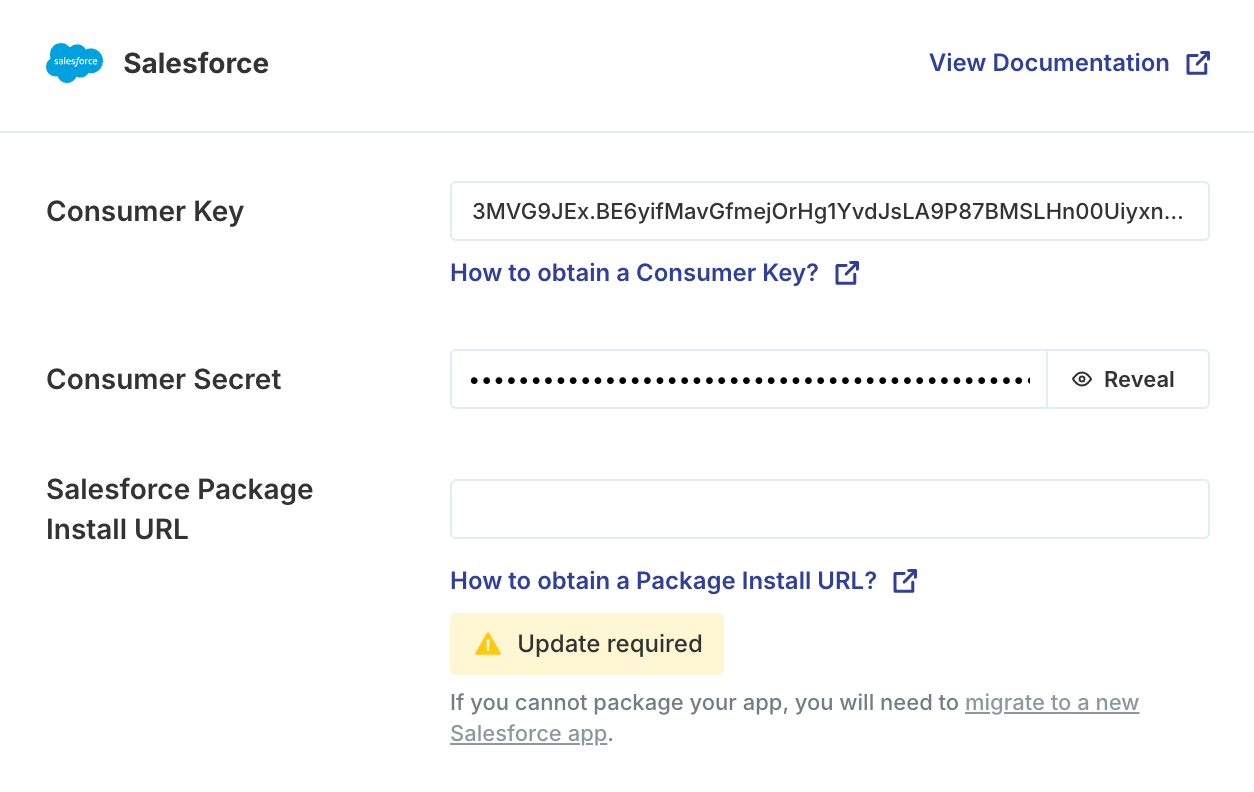
Click the 'migrate to a new Salesforce app' link.
- The Connected App configuration will become read-only, and any changes to the App Configuration will apply to the new External Client App.
- Your existing users will remain connected to your old Connected App, and their requests, workflows, or syncs will not be disrupted.
- New users of your Salesforce integration will be prompted to install the new External Client App, using the package installation process described in Testing Your Setup.