> ## Documentation Index
> Fetch the complete documentation index at: https://docs.useparagon.com/llms.txt
> Use this file to discover all available pages before exploring further.
# Building a BambooHR Integration
> In this tutorial, we'll build a basic BambooHR integration that syncs employees from your app to your customers' BambooHR accounts.
This guide demonstrates how to **sync data from your app to your customer's BambooHR accounts**. For demonstration purposes, we’ll build a workflow that creates a new employee in our user's BambooHR using contact data from our app. You can use the concepts covered in this tutorial in other applications as well.
### Prerequisites
1. [Connect your BambooHR application to Paragon](/resources/integrations/bamboohr).
2. Add your BambooHR app credentials to [activate your integration](/resources/integrations/bamboohr#add-your-bamboohr-app-to-paragon).
## 1. Build your workflow
#### Step 1.1: Create a new BambooHR workflow
It's important that you give your workflows a descriptive name to provide the best experience for your user.
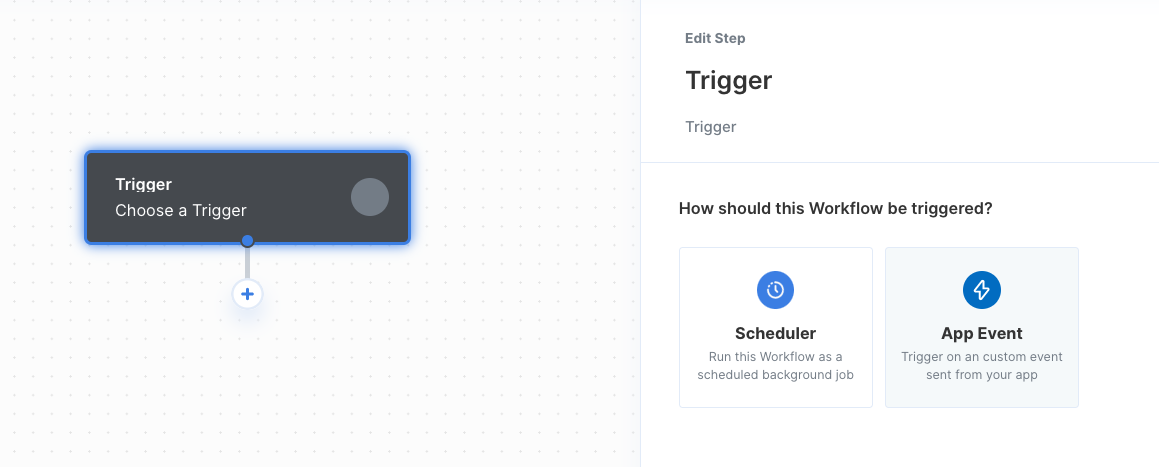
#### Step 1.2: Create an App Event
Since we want to pass employee data from our application to our customer's BambooHR account, we'll use the [App Event](/workflows/triggers#app-events) trigger. Select the trigger step from the Workflow Editor, then click "App Event".
 Select **Choose an App Event > Create new App Event**, then add the following parameters:
* **Event Name** - the name of your App Event. (e.g. Contact Created)
* **Event Schema** - example JSON Object that will be sent from your app. JSON objects are written in key/value pairs. Keys must be `strings`, and values must be a valid JSON data type (`string`, `number`, `object`, `array`, `boolean` or `null`)
You can use the sample App Event Schema below to jumpstart your progress:
```json Employee Created theme={null}
{
"first_name": "Buddha",
"last_name": "Samuel",
"email": "buddha@useparagon.com",
"company": "Paragon",
"title": "Chief Dog Officer"
}
```
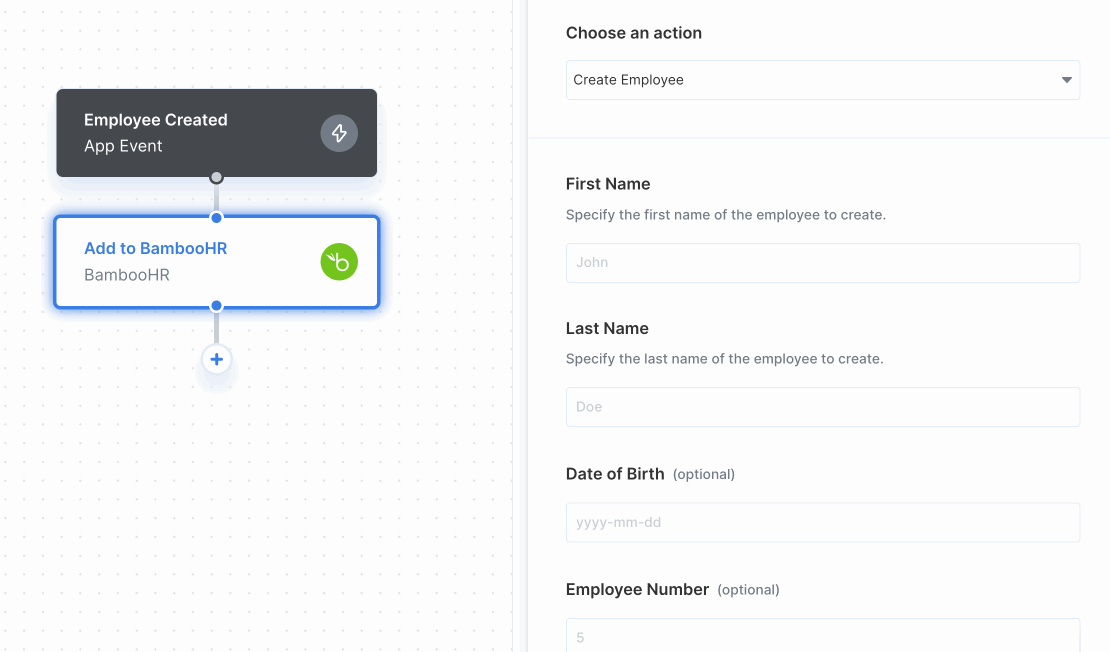
#### Step 1.3: Add a BambooHR step
Add a BambooHR step to your workflow and use the dropdown menu to select `Create Employee` as the action. You can input the fields from your App Event by typing two left curly braces `{{` to bring up the dynamic variable menu.
Select **Choose an App Event > Create new App Event**, then add the following parameters:
* **Event Name** - the name of your App Event. (e.g. Contact Created)
* **Event Schema** - example JSON Object that will be sent from your app. JSON objects are written in key/value pairs. Keys must be `strings`, and values must be a valid JSON data type (`string`, `number`, `object`, `array`, `boolean` or `null`)
You can use the sample App Event Schema below to jumpstart your progress:
```json Employee Created theme={null}
{
"first_name": "Buddha",
"last_name": "Samuel",
"email": "buddha@useparagon.com",
"company": "Paragon",
"title": "Chief Dog Officer"
}
```
#### Step 1.3: Add a BambooHR step
Add a BambooHR step to your workflow and use the dropdown menu to select `Create Employee` as the action. You can input the fields from your App Event by typing two left curly braces `{{` to bring up the dynamic variable menu.
 #### Step 1.4: Deploy your workflow
Now that your workflow is all set up, deploy your workflow by clicking the "Deploy" button in the top-right of your screen.
#### Step 1.4: Deploy your workflow
Now that your workflow is all set up, deploy your workflow by clicking the "Deploy" button in the top-right of your screen.
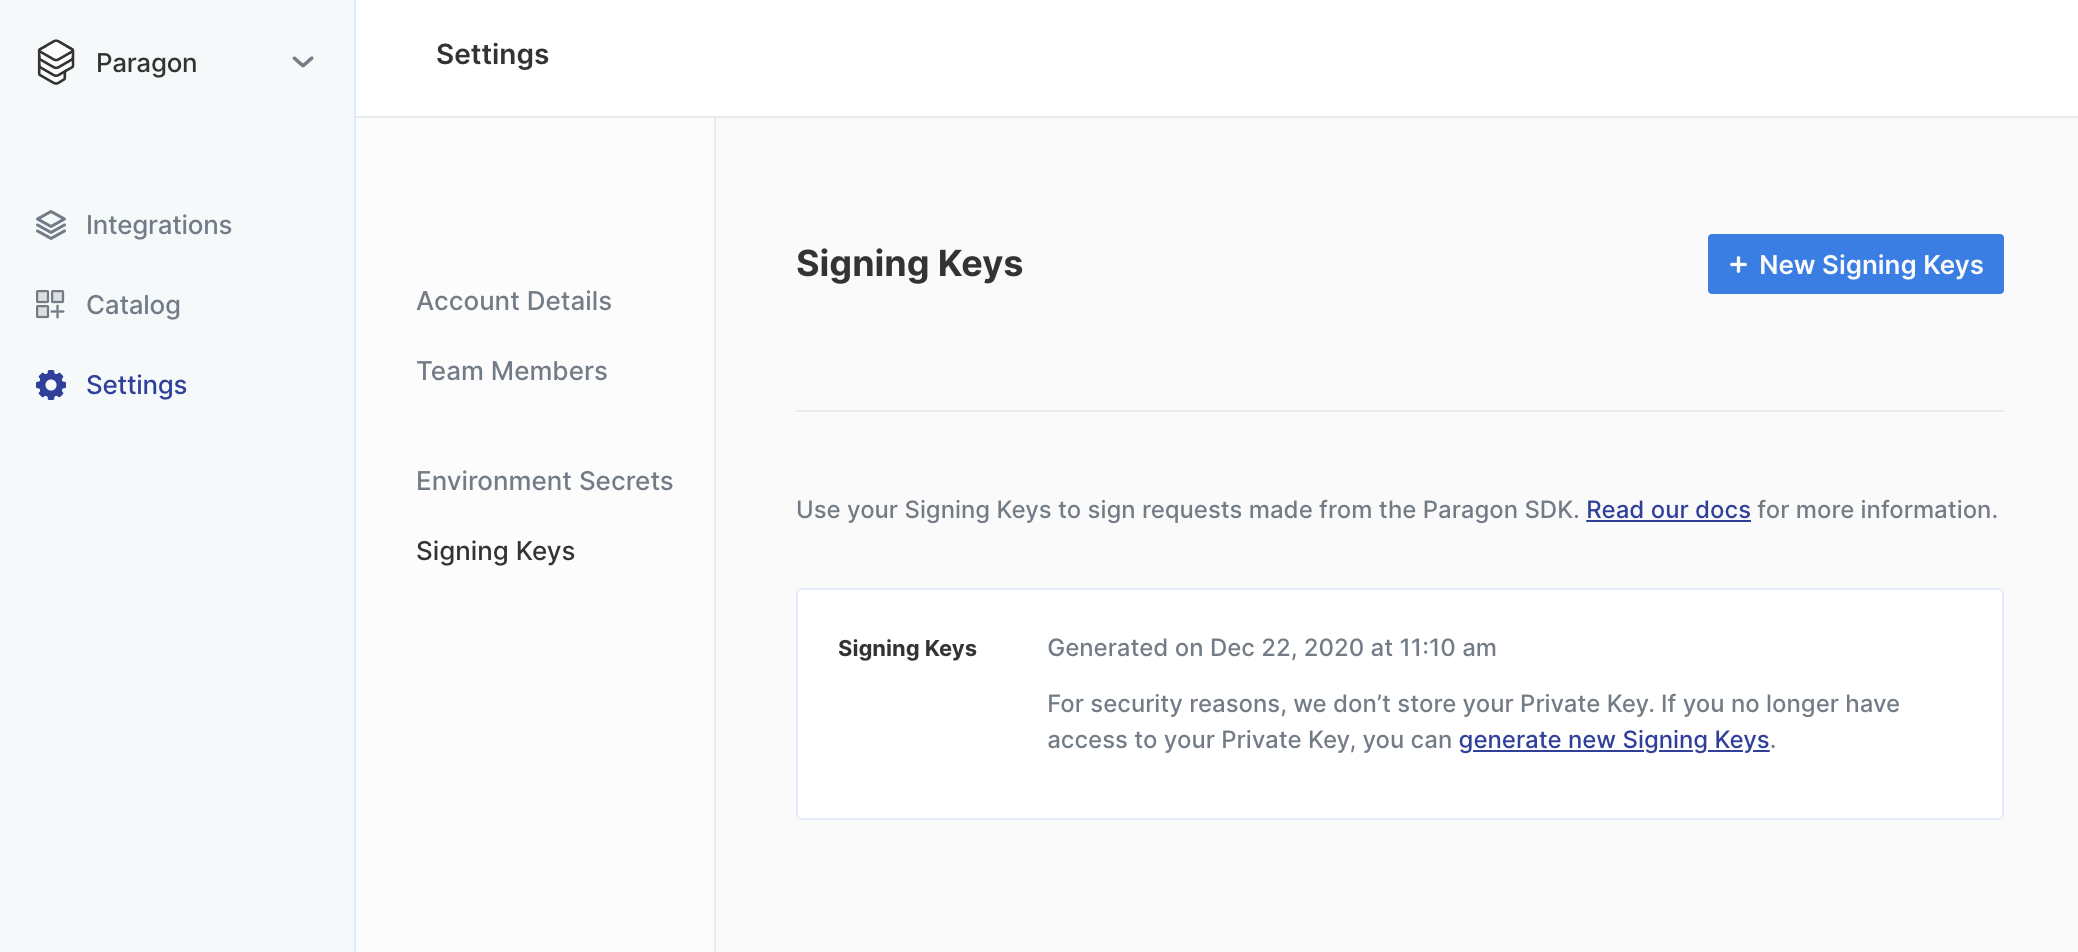
.png?fit=max&auto=format&n=EuLlf5VxgsSnEq57&q=85&s=0068e700a1a7c00415be8e47e41c7efc) ## 2. Generate a Paragon Signing Key
To generate a Signing Key, go to **Settings > Signing Keys** in your Paragon dashboard. You should store this key in an environment secrets file.
## 2. Generate a Paragon Signing Key
To generate a Signing Key, go to **Settings > Signing Keys** in your Paragon dashboard. You should store this key in an environment secrets file.
 For security reasons, we don’t store your Private Key and cannot show it to you again, so we recommend you download the key and store it someplace secure.
## 3. Install the Paragon SDK
The Paragon SDK gives you access to the Paragon global, which you can access as `paragon`.
You can install the Paragon SDK with npm:
```bash theme={null}
npm install @useparagon/connect
```
The SDK can be imported in your client-side JavaScript files as a module:
```js theme={null}
import { paragon } from '@useparagon/connect';
```
**Don't want to install the SDK just yet?**
Use Paragon's [Hosted Demo Environment](/demo) to start testing your integrations without embedding the SDK in your application. [Learn more](/demo).
## 4. Authenticate your user
Next, you'll need a library in your target language to sign JWTs with RS256. You can find one in your language at [https://jwt.io/](https://jwt.io/).
If your application is a fully client-rendered single-page app, you may have to create and use an additional API endpoint to retrieve a signed JWT (or reuse an existing endpoint that handles authentication or user info).
#### Step 4.1: Sign a Paragon User Token
The Paragon User Token is a signed JWT that minimally must include the `sub`, `iat`, and `exp` claims:
```js JavaScript theme={null}
{
// Uniquely identifying key for a user
"sub": "the-user-id",
// Issue timestamp, should be the current time
"iat": 1608600116
// Expiry timestamp for token, such as 1 hour from time of signature (iat)
"exp": 1608603716
}
```
**Just for testing: Generating one-off JWTs**
Use the [Paragon JWT Generator](https://jwt.useparagon.com/) to generate test JWTs for your development purposes. In production, static tokens should never be used.
#### Step 4.2: Call paragon.authenticate()
You'll call `paragon.authenticate` in your view with a JWT signed by your backend using the library chosen in [Step 4.1](/tutorials/building-a-hubspot-integration#step-4-1-sign-a-paragon-user-token). **This JWT is the Paragon user token.**
[`paragon.authenticate`](/apis/api-reference#authenticate) should be called at the beginning of your application's lifecycle in all cases. This is to make sure that the `userToken` is always as fresh as possible, with respect to your user's existing session on your own site. You may reference [Installing the Connect SDK](/getting-started/installing-the-connect-sdk#setup) for a detailed explanation on how to use [`paragon.authenticate`](/apis/api-reference#authenticate).
```js theme={null}
paragon.authenticate(
// You can find your project ID in the Overview tab of any Integration
"38b1f170-0c43-4eae-9a04-ab85325d99f7",
// See Setup for how to encode your user token
"eyJhbGciOiJSUzI1NiIsInR5cCI6IkpXVCJ9.ey..."
);
```
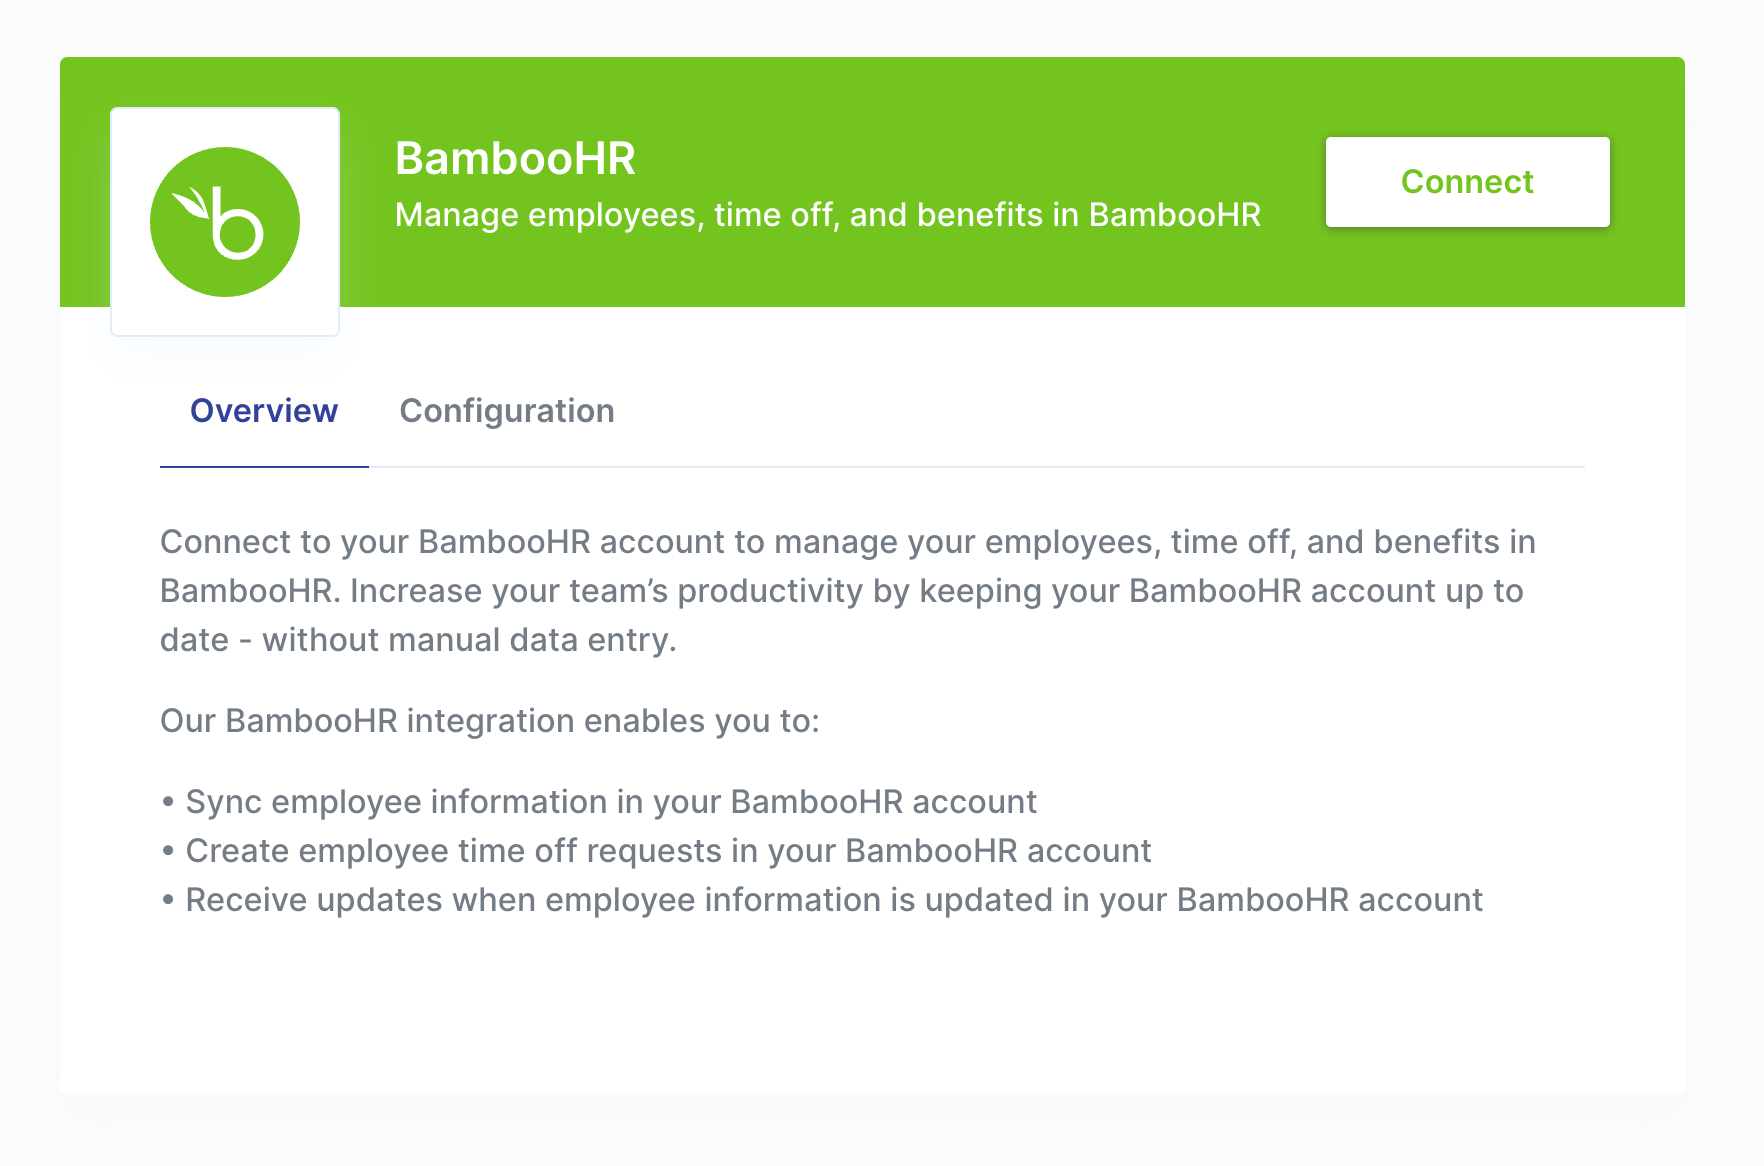
## 5. Connect to your integration
Now that you've authenticated your user, you can call `paragon.connect` to bring up the Paragon Connect Portal.
```js JavaScript theme={null}
paragon.connect("bamboohr");
```
For security reasons, we don’t store your Private Key and cannot show it to you again, so we recommend you download the key and store it someplace secure.
## 3. Install the Paragon SDK
The Paragon SDK gives you access to the Paragon global, which you can access as `paragon`.
You can install the Paragon SDK with npm:
```bash theme={null}
npm install @useparagon/connect
```
The SDK can be imported in your client-side JavaScript files as a module:
```js theme={null}
import { paragon } from '@useparagon/connect';
```
**Don't want to install the SDK just yet?**
Use Paragon's [Hosted Demo Environment](/demo) to start testing your integrations without embedding the SDK in your application. [Learn more](/demo).
## 4. Authenticate your user
Next, you'll need a library in your target language to sign JWTs with RS256. You can find one in your language at [https://jwt.io/](https://jwt.io/).
If your application is a fully client-rendered single-page app, you may have to create and use an additional API endpoint to retrieve a signed JWT (or reuse an existing endpoint that handles authentication or user info).
#### Step 4.1: Sign a Paragon User Token
The Paragon User Token is a signed JWT that minimally must include the `sub`, `iat`, and `exp` claims:
```js JavaScript theme={null}
{
// Uniquely identifying key for a user
"sub": "the-user-id",
// Issue timestamp, should be the current time
"iat": 1608600116
// Expiry timestamp for token, such as 1 hour from time of signature (iat)
"exp": 1608603716
}
```
**Just for testing: Generating one-off JWTs**
Use the [Paragon JWT Generator](https://jwt.useparagon.com/) to generate test JWTs for your development purposes. In production, static tokens should never be used.
#### Step 4.2: Call paragon.authenticate()
You'll call `paragon.authenticate` in your view with a JWT signed by your backend using the library chosen in [Step 4.1](/tutorials/building-a-hubspot-integration#step-4-1-sign-a-paragon-user-token). **This JWT is the Paragon user token.**
[`paragon.authenticate`](/apis/api-reference#authenticate) should be called at the beginning of your application's lifecycle in all cases. This is to make sure that the `userToken` is always as fresh as possible, with respect to your user's existing session on your own site. You may reference [Installing the Connect SDK](/getting-started/installing-the-connect-sdk#setup) for a detailed explanation on how to use [`paragon.authenticate`](/apis/api-reference#authenticate).
```js theme={null}
paragon.authenticate(
// You can find your project ID in the Overview tab of any Integration
"38b1f170-0c43-4eae-9a04-ab85325d99f7",
// See Setup for how to encode your user token
"eyJhbGciOiJSUzI1NiIsInR5cCI6IkpXVCJ9.ey..."
);
```
## 5. Connect to your integration
Now that you've authenticated your user, you can call `paragon.connect` to bring up the Paragon Connect Portal.
```js JavaScript theme={null}
paragon.connect("bamboohr");
```
 **Note:** Toggle your workflow from the **Configuration** tab to enable your workflow after connecting to your BambooHR account.
## 6. Send an App Event
Lastly, we'll send an App Event whenever a lead is created in your app. App Events can be sent from your application using the Paragon SDK or REST API. In both cases, you must pass two parameters:
* **name** - the event name defined in your App Event
* **payload** - the event payload that should match the event schema defined in your App Event
See the code examples below for how to send App Events using the Paragon SDK or API.
```js JavaScript SDK theme={null}
var eventName = "Employee Created";
var eventPayload = {
"first_name": "Buddha",
"last_name": "Samuel",
"email": "buddha@useparagon.com",
"company": "Paragon",
"title": "Chief Dog Officer"
};
// Trigger the "Contact Created" App Event
paragon.event(eventName, eventPayload)
```
```bash REST API theme={null}
// Trigger the "Lead Created" App Event
POST https://api.useparagon.com/projects//sdk/events/trigger
Authorization: Bearer
Content-Type: application/json
{
"name": "Employee Created",
"payload": {
"first_name": "Buddha",
"last_name": "Samuel",
"email": "buddha@useparagon.com",
"company": "Paragon",
"title": "Chief Dog Officer"
}
}
```
When sending live events from your application, Paragon will not validate that your event payload matches the defined event schema.
Great work! We just built a BambooHR integration that syncs new employees from your app to our customers' BambooHR accounts.
**Note:** Toggle your workflow from the **Configuration** tab to enable your workflow after connecting to your BambooHR account.
## 6. Send an App Event
Lastly, we'll send an App Event whenever a lead is created in your app. App Events can be sent from your application using the Paragon SDK or REST API. In both cases, you must pass two parameters:
* **name** - the event name defined in your App Event
* **payload** - the event payload that should match the event schema defined in your App Event
See the code examples below for how to send App Events using the Paragon SDK or API.
```js JavaScript SDK theme={null}
var eventName = "Employee Created";
var eventPayload = {
"first_name": "Buddha",
"last_name": "Samuel",
"email": "buddha@useparagon.com",
"company": "Paragon",
"title": "Chief Dog Officer"
};
// Trigger the "Contact Created" App Event
paragon.event(eventName, eventPayload)
```
```bash REST API theme={null}
// Trigger the "Lead Created" App Event
POST https://api.useparagon.com/projects//sdk/events/trigger
Authorization: Bearer
Content-Type: application/json
{
"name": "Employee Created",
"payload": {
"first_name": "Buddha",
"last_name": "Samuel",
"email": "buddha@useparagon.com",
"company": "Paragon",
"title": "Chief Dog Officer"
}
}
```
When sending live events from your application, Paragon will not validate that your event payload matches the defined event schema.
Great work! We just built a BambooHR integration that syncs new employees from your app to our customers' BambooHR accounts.