> ## Documentation Index
> Fetch the complete documentation index at: https://docs.useparagon.com/llms.txt
> Use this file to discover all available pages before exploring further.
# Custom Integrations
> Create your own custom integration with any app provider on Paragon.
## Overview
Custom Integrations are included in all **paid plans**. [Contact us](https://calendly.com/useparagon/paragon-demo) to schedule a demo of Custom Integrations or upgrade your account.
Custom Integrations allow you to build your own custom integration with any app provider on Paragon, even if it's not natively supported by our integration catalog.
Similar to natively supported integration on Paragon, Custom Integrations provide the following features:
* **Embedded Connect Portal** for your customers to activate and configure the integration in your app.
* **Fully managed authentication** with OAuth 2.0 or API Keys.
* **Visual workflow editor** for creating custom integration logic.
* **Access to any API methods** provided by the application's API.
## Building a Custom Integration
The general prerequisites for building a Custom Integration with any app provider on Paragon are:
* The app provider must have a public API.
* Have access to the app provider's API documentation.
* If the app provider uses OAuth authentication, create a developer account and developer application from the app provider.
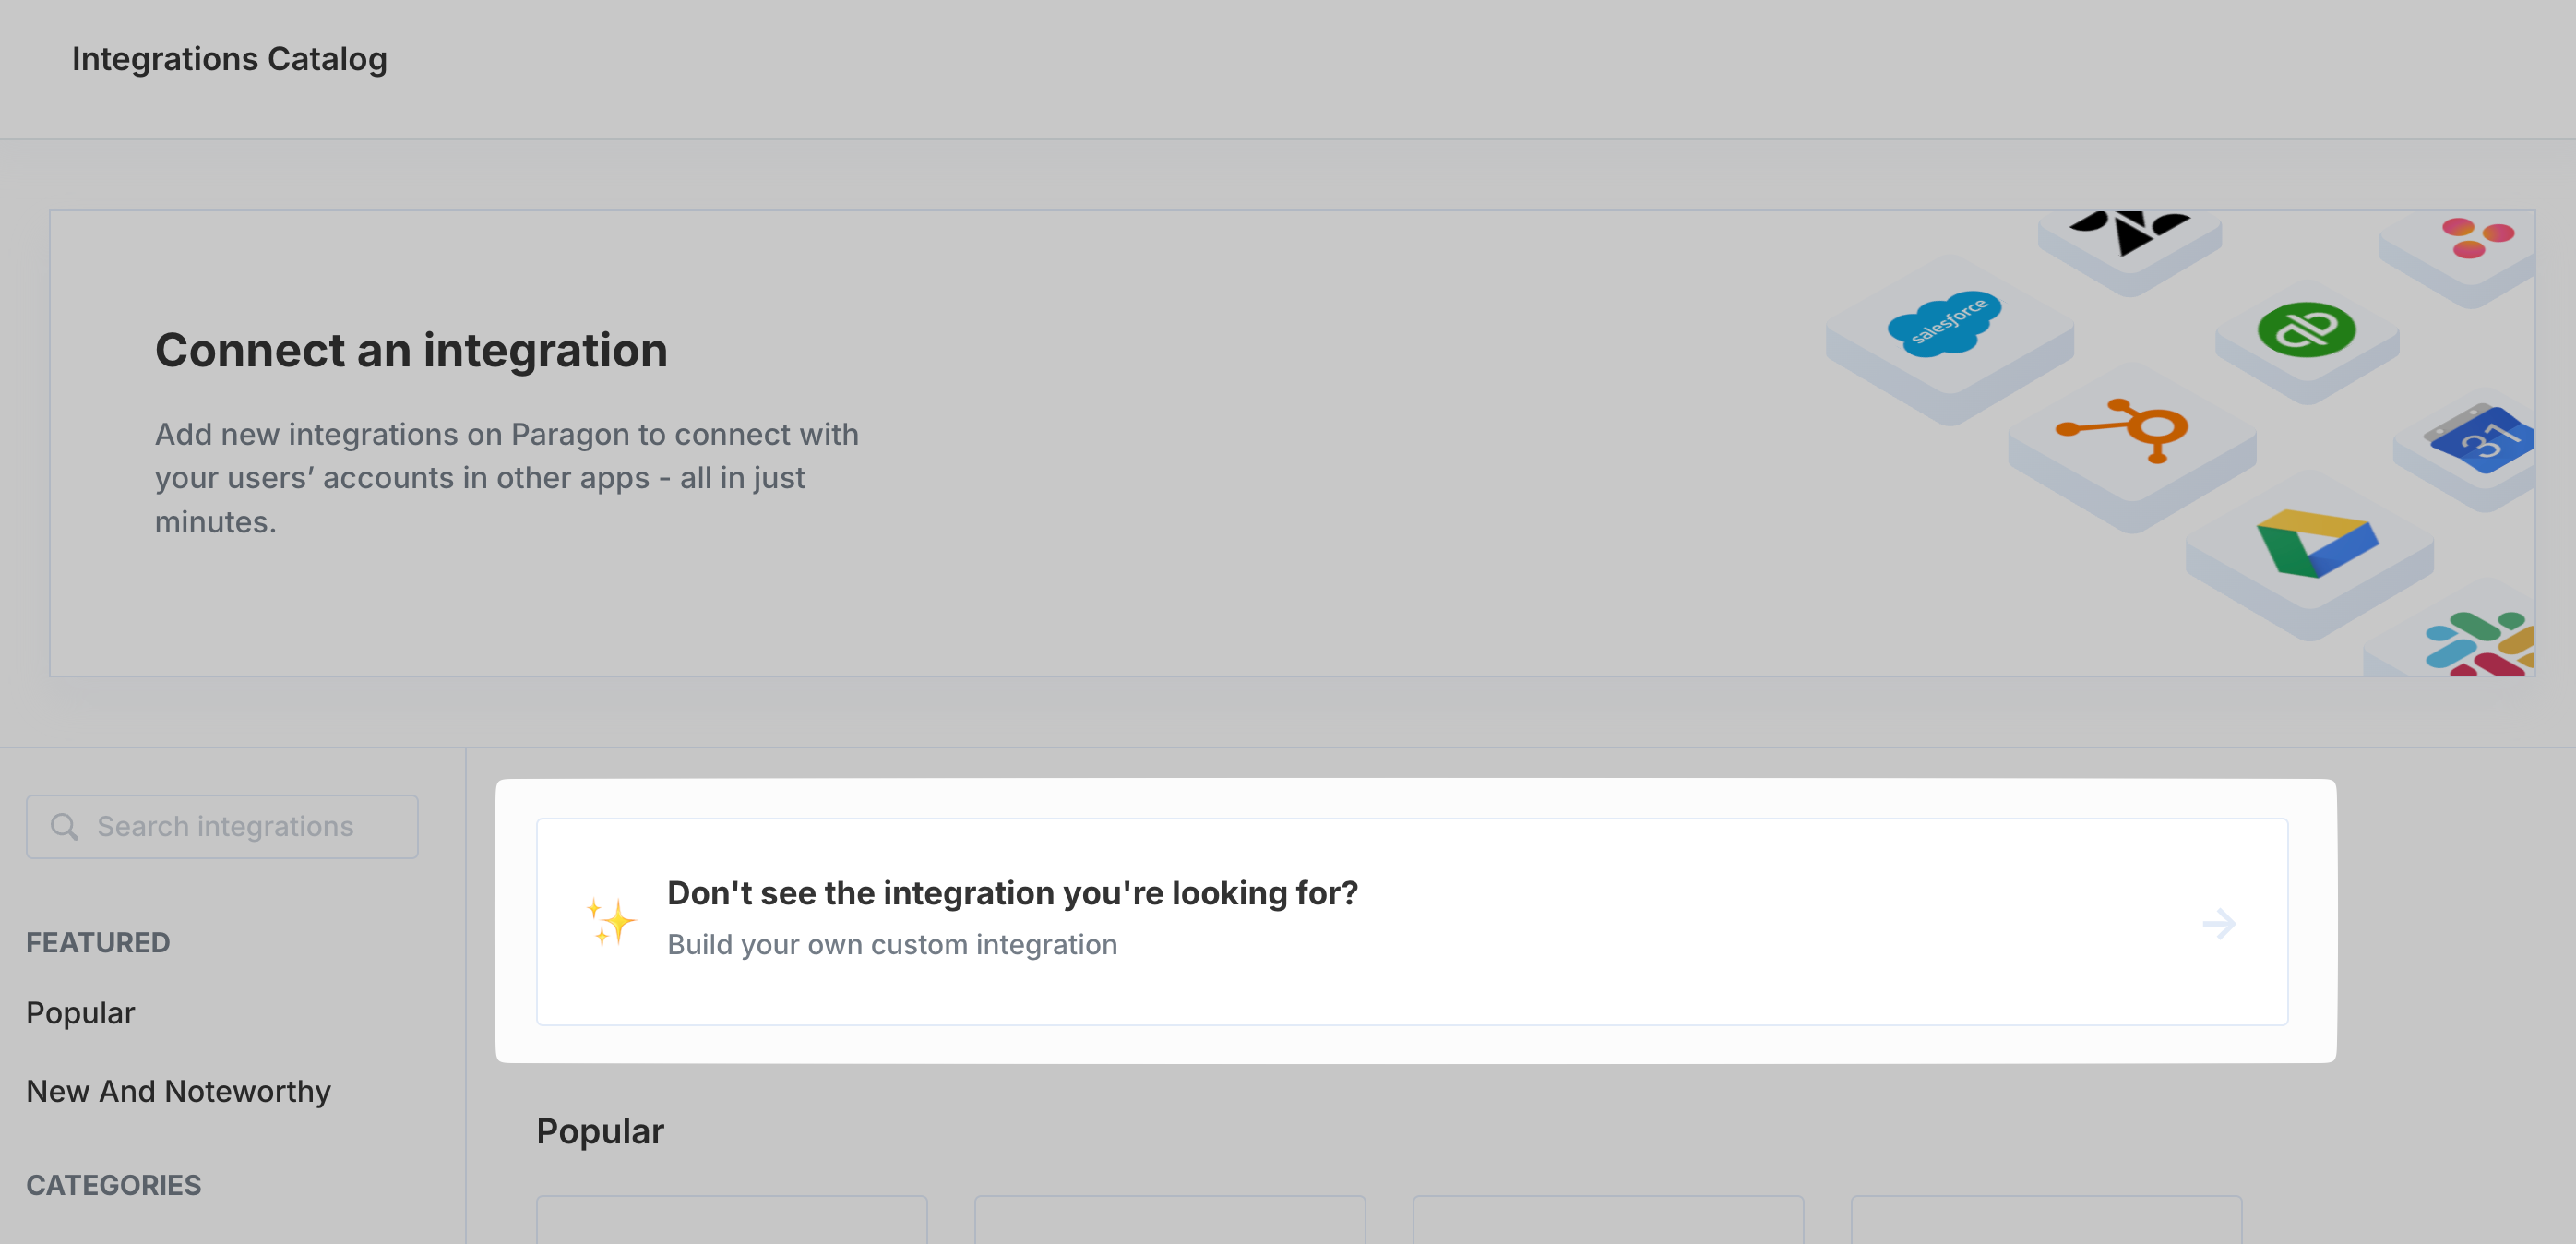
To start building a Custom Integration, click the **build your own custom integration** button at the top of your integration catalog in Paragon.
 ### Step 1. Basic Info
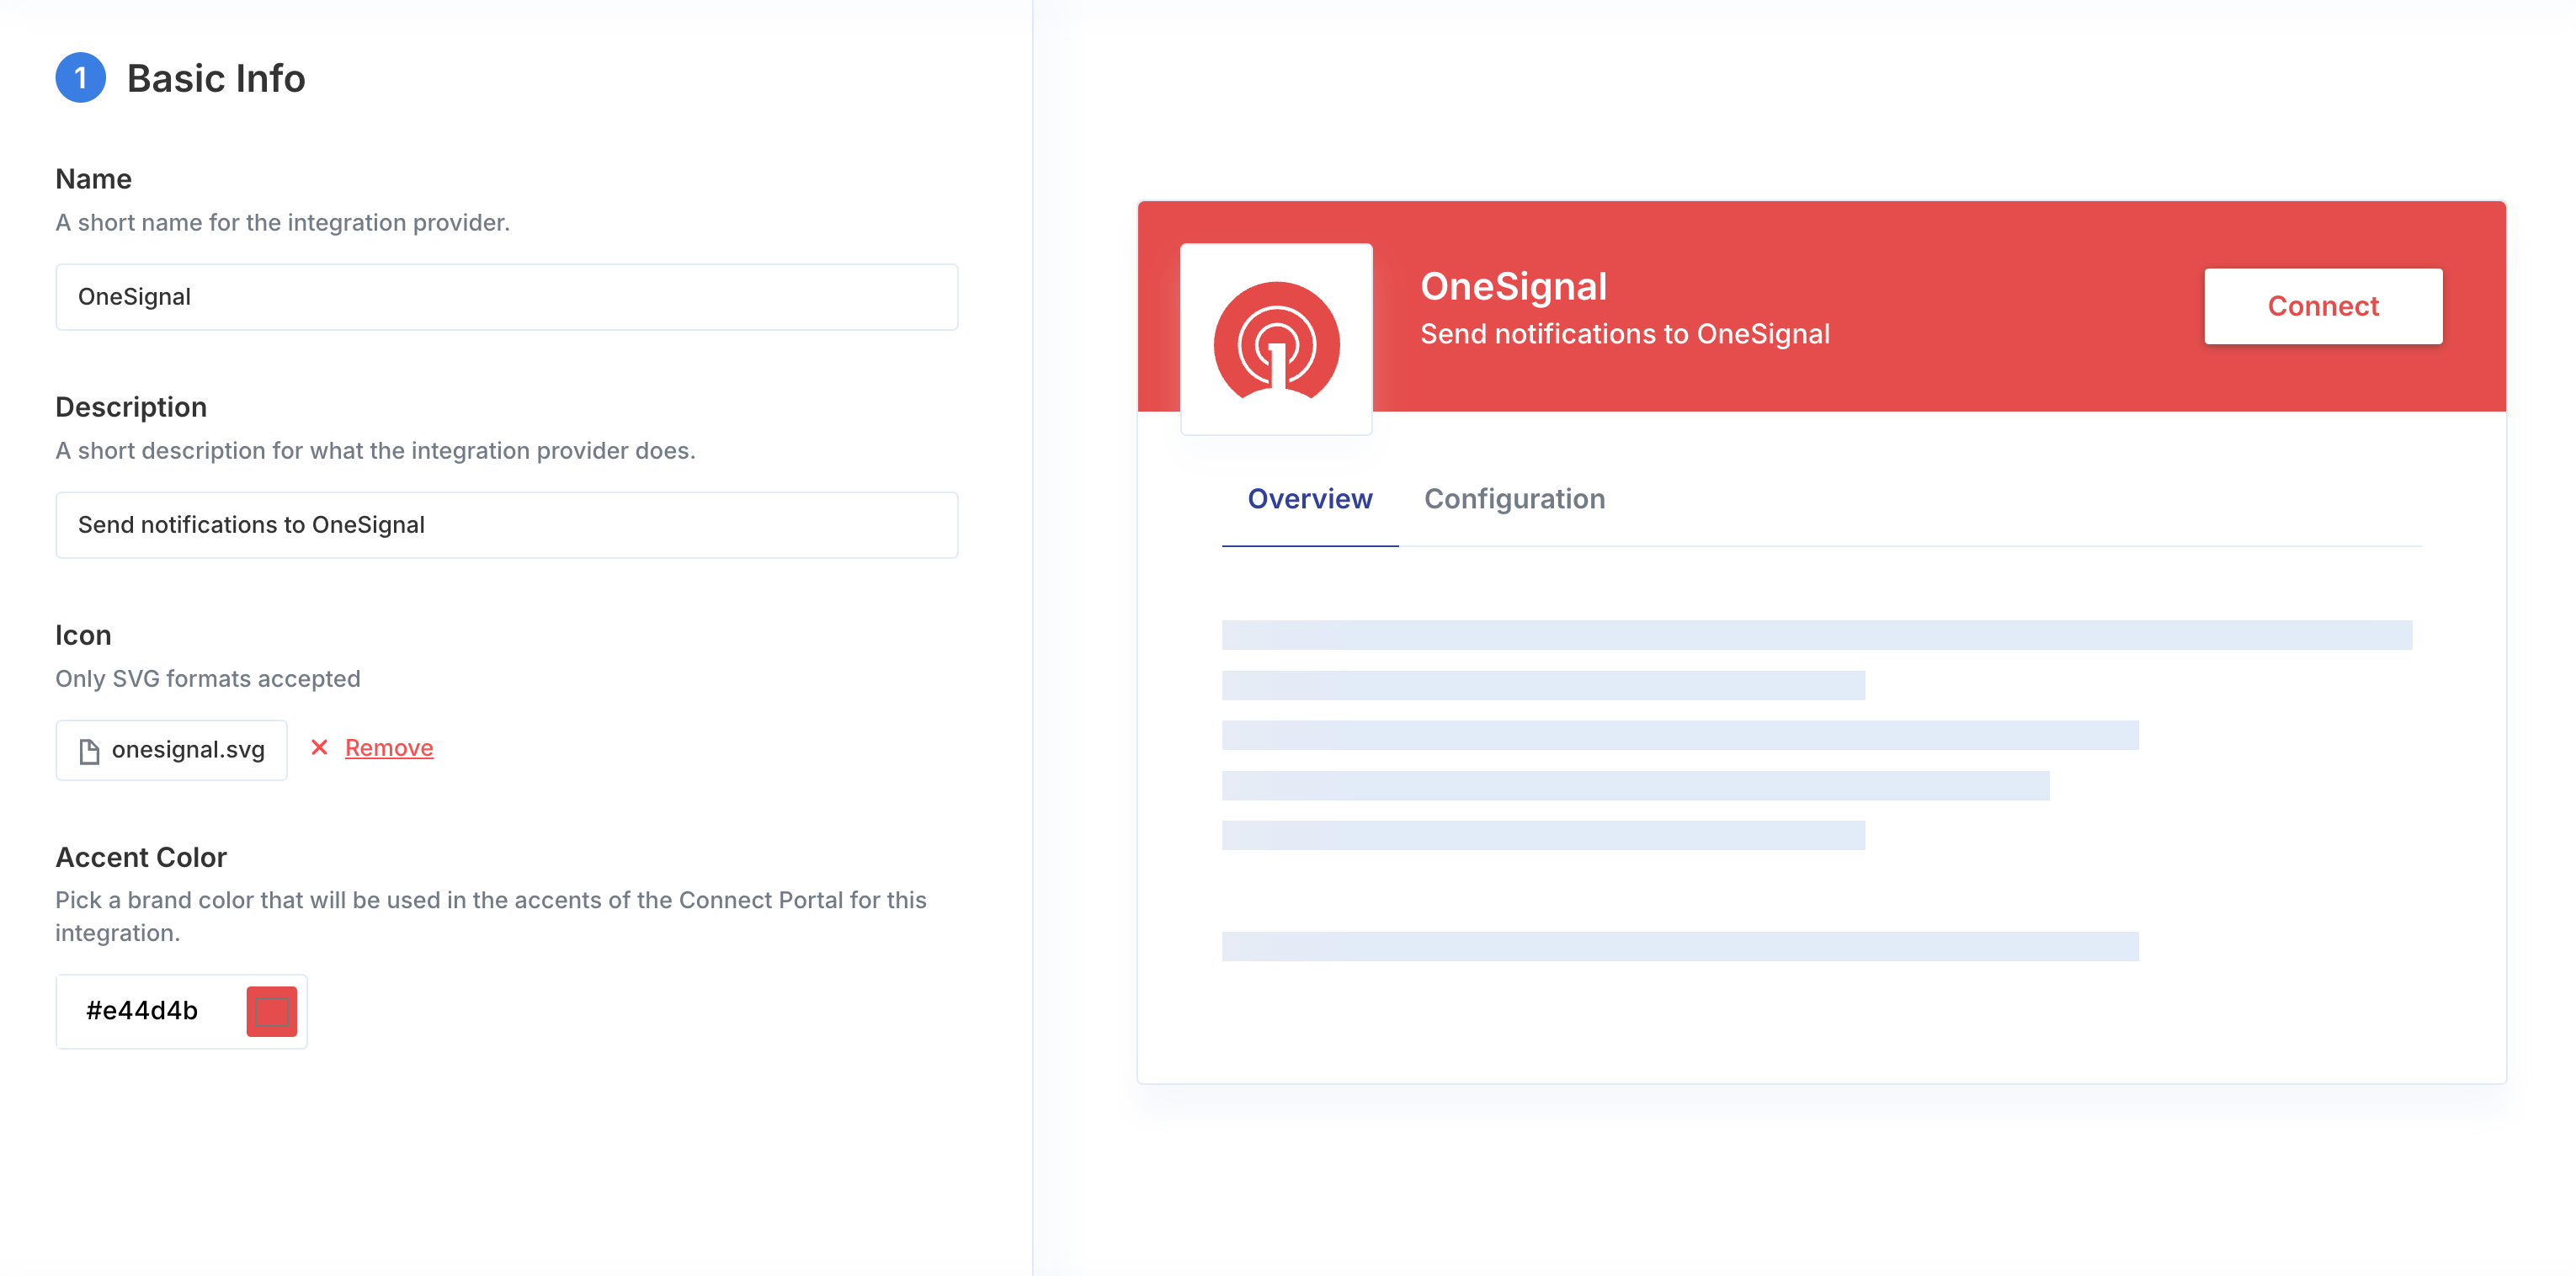
You'll first need to provide some basic information about the app provider that will appear in the Connect Portal for the integration.
* **Name** - A short name for the app provider.
* **Description** - A short description for what the app provider does.
* **App Icon** - Only SVG formats accepted.
* **Accent Color** - The brand color that will be used in the accents of the Connect Portal for this integration.
### Step 1. Basic Info
You'll first need to provide some basic information about the app provider that will appear in the Connect Portal for the integration.
* **Name** - A short name for the app provider.
* **Description** - A short description for what the app provider does.
* **App Icon** - Only SVG formats accepted.
* **Accent Color** - The brand color that will be used in the accents of the Connect Portal for this integration.
 ### Step 2. Authentication Method
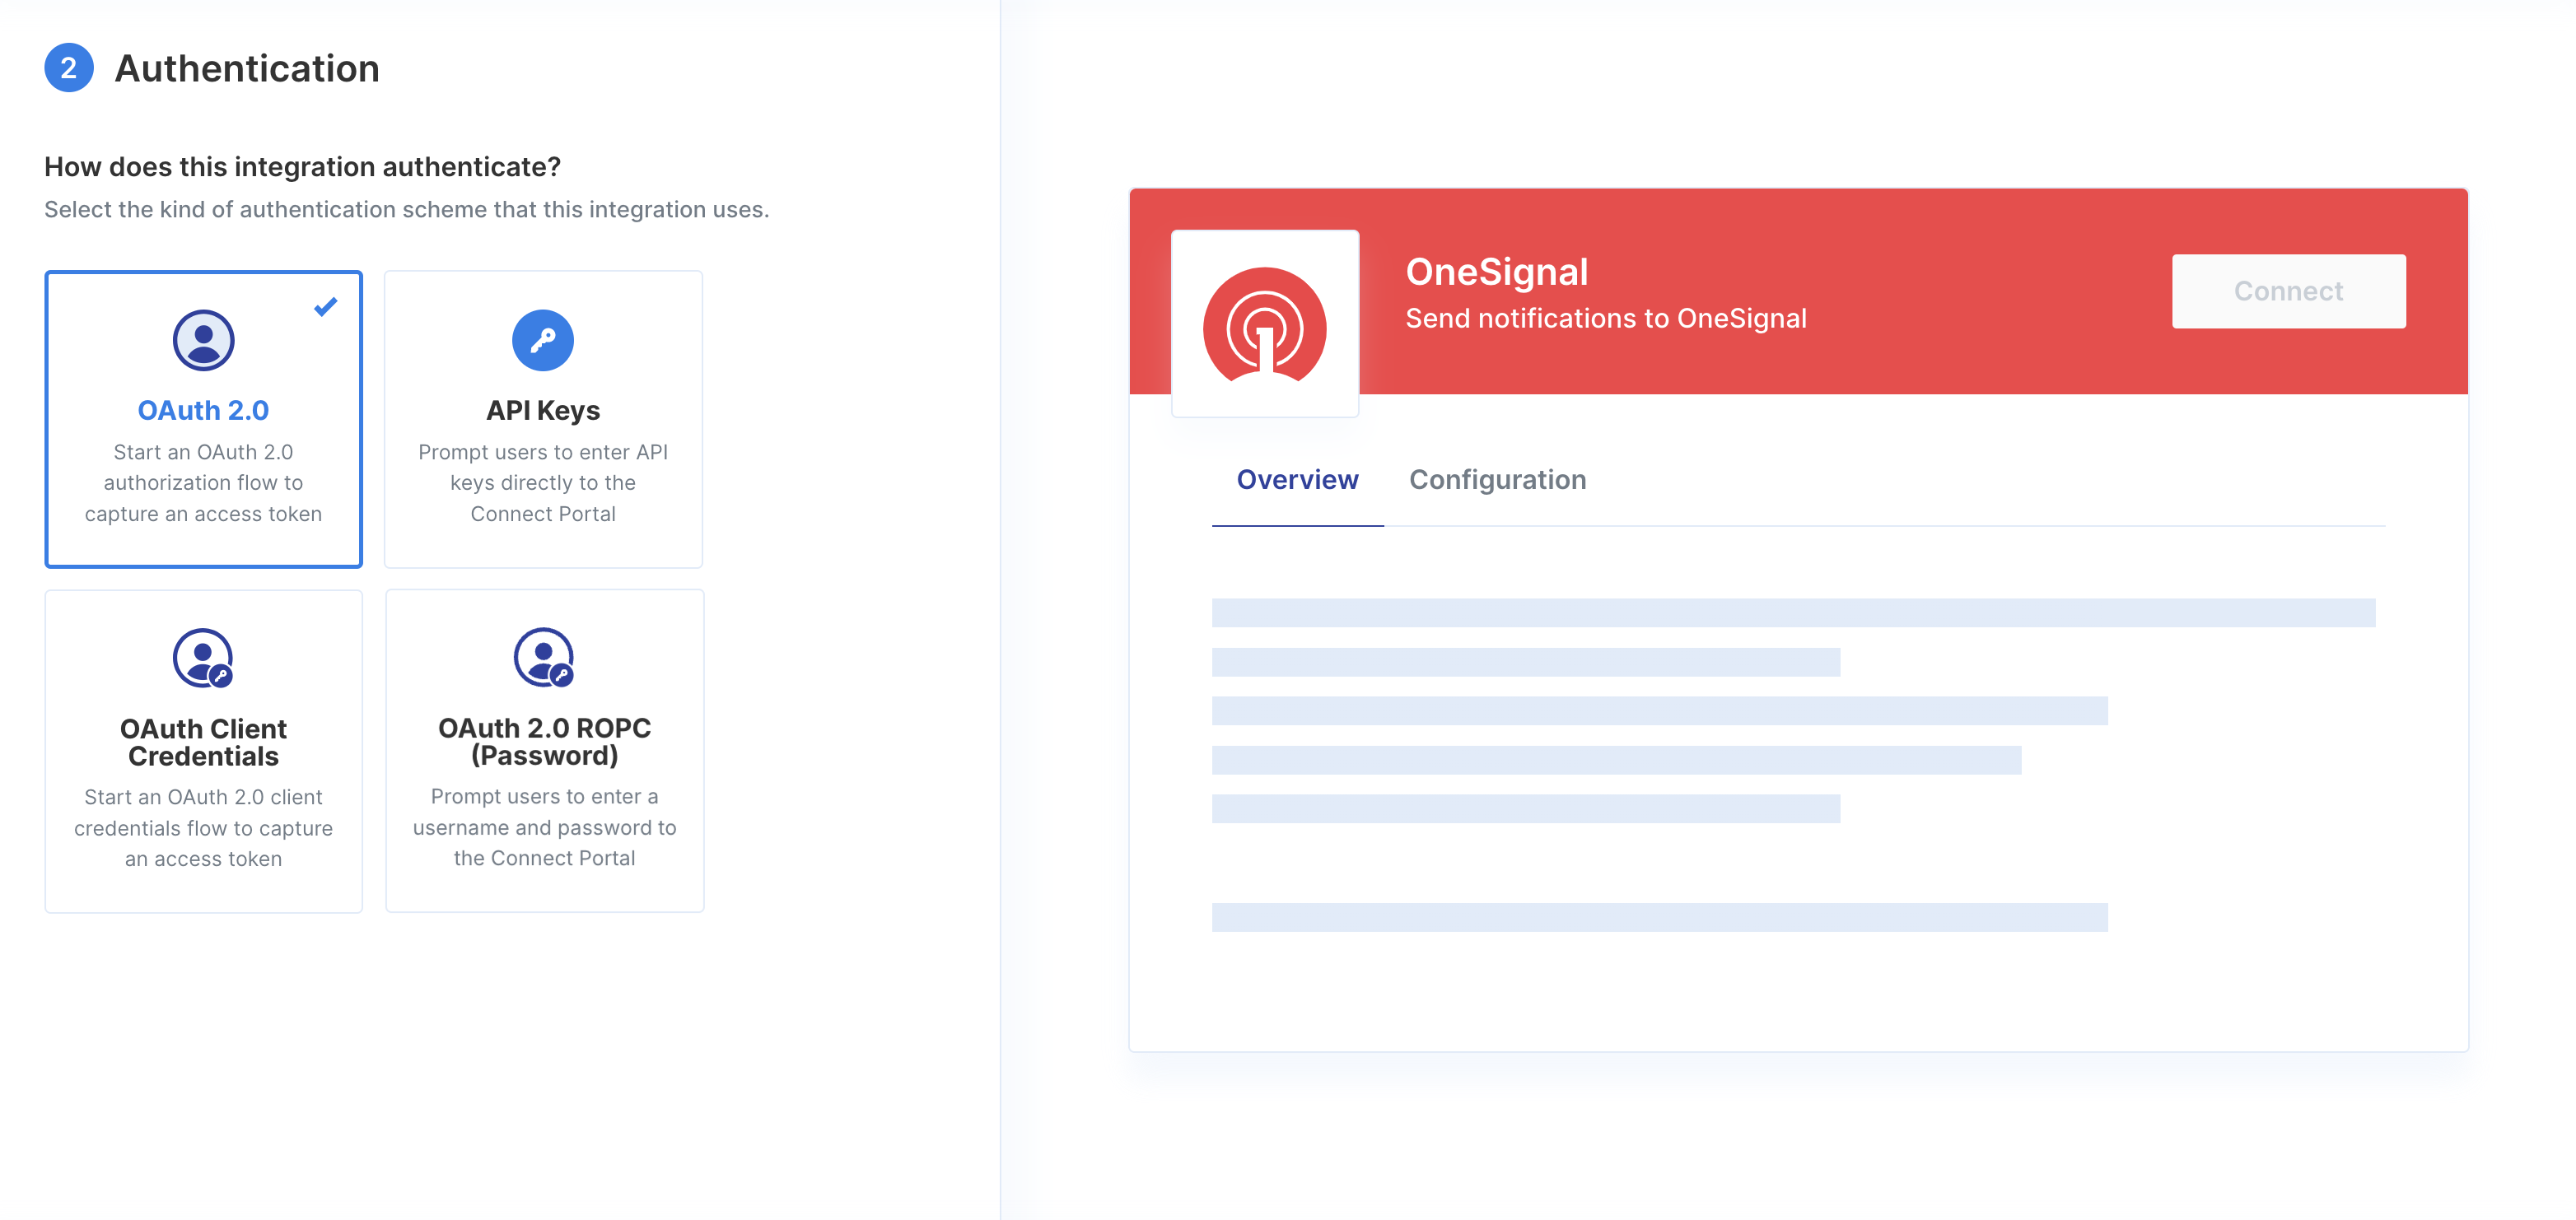
Select a method of authentication for your app provider. You can usually find this in your app provider's API documentation.
**OAuth 2.0** is typically used when a user needs to authenticate access to their account. For example, a user signing into Salesforce so that your application can make changes on their behalf.
Some app providers use **API keys** for authorization. An API key is a token that a client provides when making API calls. API keys are typically found within the app provider's account settings.
### Step 2. Authentication Method
Select a method of authentication for your app provider. You can usually find this in your app provider's API documentation.
**OAuth 2.0** is typically used when a user needs to authenticate access to their account. For example, a user signing into Salesforce so that your application can make changes on their behalf.
Some app providers use **API keys** for authorization. An API key is a token that a client provides when making API calls. API keys are typically found within the app provider's account settings.
 ### Step 3. Authentication Setup
#### OAuth 2.0
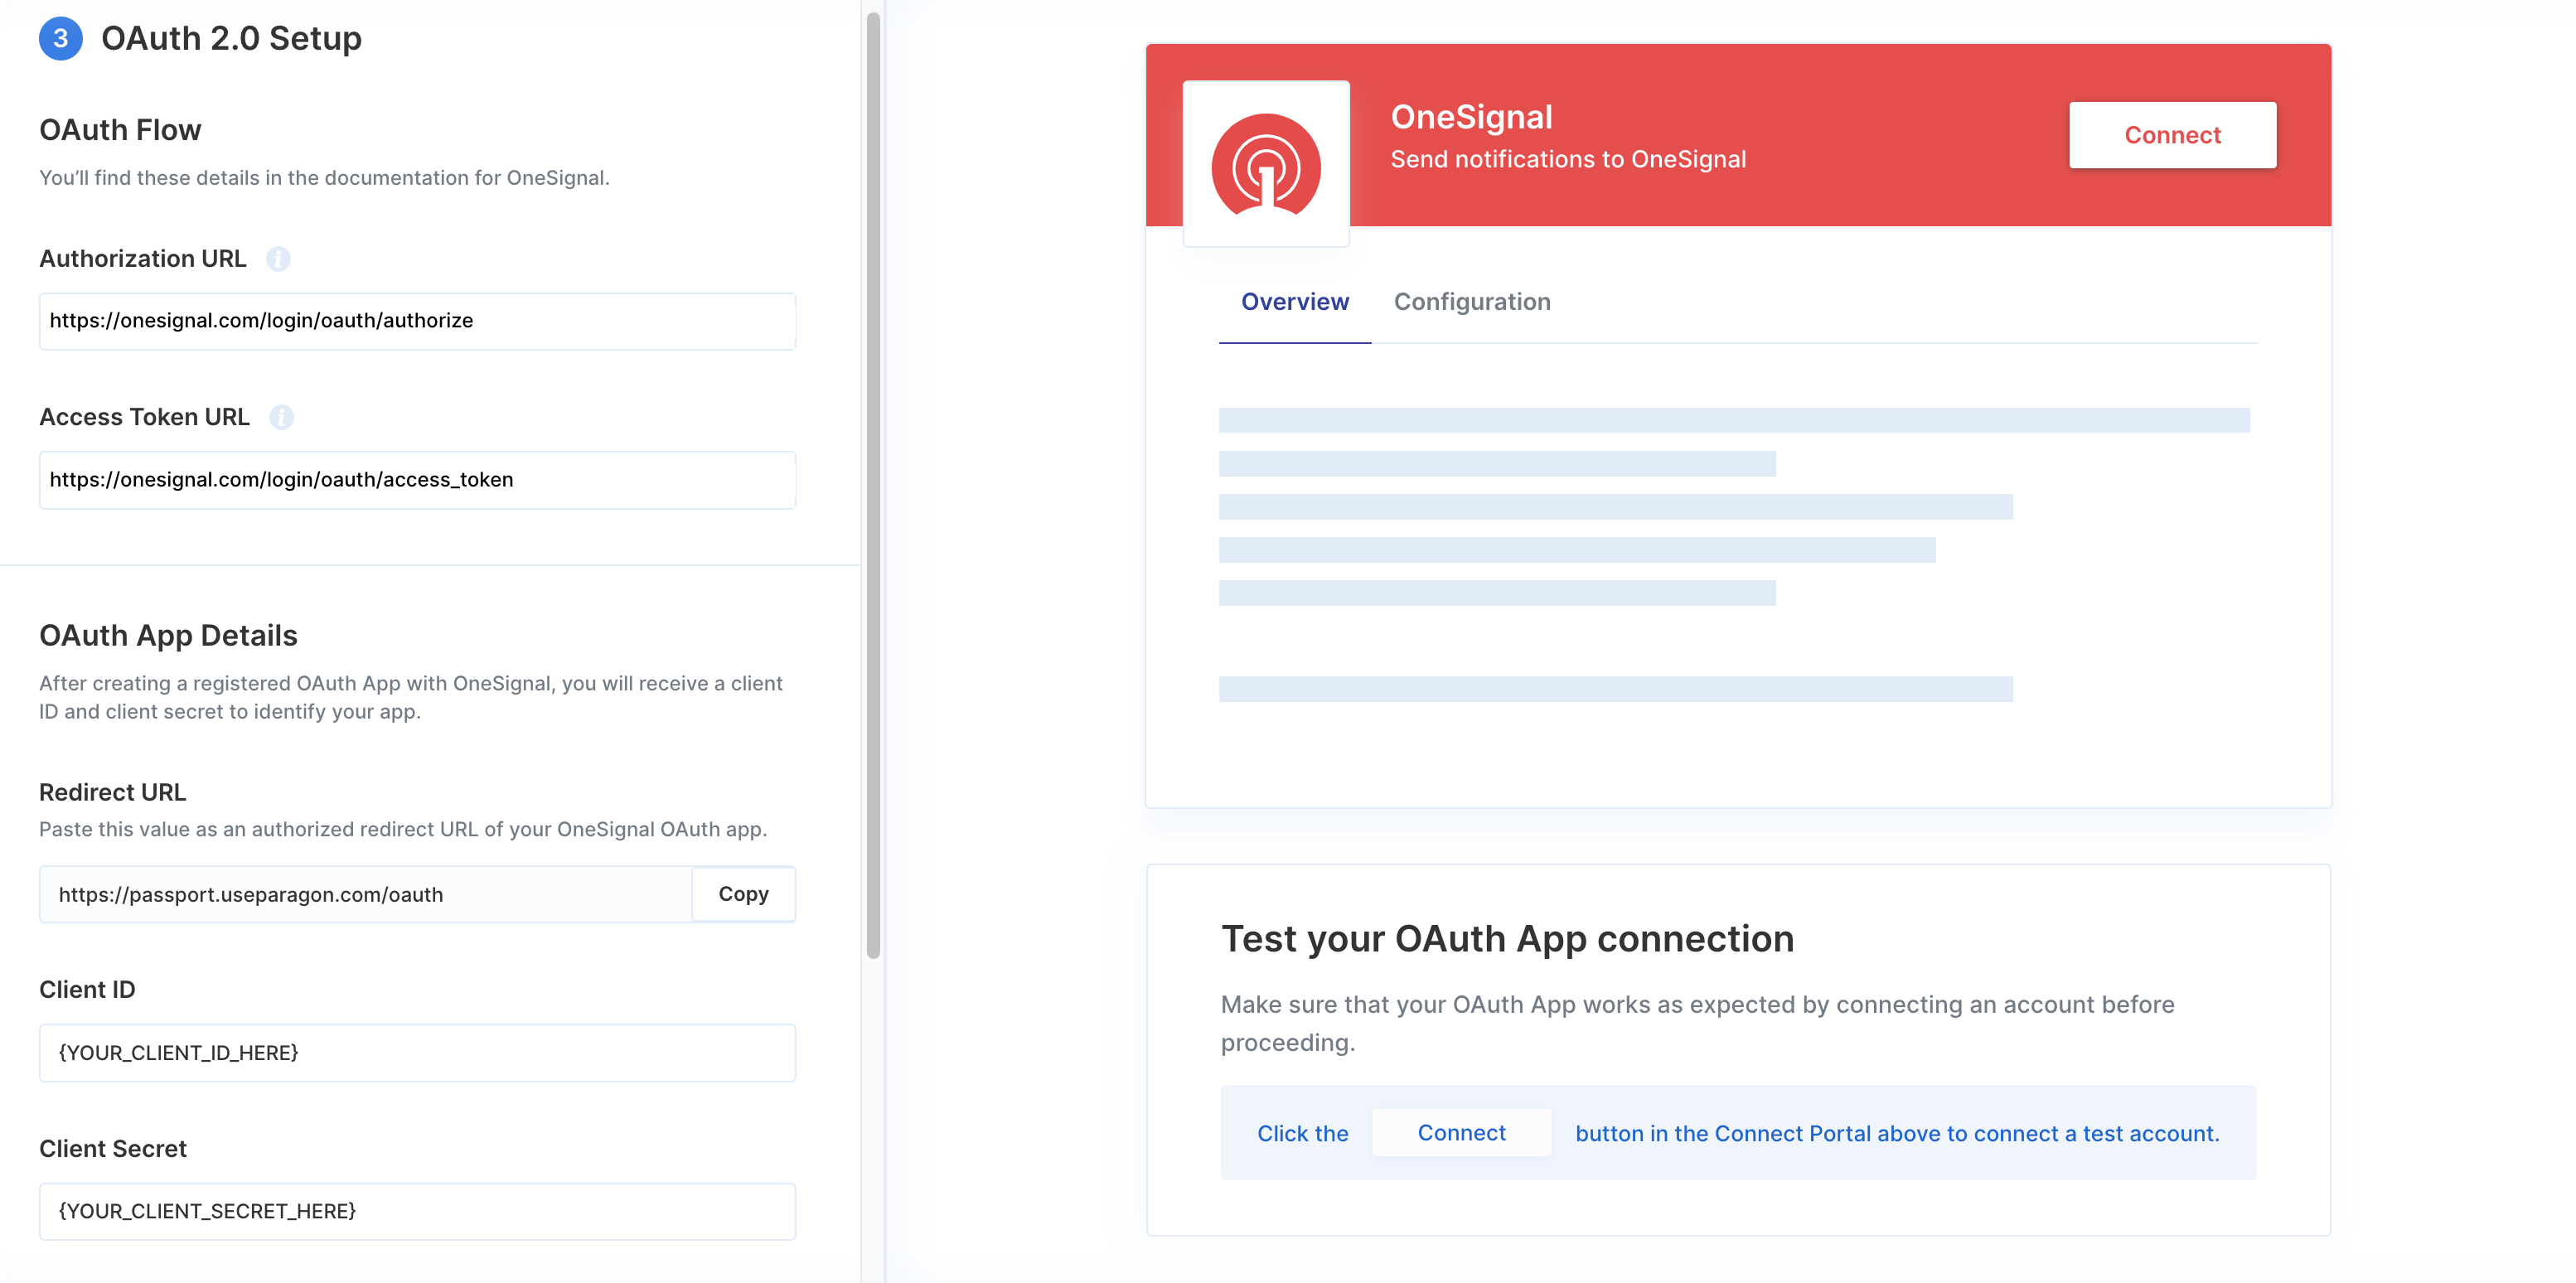
Specify the sign-in URL, also known as the **Authorization URL**, that this integration uses to begin the OAuth 2.0 authentication flow. If the URL includes a value that must be supplied by your end-user, use the **Advanced Options** to add input fields.
You can usually find the OAuth credentials for your selected provider in their API Documentation. You'll need access to the following credentials:
* Auth URL
* Access Token URL
* Client ID
* Client Secret
* Scopes Requested
### Step 3. Authentication Setup
#### OAuth 2.0
Specify the sign-in URL, also known as the **Authorization URL**, that this integration uses to begin the OAuth 2.0 authentication flow. If the URL includes a value that must be supplied by your end-user, use the **Advanced Options** to add input fields.
You can usually find the OAuth credentials for your selected provider in their API Documentation. You'll need access to the following credentials:
* Auth URL
* Access Token URL
* Client ID
* Client Secret
* Scopes Requested
 #### API Keys
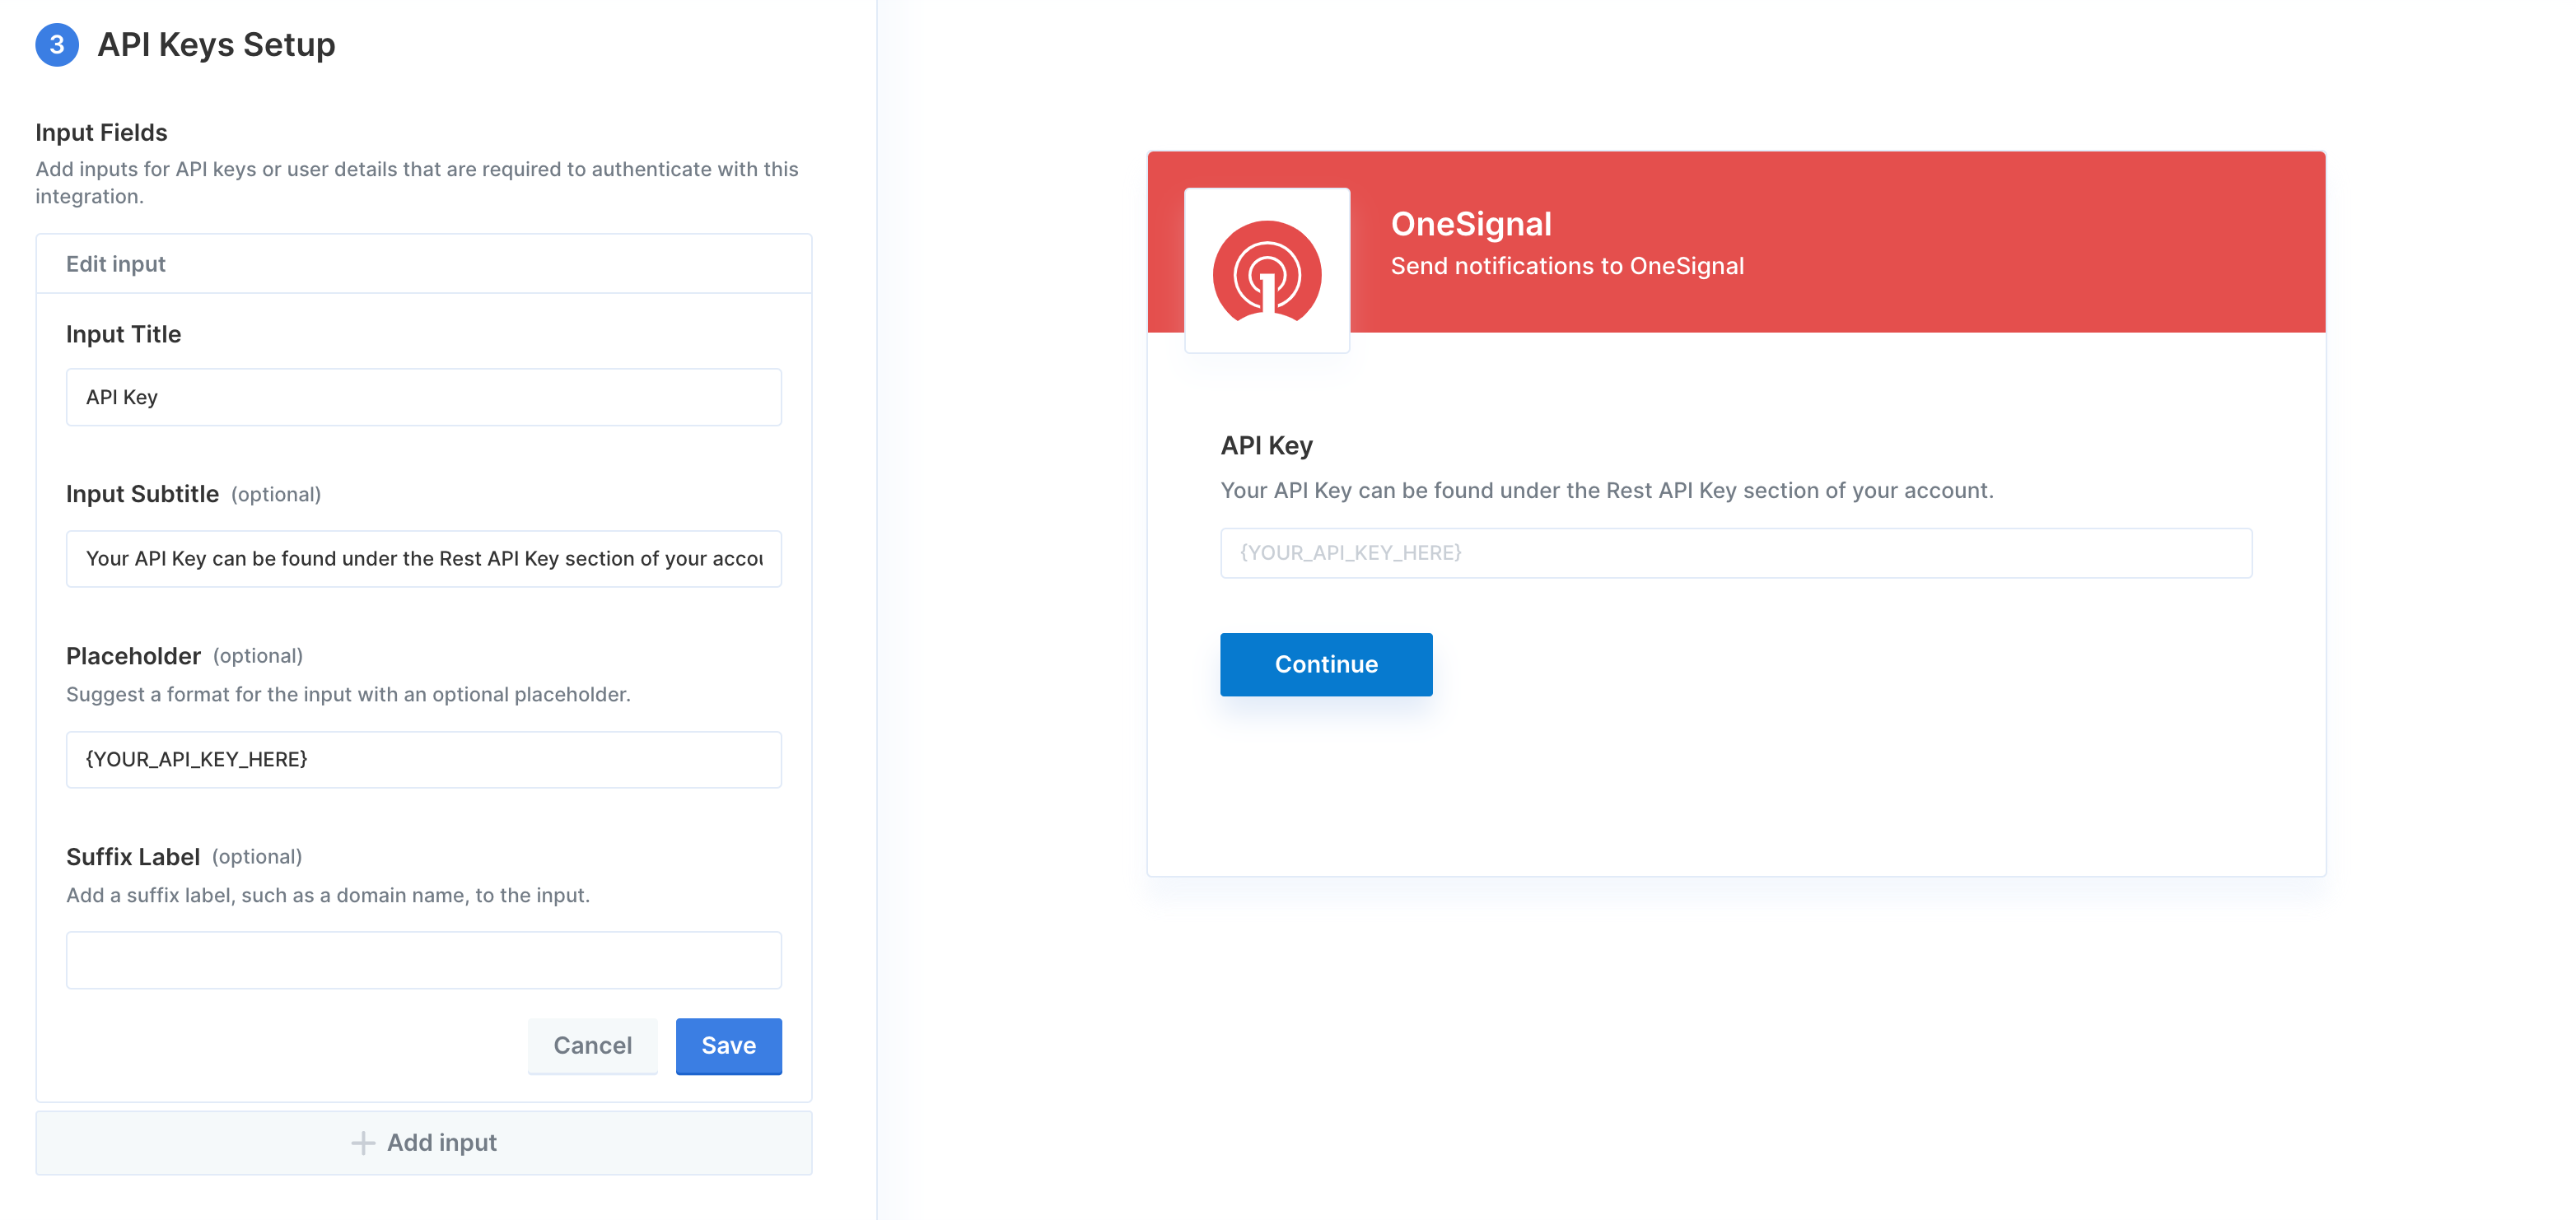
You can add **Input Fields** for API keys or user details that are required to authenticate with your selected app provider.
#### API Keys
You can add **Input Fields** for API keys or user details that are required to authenticate with your selected app provider.
 #### OAuth Client Credentials
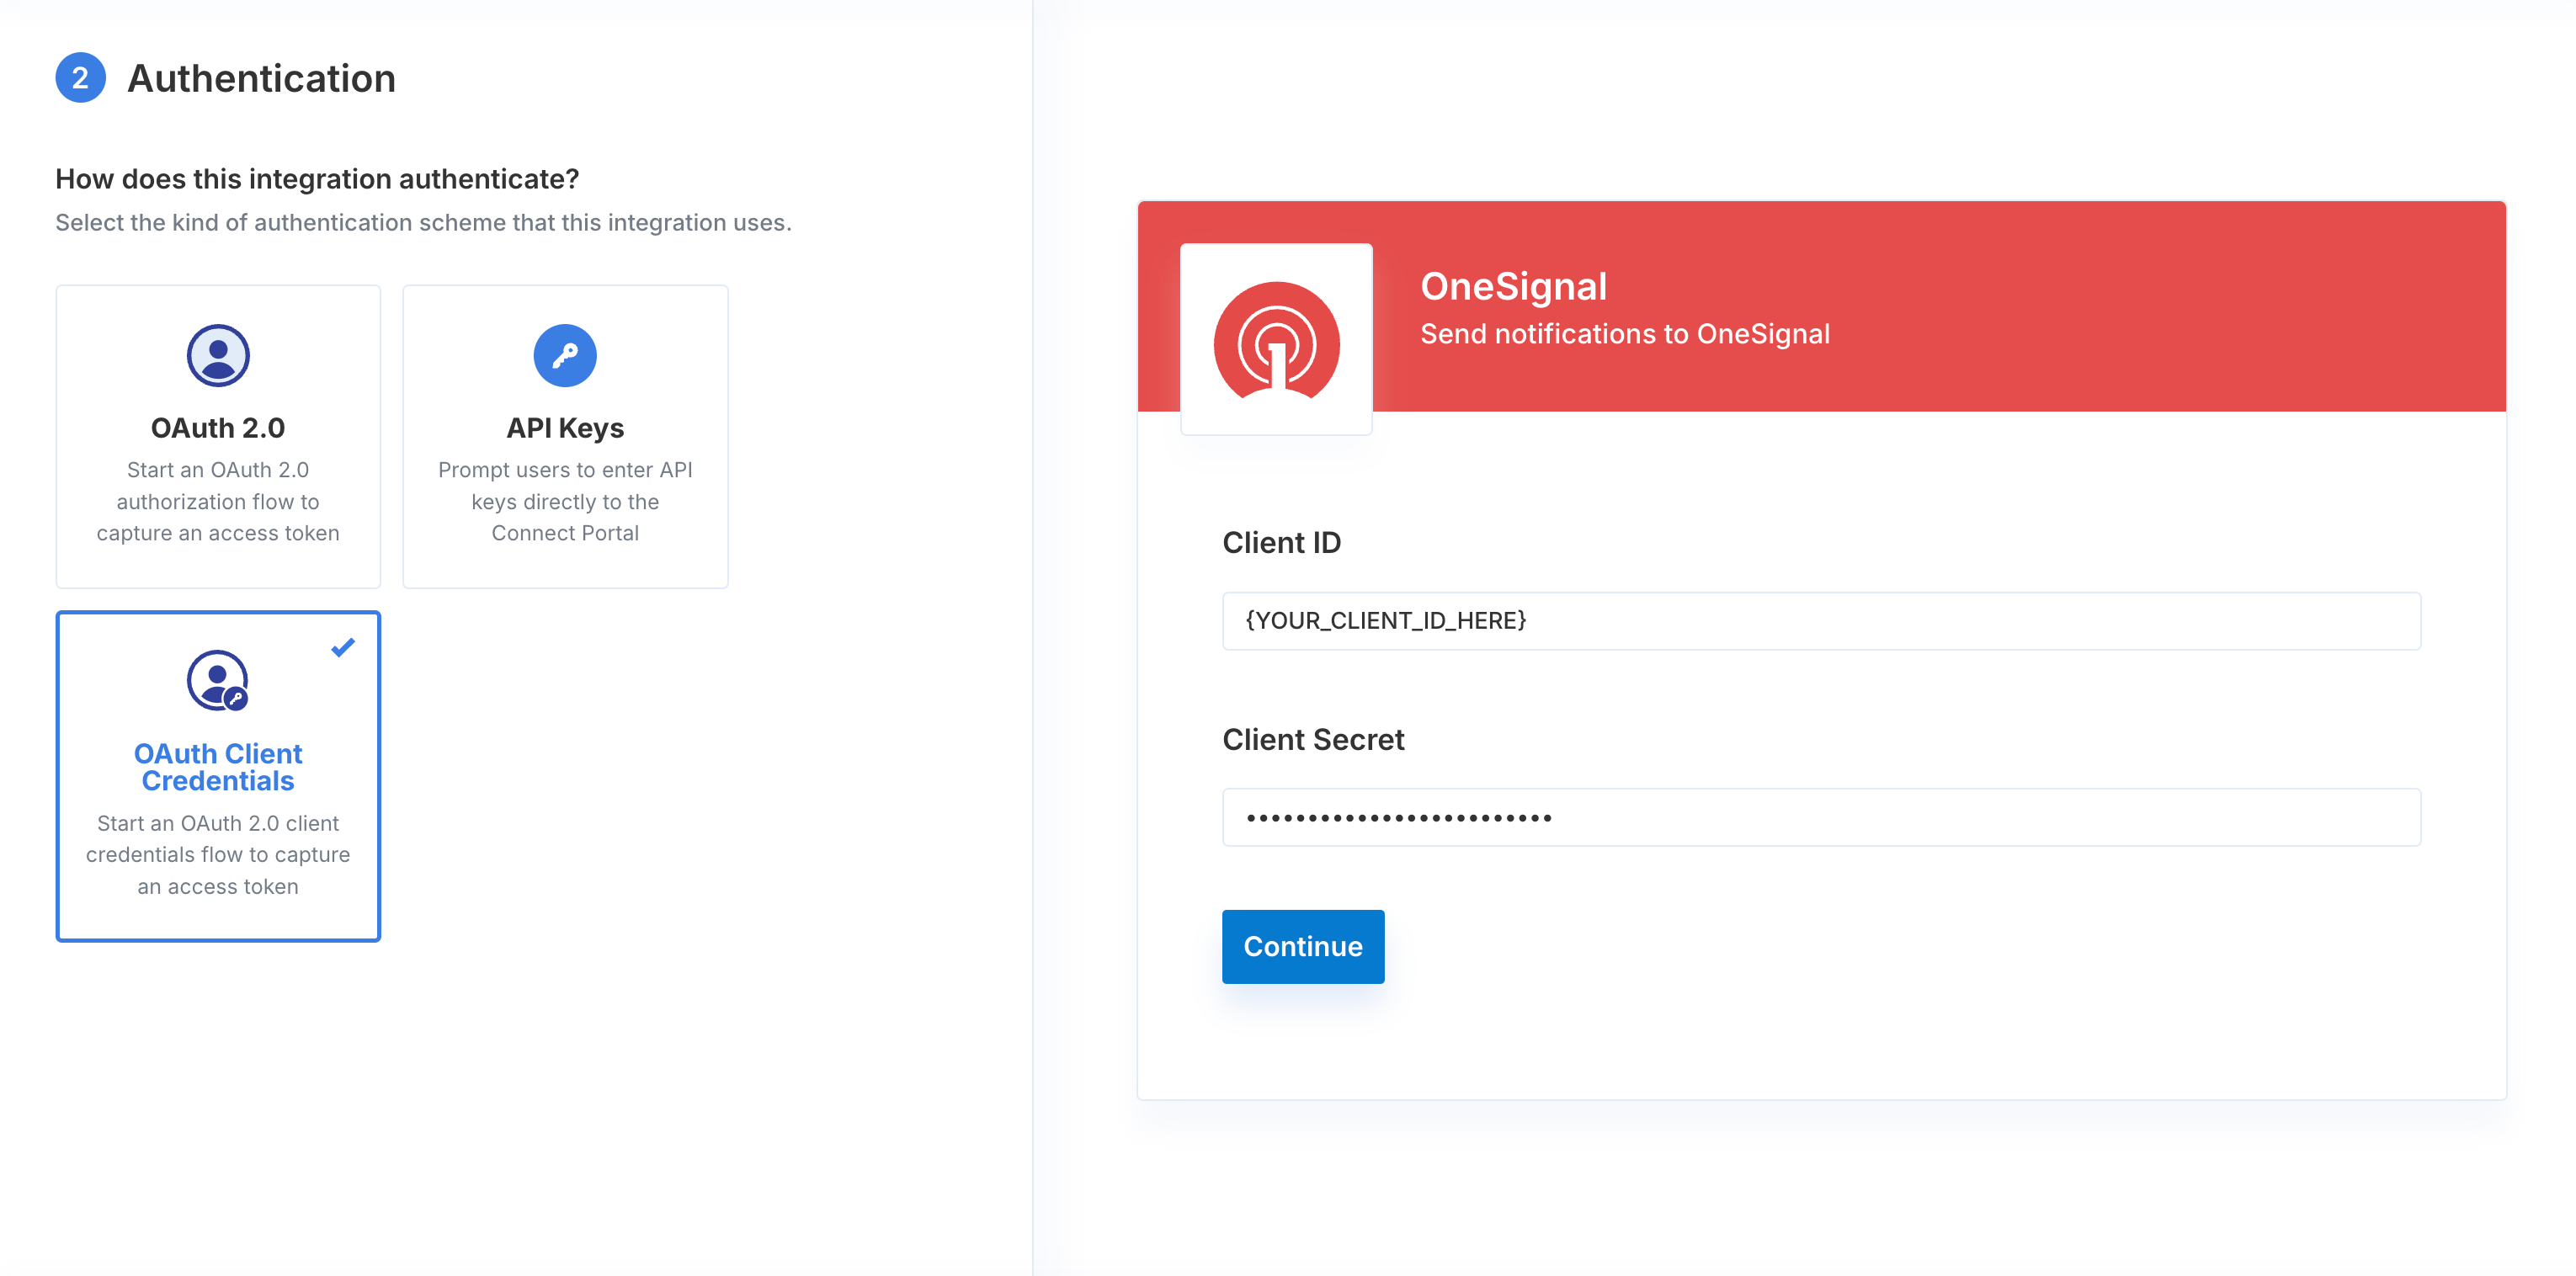
Specify the URL that this integration uses to exchange an authorization code for access tokens, also known as the **Access Token URL**. The Paragon Connect Portal prompts your user for their Client ID and Client Secret needed to validate the authentication.
#### OAuth Client Credentials
Specify the URL that this integration uses to exchange an authorization code for access tokens, also known as the **Access Token URL**. The Paragon Connect Portal prompts your user for their Client ID and Client Secret needed to validate the authentication.
 #### OAuth 2.0 ROPC (Password)
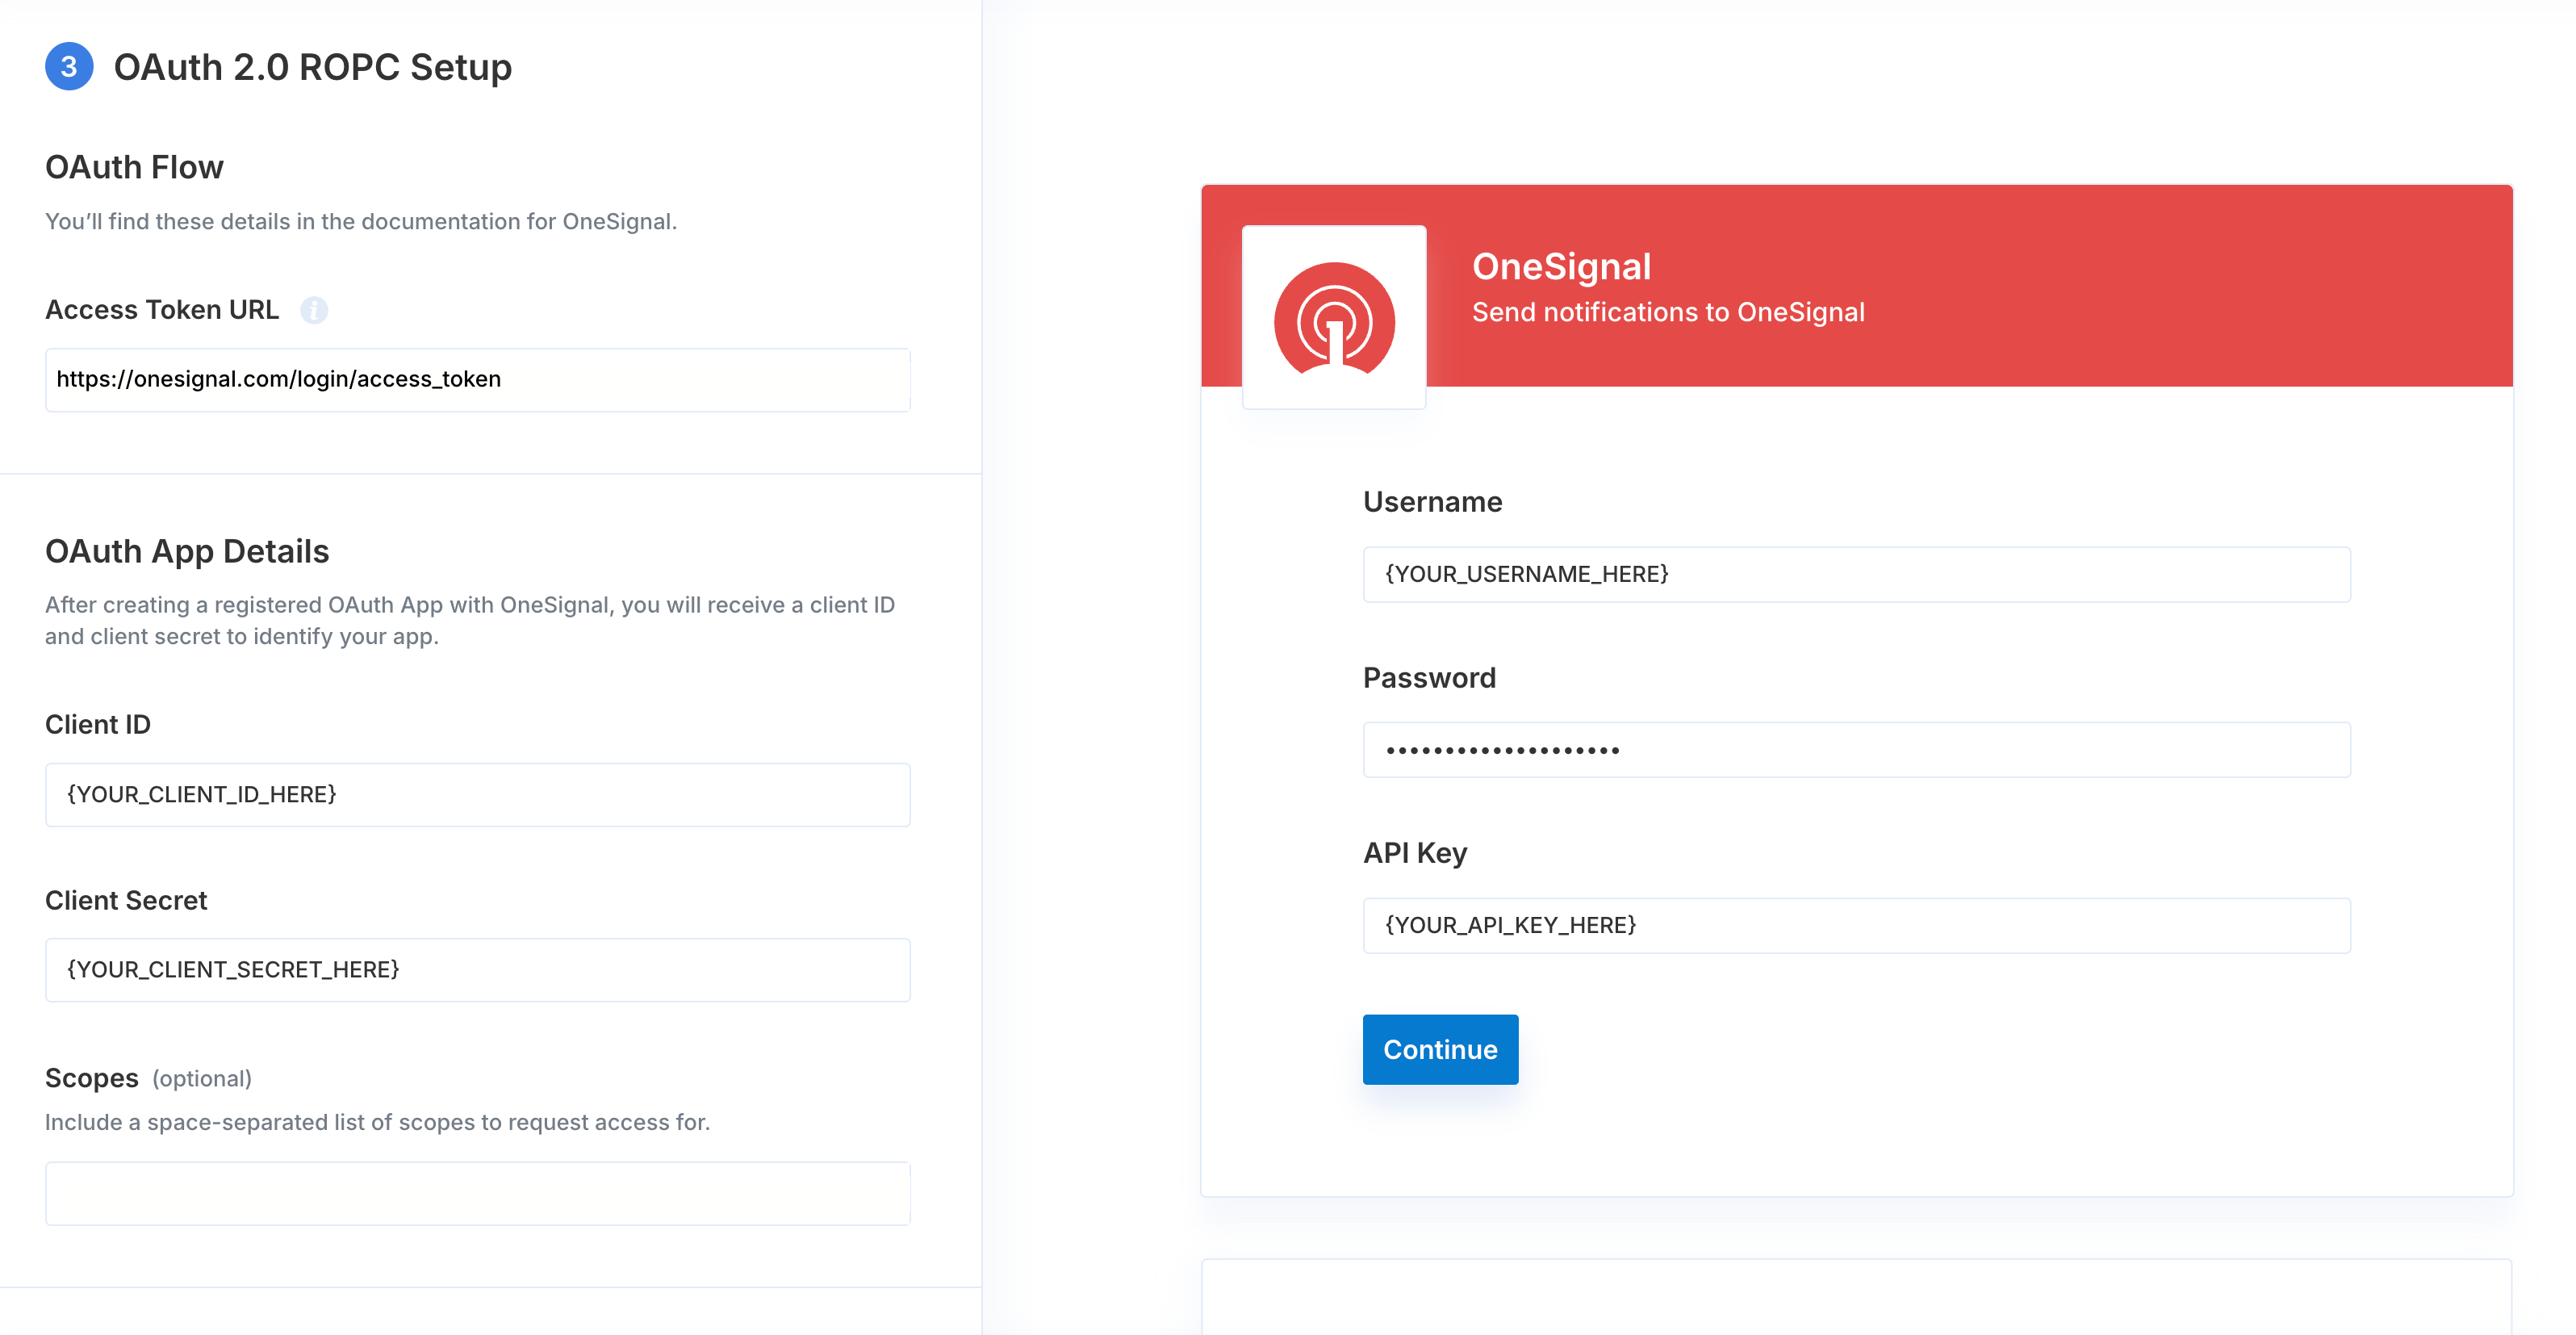
Specify the URL that this integration uses to exchange an authorization code for access tokens, also known as the **Access Token URL**, along with the **Client ID**, **Client Secret**, and any requested scopes for your app provider.
The Paragon Connect Portal prompts your user for their Username, Password, and API Key needed to validate the authentication.
#### OAuth 2.0 ROPC (Password)
Specify the URL that this integration uses to exchange an authorization code for access tokens, also known as the **Access Token URL**, along with the **Client ID**, **Client Secret**, and any requested scopes for your app provider.
The Paragon Connect Portal prompts your user for their Username, Password, and API Key needed to validate the authentication.
 Once you've added your authentication method, press the `Enable` button inside the Connect Portal preview to validate the connection. You must successfully enable your integration before moving to the next step.
### Step 4. API Setup
You can also access your custom provider through the **Workflow Builder** or **Paragon SDK.**
* **API Base URL -** Specify the base URL for API requests made to this integration.
* **API Authorization** - Specify how API requests get authenticated for this integration.
* **Test Endpoint URL** - Specify a request URL that can be used to test that your user's account credentials are valid. This endpoint must be reachable via a `GET` request.
* **User Profile** - Save data about your user’s account after connecting to the integration. The data is then referenceable in the integrations [`providerData`](https://docs.useparagon.com/apis/api-reference#getuser)
Once you've added your authentication method, press the `Enable` button inside the Connect Portal preview to validate the connection. You must successfully enable your integration before moving to the next step.
### Step 4. API Setup
You can also access your custom provider through the **Workflow Builder** or **Paragon SDK.**
* **API Base URL -** Specify the base URL for API requests made to this integration.
* **API Authorization** - Specify how API requests get authenticated for this integration.
* **Test Endpoint URL** - Specify a request URL that can be used to test that your user's account credentials are valid. This endpoint must be reachable via a `GET` request.
* **User Profile** - Save data about your user’s account after connecting to the integration. The data is then referenceable in the integrations [`providerData`](https://docs.useparagon.com/apis/api-reference#getuser)
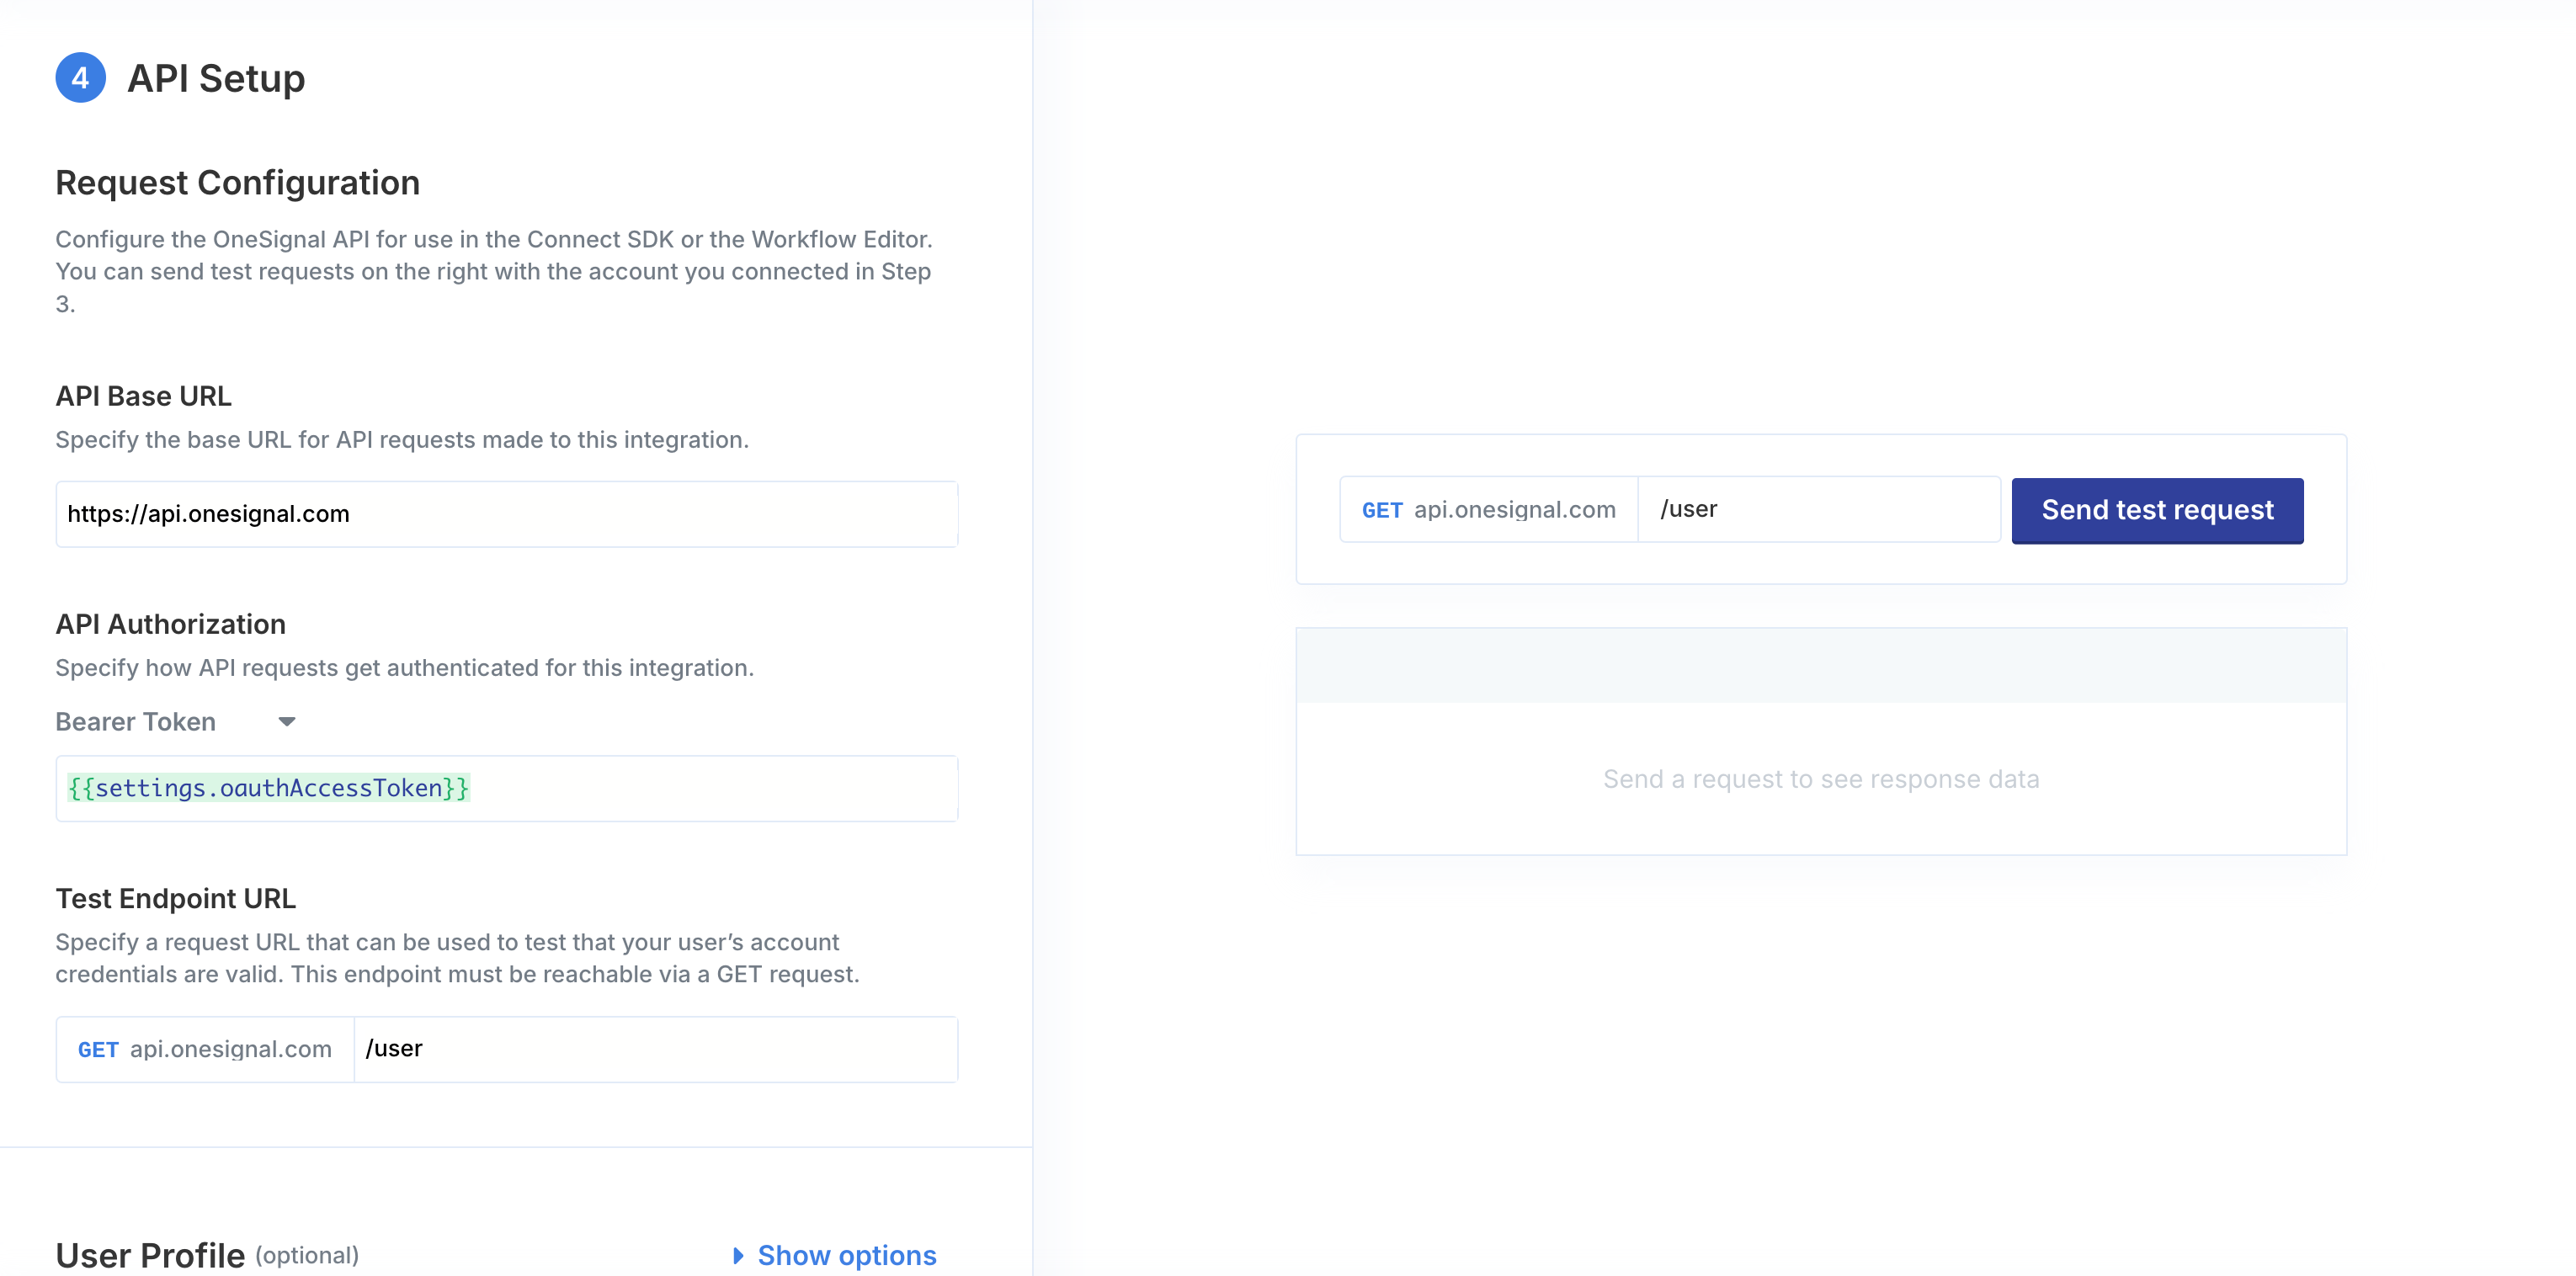 Once you've added the fields above, you can press the `Send test request` button to validate your custom integration configuration. Press the `Finish` button to save your custom integration.
## Using Custom Integrations
Once you've added a custom integration to Paragon, you can access it through the Workflow Builder, Paragon SDK, and Proxy API.
### Workflow Builder
You can make API Requests to your app provider from the Workflow Builder by selecting your app provider from the workflow sidebar. Paragon prefills the request URL with the API Base URL from [Step 4](/resources/custom-integrations#step-4-api-setup). Simply provide the API endpoint to the request that you want to make.
Once you've added the fields above, you can press the `Send test request` button to validate your custom integration configuration. Press the `Finish` button to save your custom integration.
## Using Custom Integrations
Once you've added a custom integration to Paragon, you can access it through the Workflow Builder, Paragon SDK, and Proxy API.
### Workflow Builder
You can make API Requests to your app provider from the Workflow Builder by selecting your app provider from the workflow sidebar. Paragon prefills the request URL with the API Base URL from [Step 4](/resources/custom-integrations#step-4-api-setup). Simply provide the API endpoint to the request that you want to make.
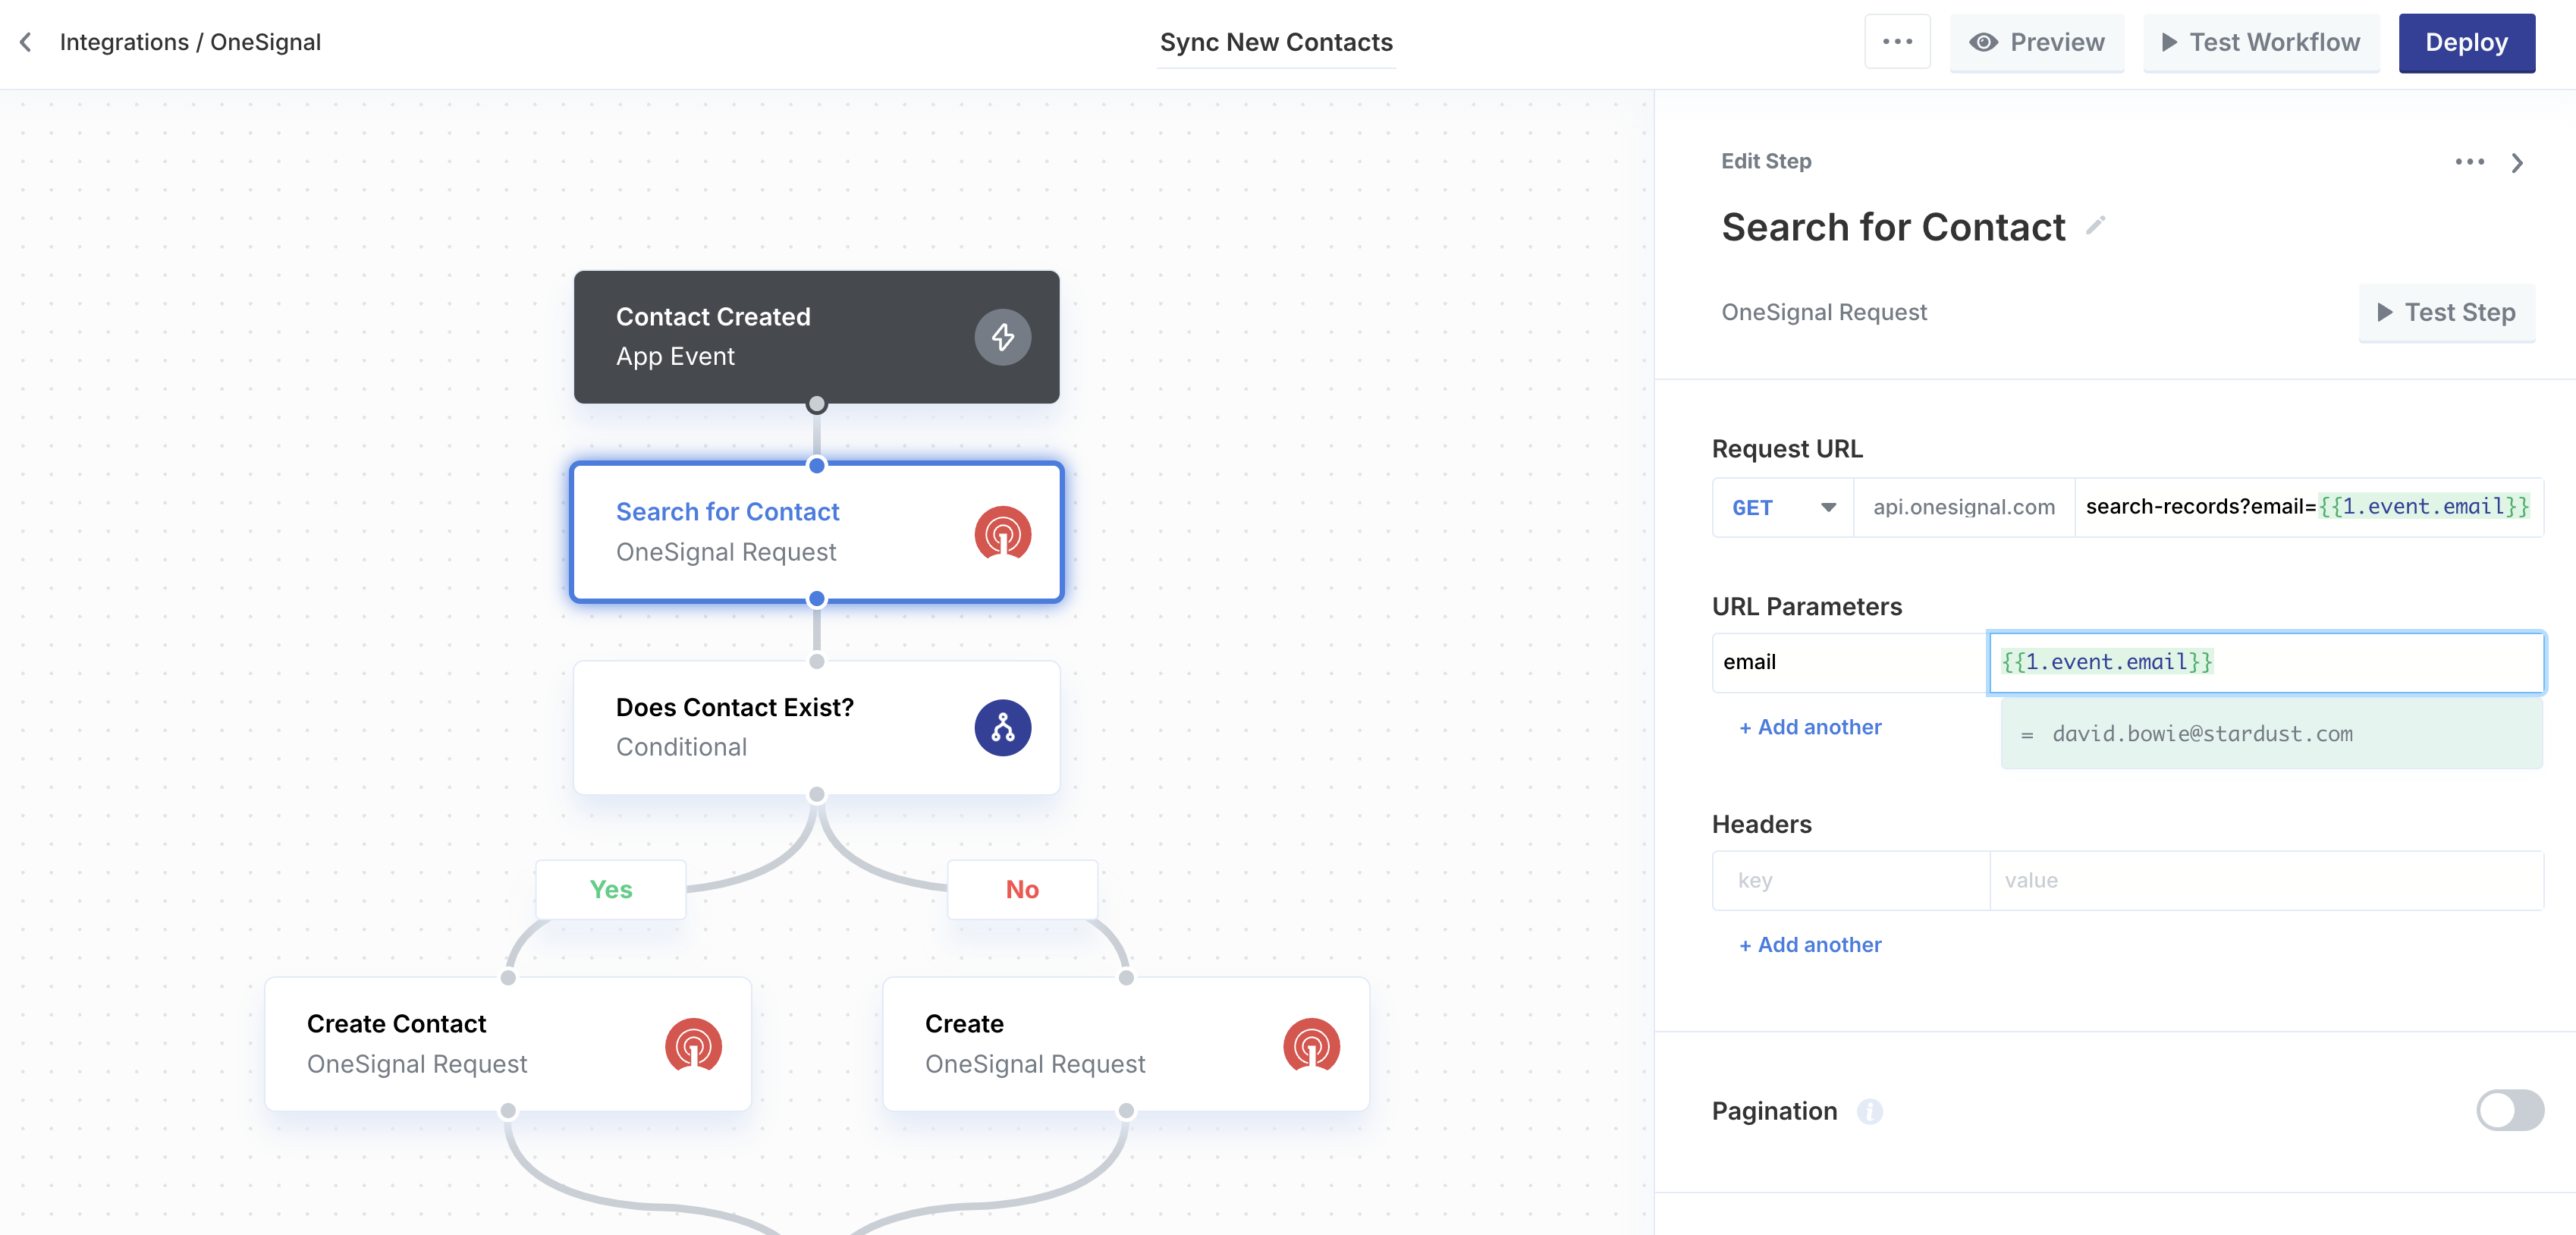 Paragon automatically provides the `Authorization` information provided in [Step 4](/resources/custom-integrations#step-4-api-setup) in the request.
}>
Learn more about building workflows in our comprehensive overview.
### Paragon SDK
Once your users have connected their accounts, you can use the Paragon SDK to access any of your app provider's endpoints on behalf of connected users. You'll need to prefix the app provider's name with `custom.` when making requests. For example, a custom GitHub integration would be referenced as `custom.github`.
**Note:** When using custom app providers in the Paragon SDK, prefix the app provider name with `custom.`.
```js JavaScript theme={null}
// You can find your project ID in the Overview tab of any Integration
// Authenticate the user
paragon.authenticate(, );
// Get Data
await paragon.request("custom.", "", {
method: "GET",
})
```
**Example:**
```js JavaScript theme={null}
// You can find your project ID in the Overview tab of any Integration
// Authenticate the user
paragon.authenticate(, )
// Create new Issue
await paragon.request("custom.onesignal", "/notifications", {
method: "POST",
body: {
"title": "This notification was created from your app"
}
})
```
}>
Learn more about triggering integration logic from the frontend with the Paragon SDK.
### Proxy API
If you'd like to issue a request from your server to your custom integration on behalf of an end-user, you can make the request to:
```bash REST API theme={null}
https://proxy.useparagon.com/projects//sdk/proxy
/custom//
Authorization: Bearer
```
* A Bearer token must also be specified with a Paragon User Token.
* This endpoint accepts any HTTP verb you want to use with the API.
* The Integration ID can be found in the dashboard (`/.../integrations/`) or with the [Get project's integrations](/apis/api-reference#get-projects-integrations) API endpoint.
**Example:**
```bash REST API theme={null}
POST https://proxy.useparagon.com/projects/19d...012/sdk/proxy
/fb243b75-35e7-46b3-ba6c-967ccebeb449/notifications
Authorization: Bearer eyJ...
Content-Type: application/json
{
"title": "This notification was created from your app"
}
```
}>
Learn more about triggering integration logic from the backend with the Proxy API.
Paragon automatically provides the `Authorization` information provided in [Step 4](/resources/custom-integrations#step-4-api-setup) in the request.
}>
Learn more about building workflows in our comprehensive overview.
### Paragon SDK
Once your users have connected their accounts, you can use the Paragon SDK to access any of your app provider's endpoints on behalf of connected users. You'll need to prefix the app provider's name with `custom.` when making requests. For example, a custom GitHub integration would be referenced as `custom.github`.
**Note:** When using custom app providers in the Paragon SDK, prefix the app provider name with `custom.`.
```js JavaScript theme={null}
// You can find your project ID in the Overview tab of any Integration
// Authenticate the user
paragon.authenticate(, );
// Get Data
await paragon.request("custom.", "", {
method: "GET",
})
```
**Example:**
```js JavaScript theme={null}
// You can find your project ID in the Overview tab of any Integration
// Authenticate the user
paragon.authenticate(, )
// Create new Issue
await paragon.request("custom.onesignal", "/notifications", {
method: "POST",
body: {
"title": "This notification was created from your app"
}
})
```
}>
Learn more about triggering integration logic from the frontend with the Paragon SDK.
### Proxy API
If you'd like to issue a request from your server to your custom integration on behalf of an end-user, you can make the request to:
```bash REST API theme={null}
https://proxy.useparagon.com/projects//sdk/proxy
/custom//
Authorization: Bearer
```
* A Bearer token must also be specified with a Paragon User Token.
* This endpoint accepts any HTTP verb you want to use with the API.
* The Integration ID can be found in the dashboard (`/.../integrations/`) or with the [Get project's integrations](/apis/api-reference#get-projects-integrations) API endpoint.
**Example:**
```bash REST API theme={null}
POST https://proxy.useparagon.com/projects/19d...012/sdk/proxy
/fb243b75-35e7-46b3-ba6c-967ccebeb449/notifications
Authorization: Bearer eyJ...
Content-Type: application/json
{
"title": "This notification was created from your app"
}
```
}>
Learn more about triggering integration logic from the backend with the Proxy API.