> ## Documentation Index
> Fetch the complete documentation index at: https://docs.useparagon.com/llms.txt
> Use this file to discover all available pages before exploring further.
# Headless Connect Portal
> Bring your existing components or design system into your Paragon integrations experience with the Headless Connect Portal.
The Headless Connect Portal can be used with your own UI components or design system to make your integrations feel native to the design of your app, while leveraging the SDK for all of the backend details of connecting and configuring your users' integrations.
Headless mode still provides **fully managed authentication**, so you don't need to worry about managing, storing, or refreshing your customers' credentials.
## Example Implementation
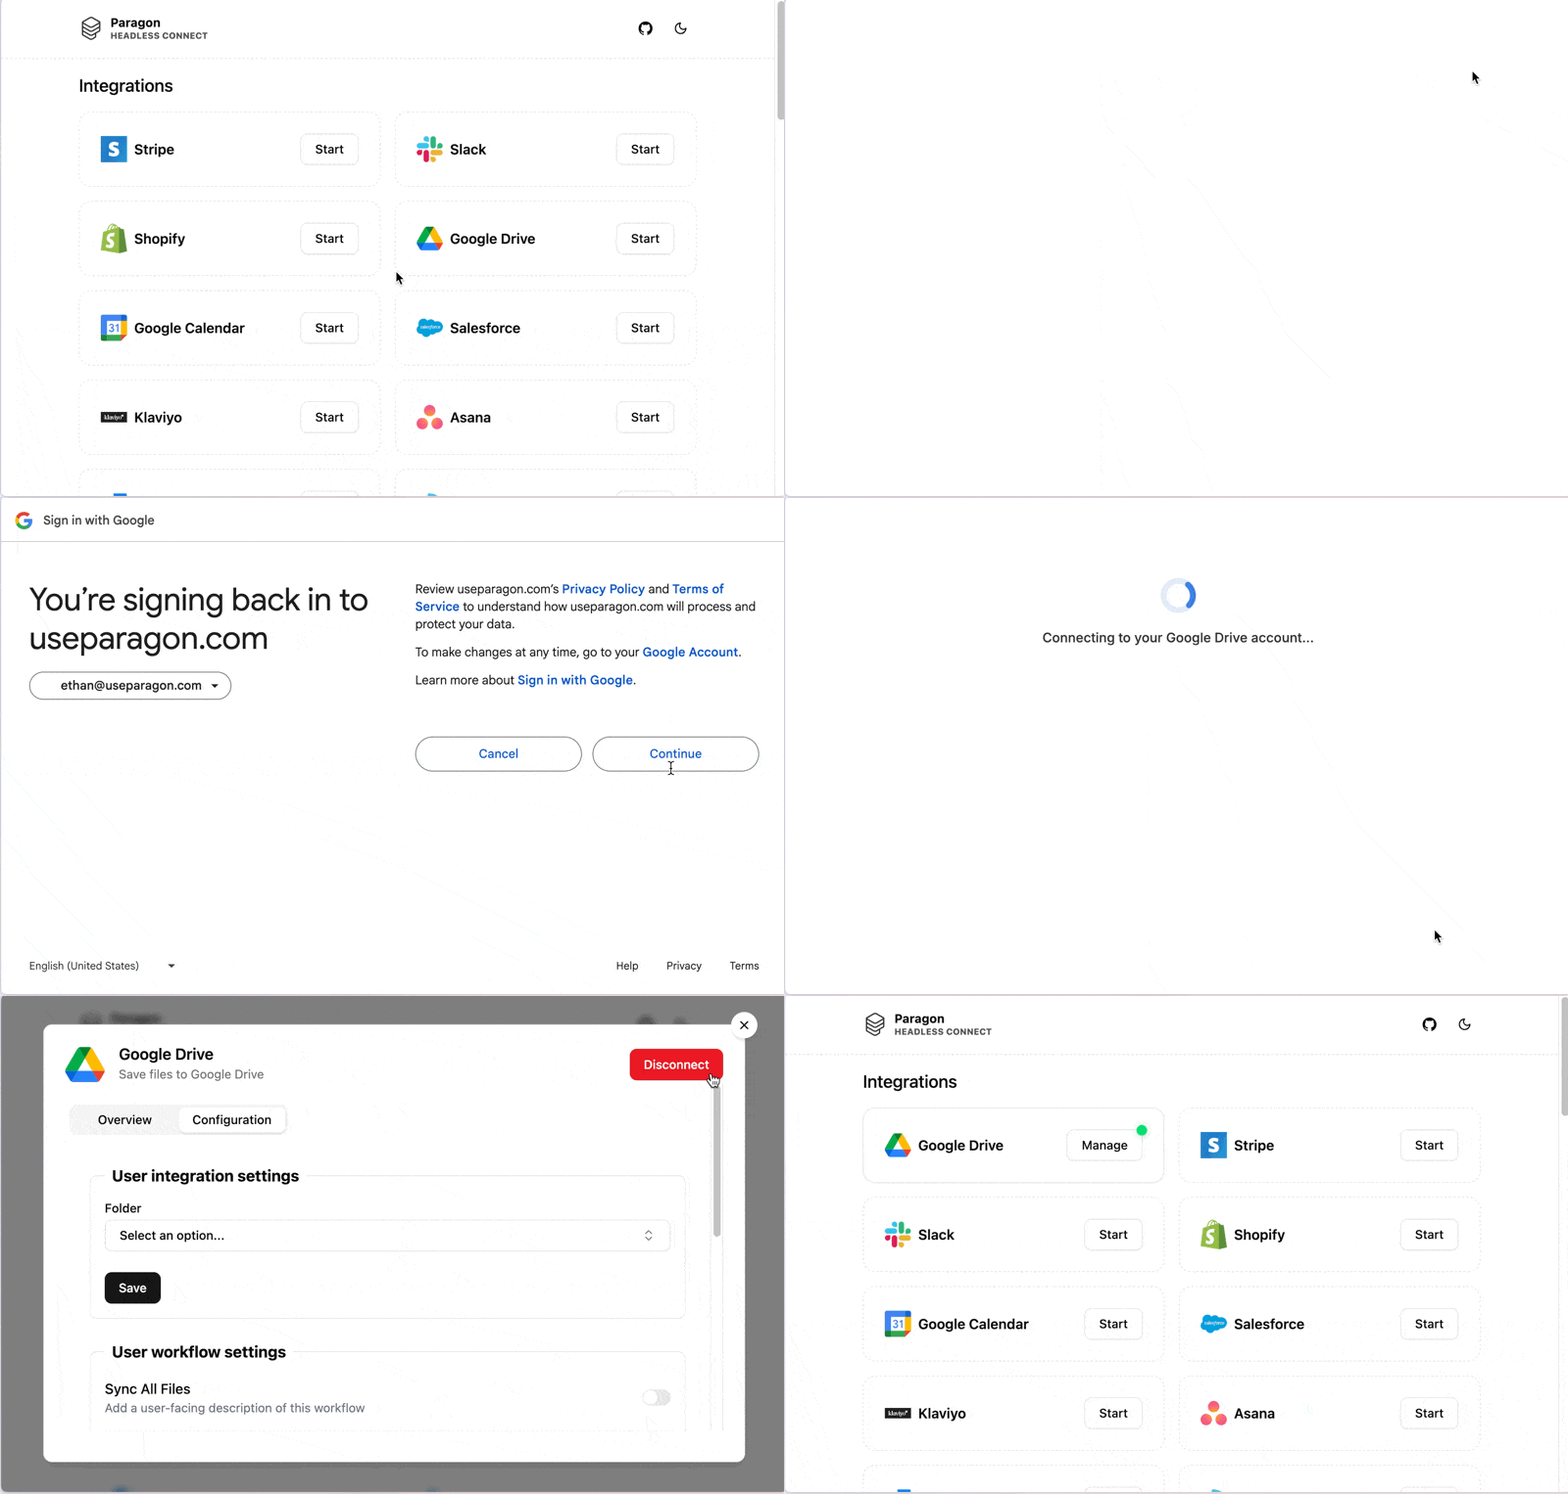
Below is an end-to-end example implemented with React and [shadcn/ui](https://ui.shadcn.com/) components (no pre-built Paragon components are used):
We have open-sourced the above implementation in a public repository here:
An end-to-end implementation example of the Headless Connect Portal using
React
You can use the example implementation or any of its components as a starting point for your application, or read on to learn how to implement it yourself.
## Usage
To implement the Headless Connect Portal, use the SDK to implement the following product surfaces in your app:
* **Integrations Catalog**: Listing all available integrations in a catalog to allow your users to discover integrations and connect their accounts.
* **Integration Install / Uninstall Flow**: Guiding your user through the install stages of any integration, including the OAuth 2.0 flow (if required for the integration)
* **User Settings and Workflow Configuration**: Providing inputs for users to configure [User Settings](/connect-portal/workflow-user-settings) for their integration.
Follow the sections below to learn how to implement each of these product surfaces using the Paragon SDK.
**Have you implemented SDK authentication?**
The Usage guide below assumes that you have already implemented the basics of SDK authentication described in [Getting Started](/getting-started/installing-the-connect-sdk). All of the functions below should be called *after* SDK authentication is completed.
### Enabling Headless Mode
To turn on Headless mode for the SDK, call the `paragon.setHeadless` function:
```js theme={null}
import { paragon } from "@useparagon/connect";
paragon.setHeadless(true);
```
This only needs to be called once after SDK initialization to use the Headless Connect Portal functions.
### Integrations Catalog
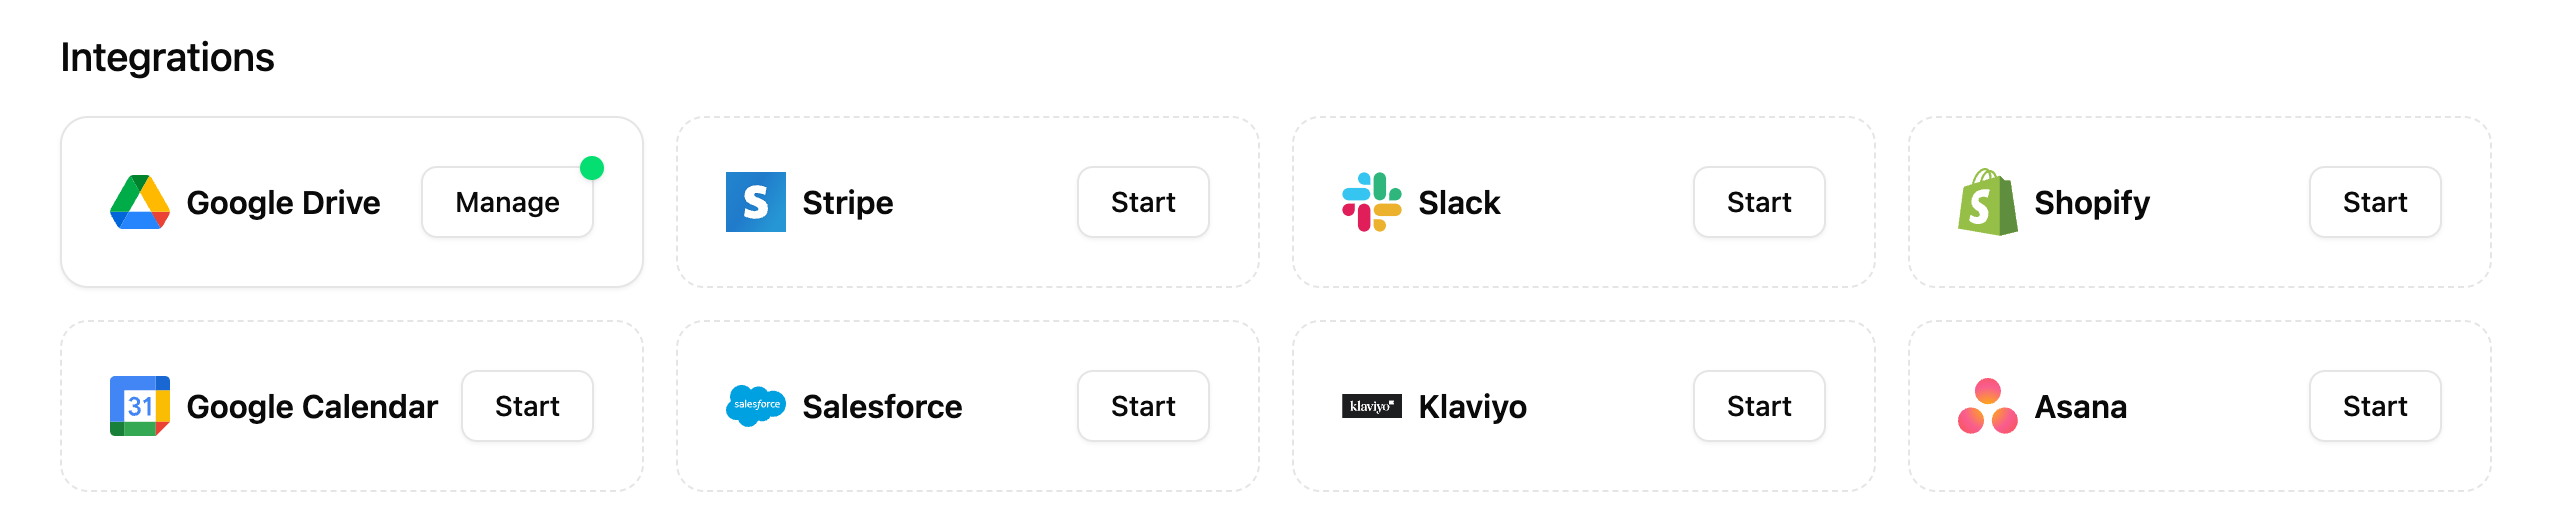
In your app's Integrations Catalog or Settings view, list available integrations from your Paragon project to allow your users to discover integrations and connect their accounts:
You can render this view by calling `paragon.getIntegrationMetadata`:
```js theme={null}
paragon.getIntegrationMetadata();
```
Each entry in the returned list will be an object with the integration's display metadata, including the brand name, icon, and accent color:
```js theme={null}
[
{
type: "salesforce",
name: "Salesforce",
brandColor: "#057ACF",
icon: "https://cdn.useparagon.com/latest/dashboard/public/integrations/salesforce.svg",
},
];
```
See our reference implementation of the Integrations Catalog in the example
repo.
Learn more about `paragon.getIntegrationMetadata` in the SDK Reference.
#### Integration Detail View
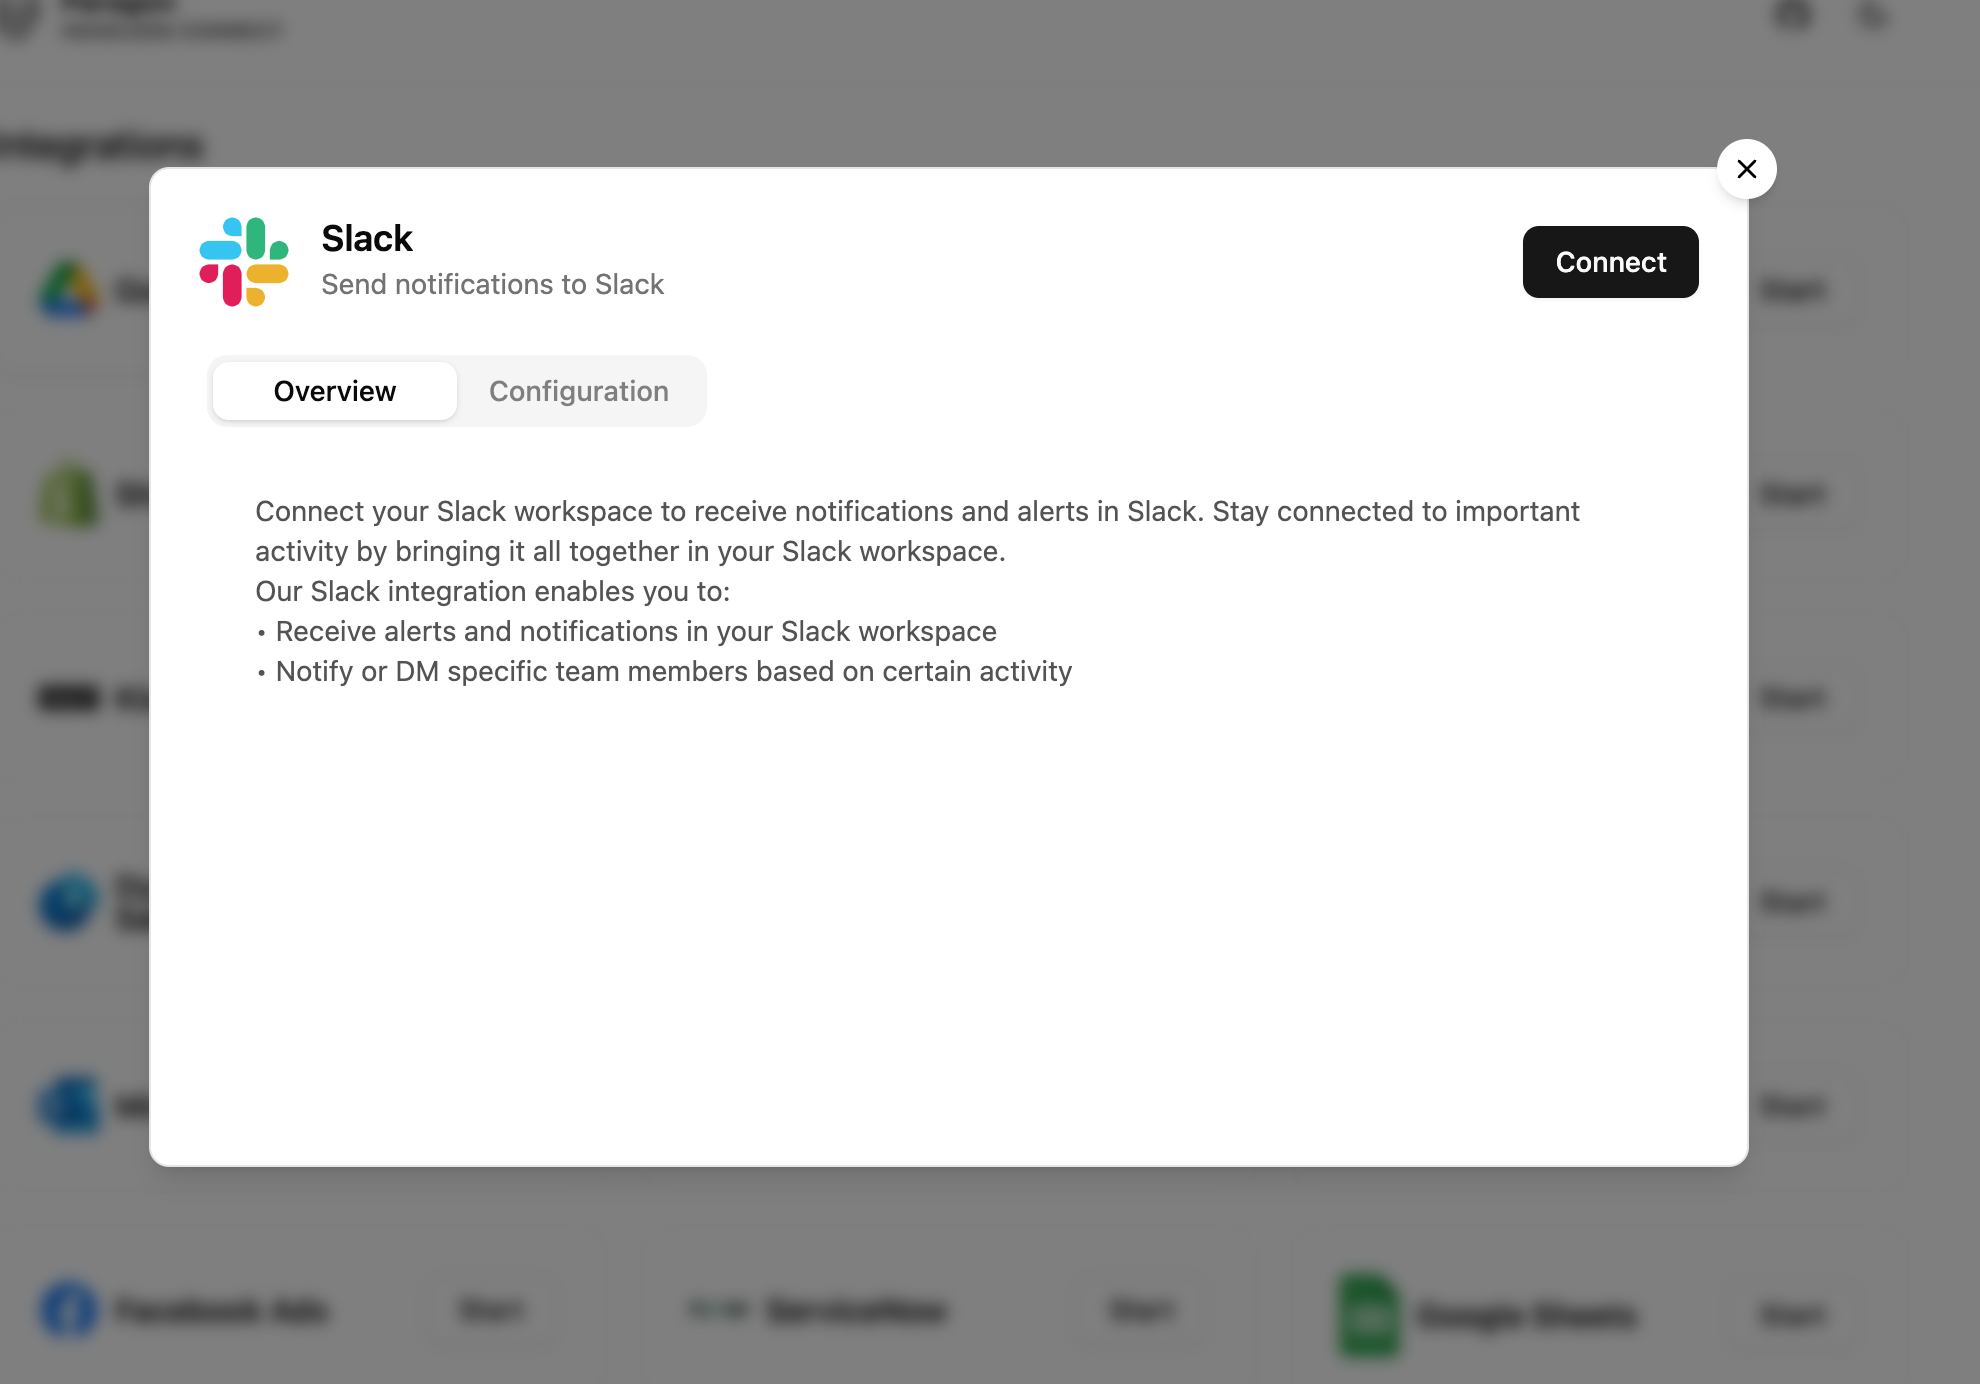
As a part of your catalog, you may want to show users additional information when they click on an integration (or inline with the catalog):
To get the additional user-facing descriptions and informational text about the integration [configured in your Paragon dashboard](/connect-portal/connect-portal-customization), use [`paragon.getIntegrationConfig`](/apis/api-reference#getintegrationconfig):
```js theme={null}
paragon.getIntegrationConfig("slack");
```
This will return an object with the descriptions, User Settings, and Workflows associated with the integration:
```json Response expandable theme={null}
{
"shortDescription": "Send notifications to Slack",
"longDescription": "Connect your Slack workspace to receive notifications and alerts in Slack. Stay connected to important activity by bringing it all together in your Slack workspace.\n\nOur Slack integration enables you to:\n\n• Receive alerts and notifications in your Slack workspace\n• Notify or DM specific team members based on certain activity",
"availableUserSettings": [
{
"id": "2d5662c9-6750-46c2-8588-2ac904532efb",
"type": "DYNAMIC_ENUM",
"title": "Channel",
"required": false,
"sourceType": "channels"
}
],
"availableWorkflows": [
{
"id": "2248335c-671c-47e4-b9a0-3641a9f2d301",
"inputs": [],
"infoText": "Send a Slack notification when a Task is created",
"defaultEnabled": false,
"description": "Send Slack Notification"
}
],
"hiddenWorkflows": []
}
```
See our reference implementation of the Integration Detail View in the
example repo.
Learn more about `paragon.getIntegrationConfig` in the SDK Reference.
#### Displaying Account State
To display your user's account connection status in the Integrations Catalog (for example, showing a "Manage" button instead of a "Connect" button for integrations they have already installed), call `paragon.getUser` to get the user's account state and `paragon.subscribe` to react to state changes.
```js Getting account state with getUser expandable theme={null}
paragon.getUser();
// Returns:
{
"authenticated": true,
"userId": "user-id",
"integrations": {
"salesforce": {
"enabled": false,
"configuredWorkflows": {}
},
"slack": {
"enabled": true,
"configuredWorkflows": {},
"credentialStatus": "VALID",
"credentialId": "81af6717-9476-458d-8c29-f0aee7ce6d12",
"providerId": "TM7FL705V",
"providerData": {}
},
"hubspot": {
"enabled": false,
"configuredWorkflows": {}
}
},
"meta": {}
}
```
We can use the result of this object to conditionally show a **Connect** or **Manage** button, depending on the value of `user.integrations[integrationType].enabled`.
You can also react to changes in your UI by setting up `paragon.subscribe` handlers:
```js Example component using subscribe() to react to user state changes expandable theme={null}
function MyComponent() {
const [user, setUser] = useState();
// Listen for account state changes
useEffect(() => {
const listener = () => {
if (paragon) {
const authedUser = paragon.getUser();
if (authedUser.authenticated) {
setUser({ ...authedUser });
}
}
};
listener();
paragon?.subscribe("onIntegrationInstall", listener);
paragon?.subscribe("onIntegrationUninstall", listener);
return () => {
paragon?.unsubscribe("onIntegrationInstall", listener);
paragon?.unsubscribe("onIntegrationUninstall", listener);
};
}, [paragon]);
}
```
Learn more about `paragon.getUser` in the SDK Reference.
### Integration Install / Uninstall Flow
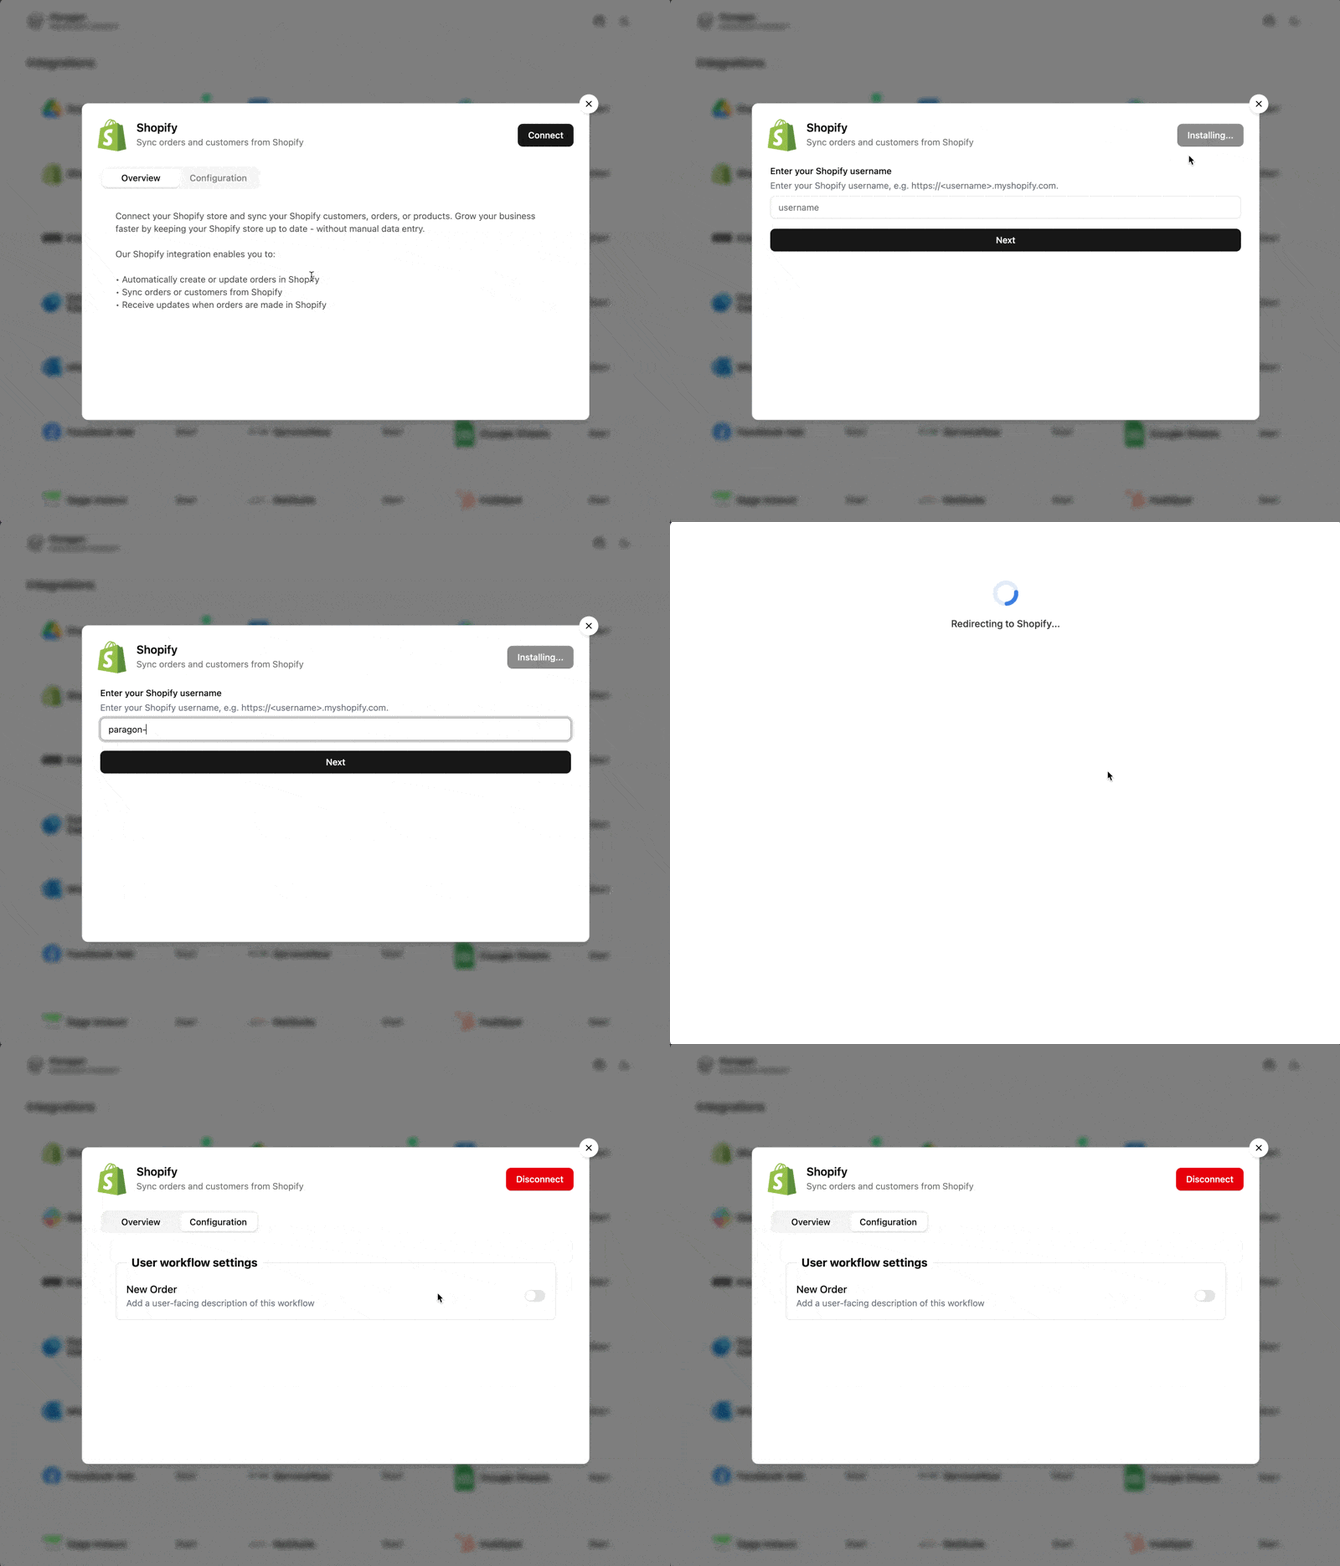
Once a user expresses intent to connect their account, guide them through an **Install Flow** using the Paragon SDK:
To implement an Install Flow, your app will need to handle the following stages of the installation process which should take place in your app (the stages used by each integration will vary):
* Account Type selection (e.g. Salesforce Production vs. Salesforce Sandbox) -- `AccountTypeStage`
* Pre-OAuth / API Key inputs (e.g. Stripe API Key input, Shopify Store URL) -- `PreOptionsStage`
* Post-OAuth inputs (e.g. Atlassian site, SharePoint site selection) -- `PostOptionsStage`
* Instructional content (e.g. Salesforce package installation) -- `InstructionStage`
See a full reference of install flow stages and their properties in the [SDK Reference](/apis/api-reference#installflowstage).
Any redirection or popup window that is required for OAuth will automatically occur between stages. The SDK will internally manage all state for the popup window and OAuth prompt, but if an error occurs during the install flow, you can receive errors using the `onError` callback and prompt users of any issues.
Begin an Install Flow by calling `paragon.installFlow.start`:
```js theme={null}
paragon.installFlow
.start(props.integration, {
onNext: (next) => {
// Handle next install stage by presenting or updating UI for user input
},
onComplete: () => {
// Installation has completed successfully
},
onError: (error, errorContext) => {
// Handle error messaging
}
});
```
After calling `.start`, you may receive required install stages in the `onNext` callback (depending on the specific install flow required by the integration).
To handle each of the install stages in your app, you will need to:
1. Receive the stage details in the `onNext` callback.
2. Render the appropriate UI for your user to provide the necessary details in that stage.
For the `PostOptionsStage`, refer to [the User Settings docs](#exposing-user-settings) below for help rendering integration-specific dropdown inputs.
3. Update SDK state with the user's inputs by calling one of:
* [`installFlow.setAccountType`](/apis/api-reference#installflowsetaccounttype)
* [`installFlow.setPreOptions`](/apis/api-reference#installflowsetpreoptions)
* [`installFlow.setPostOptions`](/apis/api-reference#installflowsetpostoptions)
#### Example Install Flow
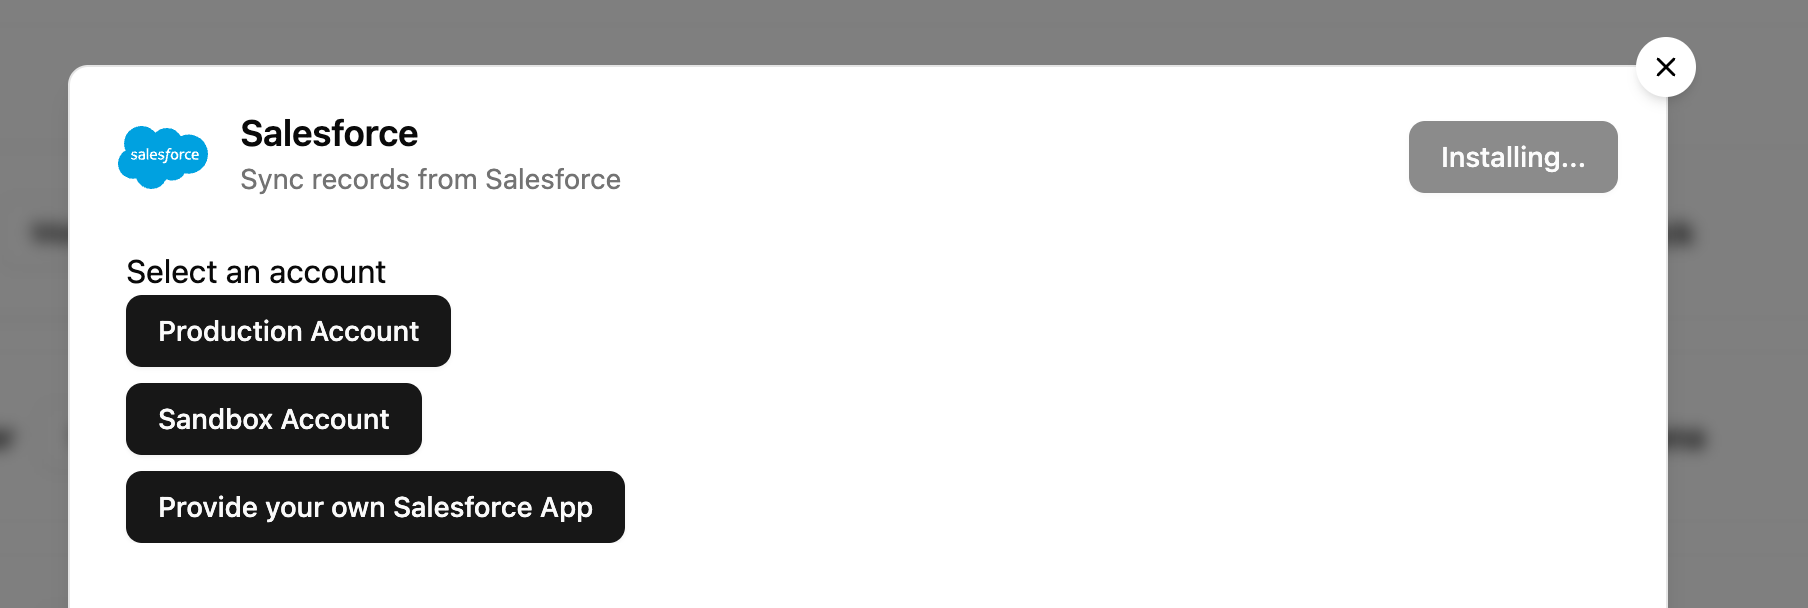
Here's a step-by-step example for how these stages would be implemented for Salesforce account types:
1. **Receive the `AccountTypeStage` in `onNext` handler:**
```js theme={null}
paragon.installFlow.start("salesforce", {
onNext: (next) => {
if (next.stage === "accountType") {
setAccountTypes(next.stage.options);
// [{ "id": "default", "accountDescription": "Production Account", "scheme": "oauth" }, {...}, {...}]
}
},
});
```
2. **Render account type options for your user to select the available types:**
```jsx theme={null}
return accountTypes.map((accountType) => {
return (
);
});
```
3. **Update SDK state with the user's inputs:**
Bind the `onClick` handler for the account type selection buttons to confirm the user's selection and start the OAuth flow.
```jsx theme={null}
return accountTypes.map((accountType) => {
return (
);
});
```
To implement the other Install Flows, check out our example implementation or SDK Reference:
See our reference implementation of the Integration Install Flow in the
example repo.
Learn more about `paragon.installFlow` and all related methods in the SDK Reference.
#### Uninstalling Integrations
When a user requests to disconnect their account, call `paragon.uninstallIntegration` to remove their account:
```js theme={null}
async function onClickUninstall() {
setUninstalling(true);
await paragon.uninstallIntegration(props.integration);
setUninstalling(false);
}
```
This function returns a Promise that resolves when the account has been fully disconnected from Paragon (including any workflows or settings they may have configured).
Learn more about `paragon.uninstallIntegration` in the SDK Reference.
### User Settings and Workflow Configuration
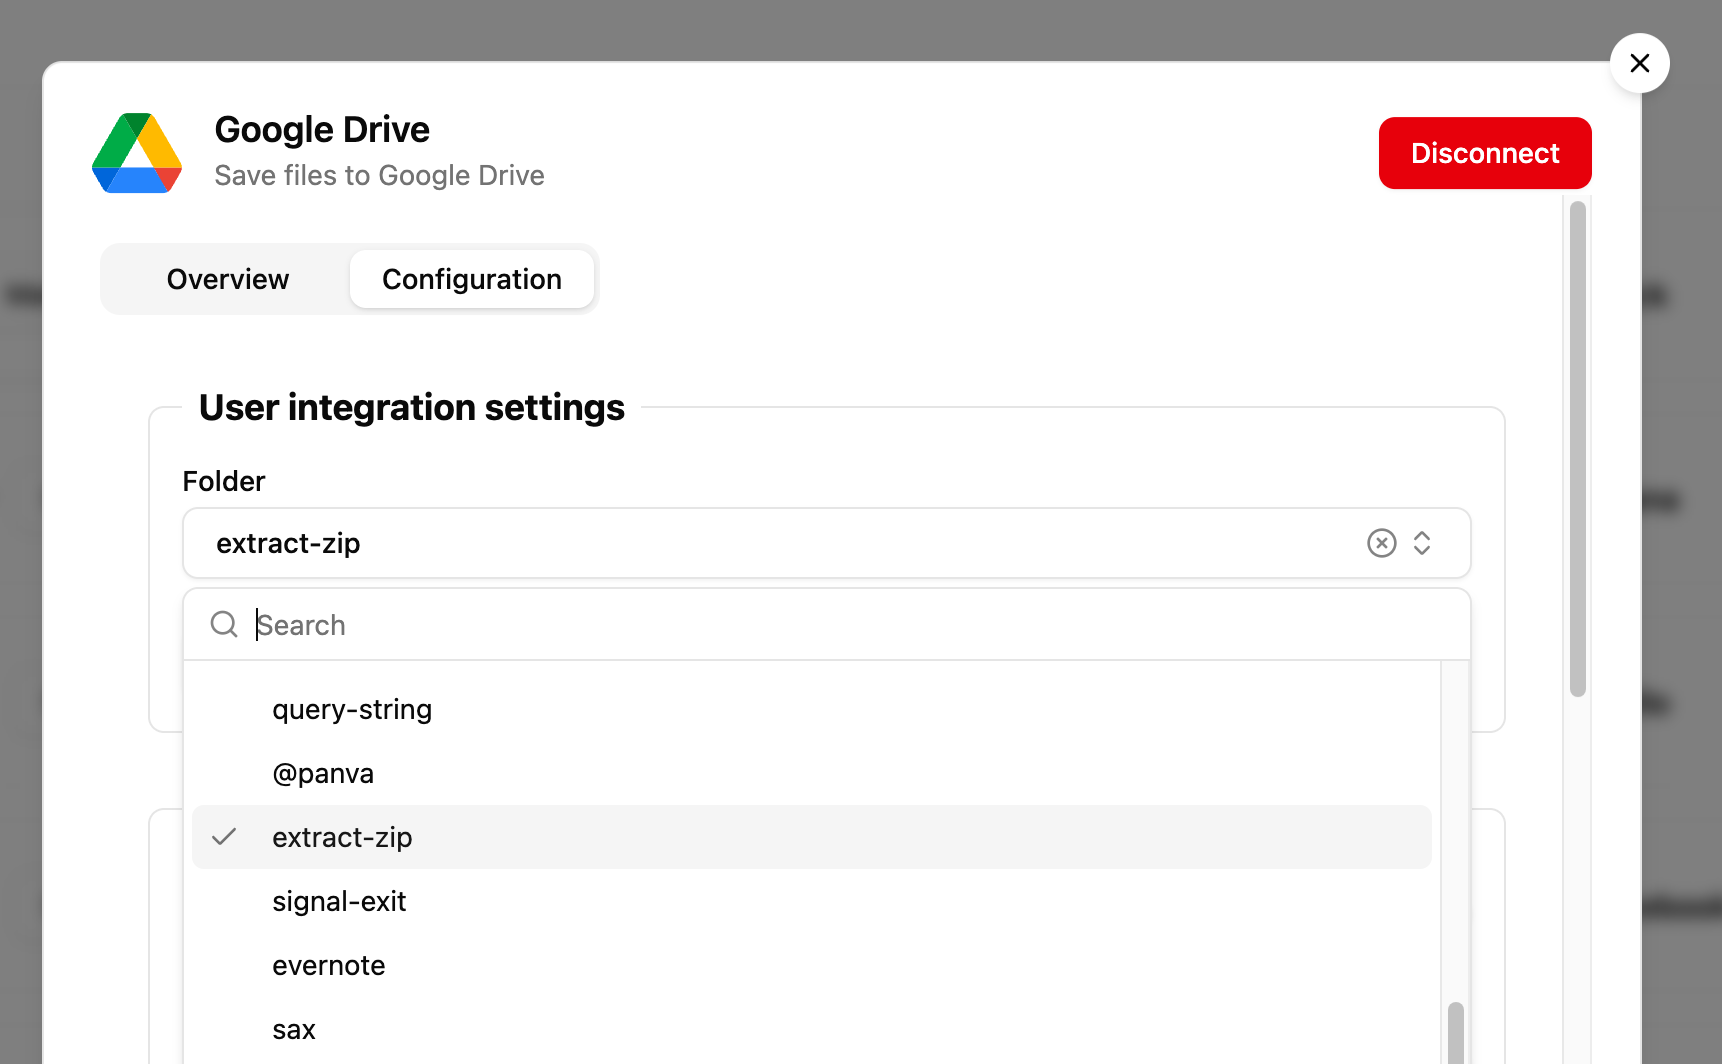
After your user has connected an integration, show a Configuration screen with your configured [User Settings](/connect-portal/workflow-user-settings) to customize their integration, like a Salesforce Field Mapping or a Google Drive Folder to sync files from.
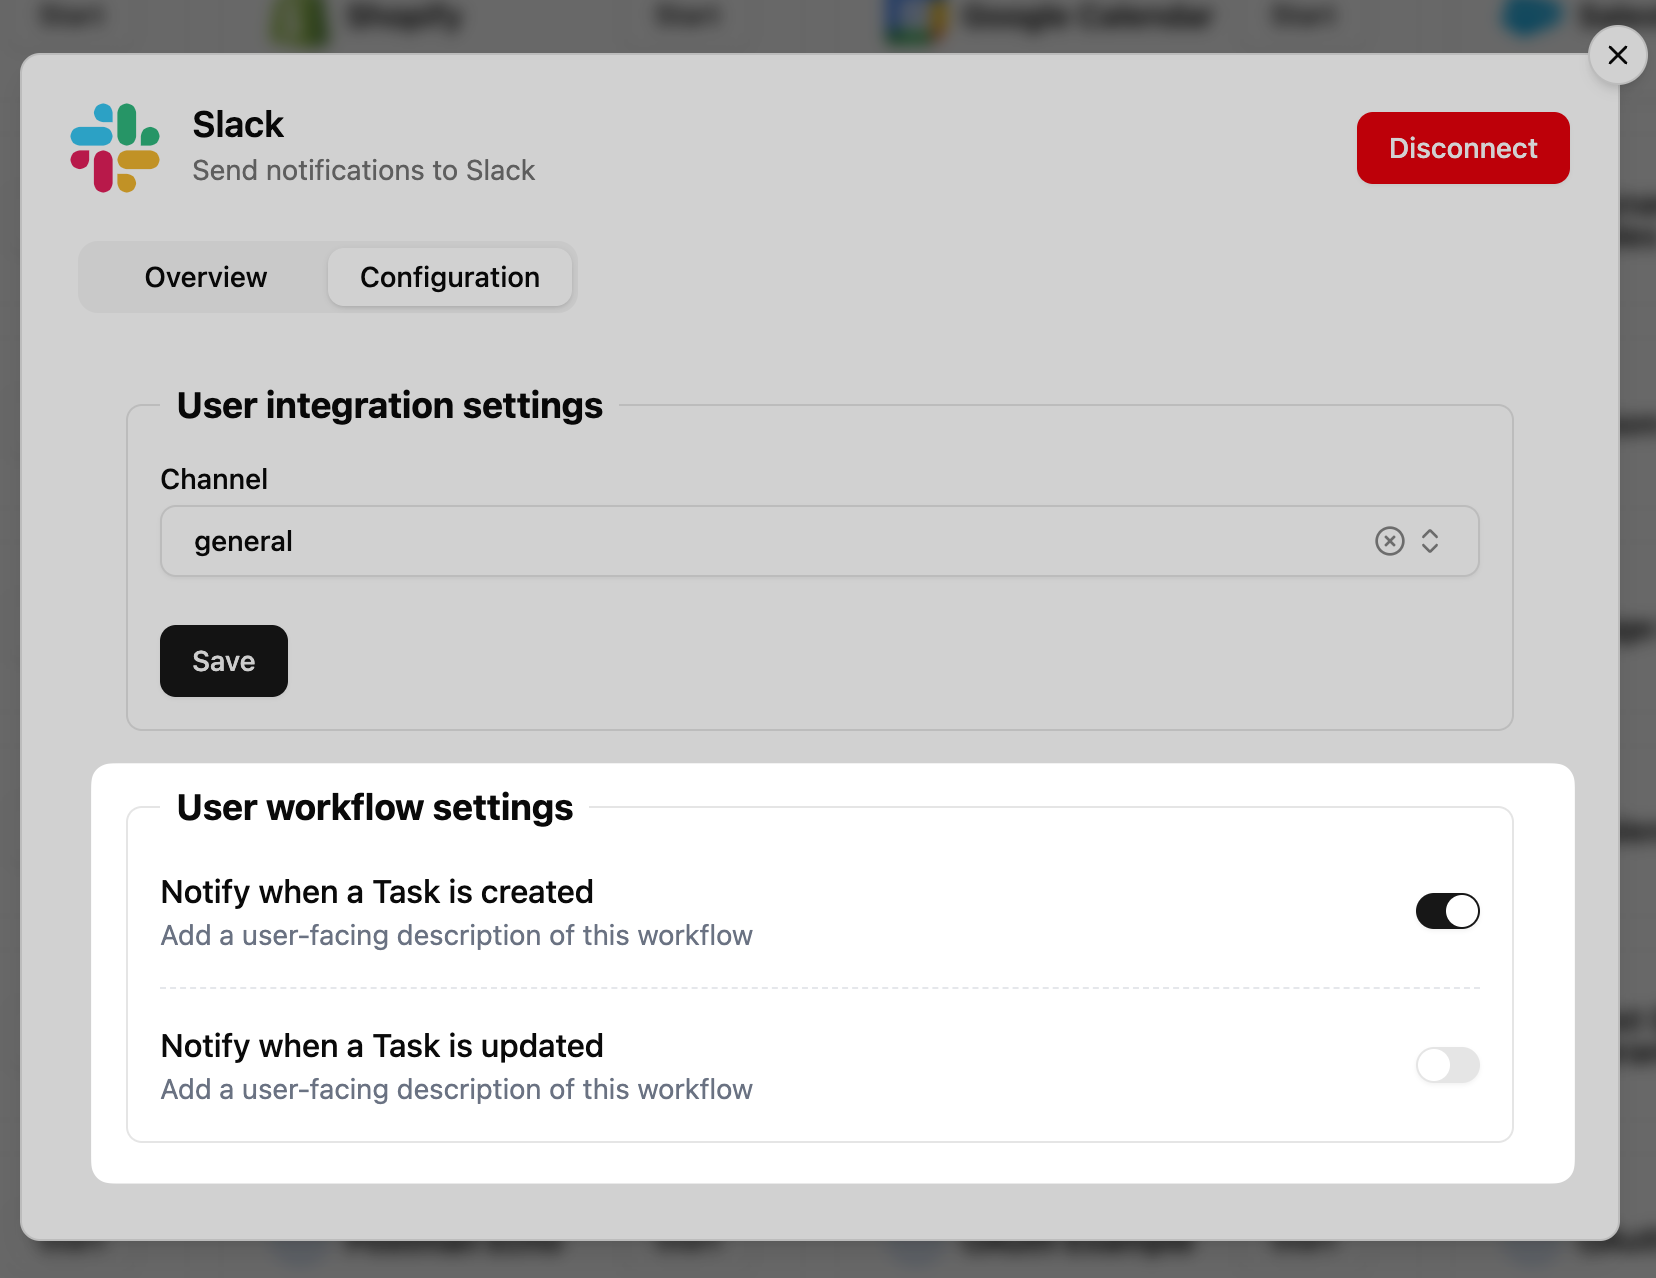
If you are using [Workflows](/workflows/overview) and want your users to have controls to opt-in or out of specific Workflows, you can render toggles to enable or disable Workflows.
You can use the [`paragon.getIntegrationConfig`](/apis/api-reference#getintegrationconfig) method to get all the User Settings that you have configured for this integration's Connect Portal:
```js theme={null}
paragon.getIntegrationConfig(type);
```
User Settings will be available as the `availableUserSettings` key of the response.
```json Response focus={2-10} expandable theme={null}
{
"availableUserSettings": [
{
"id": "2d5662c9-6750-46c2-8588-2ac904532efb",
"type": "DYNAMIC_ENUM",
"title": "Channel",
"required": false,
"sourceType": "channels"
}
],
"shortDescription": "Send notifications to Slack",
"longDescription": "Connect your Slack workspace to receive notifications and alerts in Slack. Stay connected to important activity by bringing it all together in your Slack workspace.\n\nOur Slack integration enables you to:\n\n• Receive alerts and notifications in your Slack workspace\n• Notify or DM specific team members based on certain activity",
"availableWorkflows": [
{
"id": "2248335c-671c-47e4-b9a0-3641a9f2d301",
"inputs": [],
"infoText": "Send a Slack notification when a Task is created",
"defaultEnabled": false,
"description": "Send Slack Notification"
}
],
"hiddenWorkflows": []
}
```
#### Exposing User Settings
User Settings are inputs that appear during the install or configure stage of the Connect Portal, like the Folder input in the example above. Your implementation should render inputs when:
* Your user is prompted with pre-OAuth options (`PreOptionsStage`)
* Your user is prompted with post-OAuth options (`PostOptionsStage`)
* For both `PreOptionsStage` and `PostOptionsStage`, User Settings objects can be found in `stage.options`.
* Your user is configuring integration-level or workflow-level [User Settings](/connect-portal/workflow-user-settings)
* User Settings objects can be found in [`paragon.getIntegrationConfig`](/apis/api-reference#getintegrationconfig), under `availableUserSettings` and `availableWorkflows[n].inputs`.
Some User Settings (such as `SidebarInputType.DynamicEnum` or `SidebarInputType.FieldMapping`) will require you to render a dynamic list of options from the integration (a "data source"). You can use the following functions to help load this list:
* [`paragon.getSourcesForInput`](/apis/api-reference#getsourcesforinput) - Get the data sources needed to render a dynamic input. Returns the appropriate data source objects which can be passed directly to `paragon.getFieldOptions`.
* [`paragon.getFieldOptions`](/apis/api-reference#getfieldoptions) - Load a page of options from a data source to show in a dropdown input.
```js DynamicEnum input expandable theme={null}
let config = paragon.getIntegrationConfig("slack");
let input = config.availableUserSettings[0];
// { id: "...", type: "DYNAMIC_ENUM", title: "Channel", sourceType: "channels" }
let sources = paragon.getSourcesForInput("slack", input);
// { kind: "single", source: { type: "DYNAMIC_DATA_SOURCE", cacheKey: "channels", ... } }
// Load options using the source object:
if (sources?.kind === "single") {
await paragon.getFieldOptions({
integration: "slack",
source: sources.source,
});
// { data: [{ label: "#general", value: "general" }, ...], nextPageCursor: "..." }
}
```
For compound inputs like Field Mapping, `paragon.getSourcesForInput` returns all the necessary data sources at once:
```js Field Mapping input expandable theme={null}
let config = paragon.getIntegrationConfig("salesforce");
let input = config.availableUserSettings[0];
// { id: "...", type: "FIELD_MAPPER", title: "Map fields for a Task", sourceType: "customObjectMapping" }
let sources = paragon.getSourcesForInput("salesforce", input);
// { kind: "fieldMapper", recordSource: {...}, fieldSource: {...} }
if (sources?.kind === "fieldMapper") {
// Load Record Types:
await paragon.getFieldOptions({
integration: "salesforce",
source: sources.recordSource,
});
// Load Fields for a selected record type:
await paragon.getFieldOptions({
integration: "salesforce",
source: sources.fieldSource,
parameters: [{
key: sources.recordSource.cacheKey,
source: { type: "VALUE", value: "Task" },
}],
});
}
```
You can see a full list of input types that are used by the Connect Portal and must be rendered by your implementation in [Input Types Reference](/connect-portal/input-types-reference). Alternatively, you can start by using our React-based input renderer in our [reference implementation](https://github.com/useparagon/connect-headless-example/blob/main/src/components/feature/integration/integration-modal/components/integration-settings.tsx).
#### Defining Custom Data Sources
If your Connect Portal inputs use [Custom Dropdowns](/connect-portal/workflow-user-settings/custom-dropdowns) or Field Mapping with your own integration or application fields, you can use [`paragon.setDataSources`](/apis/api-reference#setdatasources) to register these data sources with the SDK.
Call `paragon.setDataSources` once after enabling headless mode, before rendering any inputs:
```js theme={null}
paragon.setHeadless(true);
paragon.setDataSources({
dropdowns: {
my_custom_dropdown: [
{ label: "Option A", value: "a" },
{ label: "Option B", value: "b" },
],
},
integrationSpecificSources: {
salesforce: {
dropdowns: {
departments: [
{ label: "Engineering", value: "eng" },
{ label: "Sales", value: "sales" },
],
},
},
},
});
```
Data sources registered with `paragon.setDataSources` are automatically resolved by `paragon.getSourcesForInput` and `paragon.getFieldOptions`. Integration-specific sources take priority over global sources when the same key is used.
Learn more about `paragon.setDataSources` and its configuration options in the SDK Reference.
Once user input is collected, you can save the values back to Paragon using one of the following functions, depending on the input's context:
* [`setPreOptions`](/apis/api-reference#installflowsetpreoptions) - Save pre-OAuth options and start the OAuth flow.
* [`setPostOptions`](/apis/api-reference#installflowsetpostoptions) - Save post-OAuth options and complete account connection.
* [`paragon.updateIntegrationUserSettings`](/apis/api-reference#updateintegrationusersettings) - Save integration-level User Settings.
* [`paragon.updateWorkflowUserSettings`](/apis/api-reference#updateworkflowusersettings) - Save workflow-level User Settings.
See our reference implementation of User Settings in the
example repo.
Learn more about the different Input Types to implement in our reference.
#### Exposing Workflow Configuration
In the Configuration tab of the headful Connect Portal, a list of Workflows appears as a list of toggles that users can opt-in or out of. This is not required if you do not use Workflows are your Workflows are set to be [enabled by default](/connect-portal/displaying-workflows#default-to-enabled).
* To render the list of available Workflows, you can use [`paragon.getIntegrationConfig`](/apis/api-reference#getintegrationconfig) and read the `availableWorkflows` key.
* To see what Workflows the user has enabled, you can use [`paragon.getUser`](/apis/api-reference#getuser) and read `user.integrations[].configuredWorkflows[].enabled`.
```js Getting Workflow state expandable theme={null}
paragon.getUser();
// Response:
{
"integrations": {
"slack": {
// (other properties excluded for brevity)
"configuredWorkflows": {
"7b516f0f-2581-470f-a26d-72dfa7b9b554": {
"enabled": false,
"settings": {}
}
}
}
}
}
```
* To toggle a Workflow on or off for a user, you can use [`paragon.updateWorkflowState`](/apis/api-reference#updateworkflowstate) to pass a partial update object of the Workflows that should be enabled or disabled for a user.
```js Updating Workflow state theme={null}
paragon.updateWorkflowState({
// [Workflow UUID]: boolean
"7b516f0f-2581-470f-a26d-72dfa7b9b554": true,
});
```
See our reference implementation of User Settings in the
example repo.
Learn more about the `paragon.updateWorkflowState` method in the SDK Reference.
## Multiple Account Authorization
When implementing the Headless Connect Portal for [Multiple Account Authorization](/apis/api-reference/multi-account-authorization), you'll need to update your UI to handle listing multiple connections for a given integration.
You can use `selectedCredentialId` in the following SDK functions to ensure that the right account is used in multi-account setups:
* [`paragon.updateIntegrationUserSettings`](/apis/api-reference#updateintegrationusersettings)
```js theme={null}
paragon.updateIntegrationUserSettings("googledrive", {
[selectedInput.id]: newValue,
}, {
selectedCredentialId: "376910a0-74aa-4e5e-88ab-122a7fb20a56",
});
```
* [`paragon.updateWorkflowUserSettings`](/apis/api-reference#updateworkflowusersettings)
```js theme={null}
paragon.updateWorkflowUserSettings("googledrive", selectedWorkflow.id, {
[selectedInput.id]: newValue,
}, {
selectedCredentialId: "376910a0-74aa-4e5e-88ab-122a7fb20a56",
});
```
* [`paragon.updateWorkflowState`](/apis/api-reference#updateworkflowstate)
```js theme={null}
paragon.updateWorkflowState({
"7b516f0f-2581-470f-a26d-72dfa7b9b554": true,
}, {
selectedCredentialId: "376910a0-74aa-4e5e-88ab-122a7fb20a56",
});
```
* [`paragon.uninstallIntegration`](/apis/api-reference#uninstallintegration)
```js theme={null}
paragon.uninstallIntegration("googledrive", {
selectedCredentialId: "376910a0-74aa-4e5e-88ab-122a7fb20a56",
});
```
* [`paragon.getFieldOptions`](/apis/api-reference#getfieldoptions)
```js theme={null}
paragon.getFieldOptions({
integration: "googledrive",
action: "folders",
selectedCredentialId: "376910a0-74aa-4e5e-88ab-122a7fb20a56",
});
```
In all of the above, you can get the Credential ID for an account from [`paragon.getUser`](/apis/api-reference#getuser), in `user.integrations[].allCredentials[n].id`.
## SDK Reference
The SDK includes the key functions below that should be used when implementing the Headless Connect Portal. Find more details about each function (including parameter types and return values) in the linked reference page.
* [`paragon.getIntegrationMetadata`](/apis/api-reference#getintegrationmetadata): Returns display and branding information for integrations in your project, including a display name and icon.
* [`paragon.installFlow.start`](/apis/api-reference#installflowstart): Prompts the user for third-party authorization details to connect their account. This function should be used when a user expresses intent to install your integration, for example: from a "Connect" button in your integrations catalog.
* [`paragon.installFlow.setAccountType`](/apis/api-reference#installflowsetaccounttype): Sets the account type for an integration being actively installed.
* [`paragon.installFlow.setPreOptions`](/apis/api-reference#installflowsetpreoptions): Sets the pre-OAuth options for an integration being actively installed.
* [`paragon.installFlow.setPostOptions`](/apis/api-reference#installflowsetpostoptions): Sets the post-OAuth options for an integration being actively installed.
* [`paragon.uninstallIntegration`](/apis/api-reference#uninstallintegration): Disconnects the user's account.
* [`paragon.getIntegrationConfig`](/apis/api-reference#getintegrationconfig): Returns the configuration for an integration, including its available User Settings and Workflows.
* [`paragon.getUser`](/apis/api-reference#getuser): Returns the current state of the user, with their integrations and account statuses.
* [`paragon.updateIntegrationUserSettings`](/apis/api-reference#updateintegrationusersettings): Updates integration-level User Settings values.
* [`paragon.updateWorkflowUserSettings`](/apis/api-reference#updateworkflowusersettings): Updates workflow-level User Settings values.
* [`paragon.updateWorkflowState`](/apis/api-reference#updateworkflowstate): Enables or disables Workflows for a user.
* [`paragon.setDataSources`](/apis/api-reference#setdatasources): Registers custom data sources for dropdown and field mapping inputs, globally or per-integration. *(SDK 2.3.0+)*
* [`paragon.getSourcesForInput`](/apis/api-reference#getsourcesforinput): Returns the data sources needed to render a specific input, which can be passed directly to `paragon.getFieldOptions`. *(SDK 2.3.0+)*
* [`paragon.getFieldOptions`](/apis/api-reference#getfieldoptions): Returns integration-specific options for dynamic User Settings, such as Dynamic Enum or Field Mapping inputs.
* [`paragon.getDataSourceOptions`](/apis/api-reference#getdatasourceoptions): For compound inputs, returns the configuration for each data source needed to render the input.
 We have open-sourced the above implementation in a public repository here:
 You can render this view by calling `paragon.getIntegrationMetadata`:
```js theme={null}
paragon.getIntegrationMetadata();
```
Each entry in the returned list will be an object with the integration's display metadata, including the brand name, icon, and accent color:
```js theme={null}
[
{
type: "salesforce",
name: "Salesforce",
brandColor: "#057ACF",
icon: "https://cdn.useparagon.com/latest/dashboard/public/integrations/salesforce.svg",
},
];
```
You can render this view by calling `paragon.getIntegrationMetadata`:
```js theme={null}
paragon.getIntegrationMetadata();
```
Each entry in the returned list will be an object with the integration's display metadata, including the brand name, icon, and accent color:
```js theme={null}
[
{
type: "salesforce",
name: "Salesforce",
brandColor: "#057ACF",
icon: "https://cdn.useparagon.com/latest/dashboard/public/integrations/salesforce.svg",
},
];
```
 To get the additional user-facing descriptions and informational text about the integration [configured in your Paragon dashboard](/connect-portal/connect-portal-customization), use [`paragon.getIntegrationConfig`](/apis/api-reference#getintegrationconfig):
```js theme={null}
paragon.getIntegrationConfig("slack");
```
This will return an object with the descriptions, User Settings, and Workflows associated with the integration:
```json Response expandable theme={null}
{
"shortDescription": "Send notifications to Slack",
"longDescription": "Connect your Slack workspace to receive notifications and alerts in Slack. Stay connected to important activity by bringing it all together in your Slack workspace.\n\nOur Slack integration enables you to:\n\n• Receive alerts and notifications in your Slack workspace\n• Notify or DM specific team members based on certain activity",
"availableUserSettings": [
{
"id": "2d5662c9-6750-46c2-8588-2ac904532efb",
"type": "DYNAMIC_ENUM",
"title": "Channel",
"required": false,
"sourceType": "channels"
}
],
"availableWorkflows": [
{
"id": "2248335c-671c-47e4-b9a0-3641a9f2d301",
"inputs": [],
"infoText": "Send a Slack notification when a Task is created",
"defaultEnabled": false,
"description": "Send Slack Notification"
}
],
"hiddenWorkflows": []
}
```
To get the additional user-facing descriptions and informational text about the integration [configured in your Paragon dashboard](/connect-portal/connect-portal-customization), use [`paragon.getIntegrationConfig`](/apis/api-reference#getintegrationconfig):
```js theme={null}
paragon.getIntegrationConfig("slack");
```
This will return an object with the descriptions, User Settings, and Workflows associated with the integration:
```json Response expandable theme={null}
{
"shortDescription": "Send notifications to Slack",
"longDescription": "Connect your Slack workspace to receive notifications and alerts in Slack. Stay connected to important activity by bringing it all together in your Slack workspace.\n\nOur Slack integration enables you to:\n\n• Receive alerts and notifications in your Slack workspace\n• Notify or DM specific team members based on certain activity",
"availableUserSettings": [
{
"id": "2d5662c9-6750-46c2-8588-2ac904532efb",
"type": "DYNAMIC_ENUM",
"title": "Channel",
"required": false,
"sourceType": "channels"
}
],
"availableWorkflows": [
{
"id": "2248335c-671c-47e4-b9a0-3641a9f2d301",
"inputs": [],
"infoText": "Send a Slack notification when a Task is created",
"defaultEnabled": false,
"description": "Send Slack Notification"
}
],
"hiddenWorkflows": []
}
```
 To implement an Install Flow, your app will need to handle the following stages of the installation process which should take place in your app (the stages used by each integration will vary):
* Account Type selection (e.g. Salesforce Production vs. Salesforce Sandbox) -- `AccountTypeStage`
* Pre-OAuth / API Key inputs (e.g. Stripe API Key input, Shopify Store URL) -- `PreOptionsStage`
* Post-OAuth inputs (e.g. Atlassian site, SharePoint site selection) -- `PostOptionsStage`
* Instructional content (e.g. Salesforce package installation) -- `InstructionStage`
To implement an Install Flow, your app will need to handle the following stages of the installation process which should take place in your app (the stages used by each integration will vary):
* Account Type selection (e.g. Salesforce Production vs. Salesforce Sandbox) -- `AccountTypeStage`
* Pre-OAuth / API Key inputs (e.g. Stripe API Key input, Shopify Store URL) -- `PreOptionsStage`
* Post-OAuth inputs (e.g. Atlassian site, SharePoint site selection) -- `PostOptionsStage`
* Instructional content (e.g. Salesforce package installation) -- `InstructionStage`
 3. **Update SDK state with the user's inputs:**
Bind the `onClick` handler for the account type selection buttons to confirm the user's selection and start the OAuth flow.
```jsx theme={null}
return accountTypes.map((accountType) => {
return (
);
});
```
To implement the other Install Flows, check out our example implementation or SDK Reference:
3. **Update SDK state with the user's inputs:**
Bind the `onClick` handler for the account type selection buttons to confirm the user's selection and start the OAuth flow.
```jsx theme={null}
return accountTypes.map((accountType) => {
return (
);
});
```
To implement the other Install Flows, check out our example implementation or SDK Reference:
 You can use the [`paragon.getIntegrationConfig`](/apis/api-reference#getintegrationconfig) method to get all the User Settings that you have configured for this integration's Connect Portal:
```js theme={null}
paragon.getIntegrationConfig(type);
```
User Settings will be available as the `availableUserSettings` key of the response.
```json Response focus={2-10} expandable theme={null}
{
"availableUserSettings": [
{
"id": "2d5662c9-6750-46c2-8588-2ac904532efb",
"type": "DYNAMIC_ENUM",
"title": "Channel",
"required": false,
"sourceType": "channels"
}
],
"shortDescription": "Send notifications to Slack",
"longDescription": "Connect your Slack workspace to receive notifications and alerts in Slack. Stay connected to important activity by bringing it all together in your Slack workspace.\n\nOur Slack integration enables you to:\n\n• Receive alerts and notifications in your Slack workspace\n• Notify or DM specific team members based on certain activity",
"availableWorkflows": [
{
"id": "2248335c-671c-47e4-b9a0-3641a9f2d301",
"inputs": [],
"infoText": "Send a Slack notification when a Task is created",
"defaultEnabled": false,
"description": "Send Slack Notification"
}
],
"hiddenWorkflows": []
}
```
#### Exposing User Settings
User Settings are inputs that appear during the install or configure stage of the Connect Portal, like the Folder input in the example above. Your implementation should render inputs when:
* Your user is prompted with pre-OAuth options (`PreOptionsStage`)
* Your user is prompted with post-OAuth options (`PostOptionsStage`)
* For both `PreOptionsStage` and `PostOptionsStage`, User Settings objects can be found in `stage.options`.
* Your user is configuring integration-level or workflow-level [User Settings](/connect-portal/workflow-user-settings)
* User Settings objects can be found in [`paragon.getIntegrationConfig`](/apis/api-reference#getintegrationconfig), under `availableUserSettings` and `availableWorkflows[n].inputs`.
Some User Settings (such as `SidebarInputType.DynamicEnum` or `SidebarInputType.FieldMapping`) will require you to render a dynamic list of options from the integration (a "data source"). You can use the following functions to help load this list:
* [`paragon.getSourcesForInput`](/apis/api-reference#getsourcesforinput) - Get the data sources needed to render a dynamic input. Returns the appropriate data source objects which can be passed directly to `paragon.getFieldOptions`.
* [`paragon.getFieldOptions`](/apis/api-reference#getfieldoptions) - Load a page of options from a data source to show in a dropdown input.
```js DynamicEnum input expandable theme={null}
let config = paragon.getIntegrationConfig("slack");
let input = config.availableUserSettings[0];
// { id: "...", type: "DYNAMIC_ENUM", title: "Channel", sourceType: "channels" }
let sources = paragon.getSourcesForInput("slack", input);
// { kind: "single", source: { type: "DYNAMIC_DATA_SOURCE", cacheKey: "channels", ... } }
// Load options using the source object:
if (sources?.kind === "single") {
await paragon.getFieldOptions({
integration: "slack",
source: sources.source,
});
// { data: [{ label: "#general", value: "general" }, ...], nextPageCursor: "..." }
}
```
For compound inputs like Field Mapping, `paragon.getSourcesForInput` returns all the necessary data sources at once:
```js Field Mapping input expandable theme={null}
let config = paragon.getIntegrationConfig("salesforce");
let input = config.availableUserSettings[0];
// { id: "...", type: "FIELD_MAPPER", title: "Map fields for a Task", sourceType: "customObjectMapping" }
let sources = paragon.getSourcesForInput("salesforce", input);
// { kind: "fieldMapper", recordSource: {...}, fieldSource: {...} }
if (sources?.kind === "fieldMapper") {
// Load Record Types:
await paragon.getFieldOptions({
integration: "salesforce",
source: sources.recordSource,
});
// Load Fields for a selected record type:
await paragon.getFieldOptions({
integration: "salesforce",
source: sources.fieldSource,
parameters: [{
key: sources.recordSource.cacheKey,
source: { type: "VALUE", value: "Task" },
}],
});
}
```
You can see a full list of input types that are used by the Connect Portal and must be rendered by your implementation in [Input Types Reference](/connect-portal/input-types-reference). Alternatively, you can start by using our React-based input renderer in our [reference implementation](https://github.com/useparagon/connect-headless-example/blob/main/src/components/feature/integration/integration-modal/components/integration-settings.tsx).
#### Defining Custom Data Sources
If your Connect Portal inputs use [Custom Dropdowns](/connect-portal/workflow-user-settings/custom-dropdowns) or Field Mapping with your own integration or application fields, you can use [`paragon.setDataSources`](/apis/api-reference#setdatasources) to register these data sources with the SDK.
Call `paragon.setDataSources` once after enabling headless mode, before rendering any inputs:
```js theme={null}
paragon.setHeadless(true);
paragon.setDataSources({
dropdowns: {
my_custom_dropdown: [
{ label: "Option A", value: "a" },
{ label: "Option B", value: "b" },
],
},
integrationSpecificSources: {
salesforce: {
dropdowns: {
departments: [
{ label: "Engineering", value: "eng" },
{ label: "Sales", value: "sales" },
],
},
},
},
});
```
Data sources registered with `paragon.setDataSources` are automatically resolved by `paragon.getSourcesForInput` and `paragon.getFieldOptions`. Integration-specific sources take priority over global sources when the same key is used.
You can use the [`paragon.getIntegrationConfig`](/apis/api-reference#getintegrationconfig) method to get all the User Settings that you have configured for this integration's Connect Portal:
```js theme={null}
paragon.getIntegrationConfig(type);
```
User Settings will be available as the `availableUserSettings` key of the response.
```json Response focus={2-10} expandable theme={null}
{
"availableUserSettings": [
{
"id": "2d5662c9-6750-46c2-8588-2ac904532efb",
"type": "DYNAMIC_ENUM",
"title": "Channel",
"required": false,
"sourceType": "channels"
}
],
"shortDescription": "Send notifications to Slack",
"longDescription": "Connect your Slack workspace to receive notifications and alerts in Slack. Stay connected to important activity by bringing it all together in your Slack workspace.\n\nOur Slack integration enables you to:\n\n• Receive alerts and notifications in your Slack workspace\n• Notify or DM specific team members based on certain activity",
"availableWorkflows": [
{
"id": "2248335c-671c-47e4-b9a0-3641a9f2d301",
"inputs": [],
"infoText": "Send a Slack notification when a Task is created",
"defaultEnabled": false,
"description": "Send Slack Notification"
}
],
"hiddenWorkflows": []
}
```
#### Exposing User Settings
User Settings are inputs that appear during the install or configure stage of the Connect Portal, like the Folder input in the example above. Your implementation should render inputs when:
* Your user is prompted with pre-OAuth options (`PreOptionsStage`)
* Your user is prompted with post-OAuth options (`PostOptionsStage`)
* For both `PreOptionsStage` and `PostOptionsStage`, User Settings objects can be found in `stage.options`.
* Your user is configuring integration-level or workflow-level [User Settings](/connect-portal/workflow-user-settings)
* User Settings objects can be found in [`paragon.getIntegrationConfig`](/apis/api-reference#getintegrationconfig), under `availableUserSettings` and `availableWorkflows[n].inputs`.
Some User Settings (such as `SidebarInputType.DynamicEnum` or `SidebarInputType.FieldMapping`) will require you to render a dynamic list of options from the integration (a "data source"). You can use the following functions to help load this list:
* [`paragon.getSourcesForInput`](/apis/api-reference#getsourcesforinput) - Get the data sources needed to render a dynamic input. Returns the appropriate data source objects which can be passed directly to `paragon.getFieldOptions`.
* [`paragon.getFieldOptions`](/apis/api-reference#getfieldoptions) - Load a page of options from a data source to show in a dropdown input.
```js DynamicEnum input expandable theme={null}
let config = paragon.getIntegrationConfig("slack");
let input = config.availableUserSettings[0];
// { id: "...", type: "DYNAMIC_ENUM", title: "Channel", sourceType: "channels" }
let sources = paragon.getSourcesForInput("slack", input);
// { kind: "single", source: { type: "DYNAMIC_DATA_SOURCE", cacheKey: "channels", ... } }
// Load options using the source object:
if (sources?.kind === "single") {
await paragon.getFieldOptions({
integration: "slack",
source: sources.source,
});
// { data: [{ label: "#general", value: "general" }, ...], nextPageCursor: "..." }
}
```
For compound inputs like Field Mapping, `paragon.getSourcesForInput` returns all the necessary data sources at once:
```js Field Mapping input expandable theme={null}
let config = paragon.getIntegrationConfig("salesforce");
let input = config.availableUserSettings[0];
// { id: "...", type: "FIELD_MAPPER", title: "Map fields for a Task", sourceType: "customObjectMapping" }
let sources = paragon.getSourcesForInput("salesforce", input);
// { kind: "fieldMapper", recordSource: {...}, fieldSource: {...} }
if (sources?.kind === "fieldMapper") {
// Load Record Types:
await paragon.getFieldOptions({
integration: "salesforce",
source: sources.recordSource,
});
// Load Fields for a selected record type:
await paragon.getFieldOptions({
integration: "salesforce",
source: sources.fieldSource,
parameters: [{
key: sources.recordSource.cacheKey,
source: { type: "VALUE", value: "Task" },
}],
});
}
```
You can see a full list of input types that are used by the Connect Portal and must be rendered by your implementation in [Input Types Reference](/connect-portal/input-types-reference). Alternatively, you can start by using our React-based input renderer in our [reference implementation](https://github.com/useparagon/connect-headless-example/blob/main/src/components/feature/integration/integration-modal/components/integration-settings.tsx).
#### Defining Custom Data Sources
If your Connect Portal inputs use [Custom Dropdowns](/connect-portal/workflow-user-settings/custom-dropdowns) or Field Mapping with your own integration or application fields, you can use [`paragon.setDataSources`](/apis/api-reference#setdatasources) to register these data sources with the SDK.
Call `paragon.setDataSources` once after enabling headless mode, before rendering any inputs:
```js theme={null}
paragon.setHeadless(true);
paragon.setDataSources({
dropdowns: {
my_custom_dropdown: [
{ label: "Option A", value: "a" },
{ label: "Option B", value: "b" },
],
},
integrationSpecificSources: {
salesforce: {
dropdowns: {
departments: [
{ label: "Engineering", value: "eng" },
{ label: "Sales", value: "sales" },
],
},
},
},
});
```
Data sources registered with `paragon.setDataSources` are automatically resolved by `paragon.getSourcesForInput` and `paragon.getFieldOptions`. Integration-specific sources take priority over global sources when the same key is used.
 In the Configuration tab of the headful Connect Portal, a list of Workflows appears as a list of toggles that users can opt-in or out of. This is not required if you do not use Workflows are your Workflows are set to be [enabled by default](/connect-portal/displaying-workflows#default-to-enabled).
* To render the list of available Workflows, you can use [`paragon.getIntegrationConfig`](/apis/api-reference#getintegrationconfig) and read the `availableWorkflows` key.
* To see what Workflows the user has enabled, you can use [`paragon.getUser`](/apis/api-reference#getuser) and read `user.integrations[].configuredWorkflows[].enabled`.
```js Getting Workflow state expandable theme={null}
paragon.getUser();
// Response:
{
"integrations": {
"slack": {
// (other properties excluded for brevity)
"configuredWorkflows": {
"7b516f0f-2581-470f-a26d-72dfa7b9b554": {
"enabled": false,
"settings": {}
}
}
}
}
}
```
* To toggle a Workflow on or off for a user, you can use [`paragon.updateWorkflowState`](/apis/api-reference#updateworkflowstate) to pass a partial update object of the Workflows that should be enabled or disabled for a user.
```js Updating Workflow state theme={null}
paragon.updateWorkflowState({
// [Workflow UUID]: boolean
"7b516f0f-2581-470f-a26d-72dfa7b9b554": true,
});
```
In the Configuration tab of the headful Connect Portal, a list of Workflows appears as a list of toggles that users can opt-in or out of. This is not required if you do not use Workflows are your Workflows are set to be [enabled by default](/connect-portal/displaying-workflows#default-to-enabled).
* To render the list of available Workflows, you can use [`paragon.getIntegrationConfig`](/apis/api-reference#getintegrationconfig) and read the `availableWorkflows` key.
* To see what Workflows the user has enabled, you can use [`paragon.getUser`](/apis/api-reference#getuser) and read `user.integrations[].configuredWorkflows[].enabled`.
```js Getting Workflow state expandable theme={null}
paragon.getUser();
// Response:
{
"integrations": {
"slack": {
// (other properties excluded for brevity)
"configuredWorkflows": {
"7b516f0f-2581-470f-a26d-72dfa7b9b554": {
"enabled": false,
"settings": {}
}
}
}
}
}
```
* To toggle a Workflow on or off for a user, you can use [`paragon.updateWorkflowState`](/apis/api-reference#updateworkflowstate) to pass a partial update object of the Workflows that should be enabled or disabled for a user.
```js Updating Workflow state theme={null}
paragon.updateWorkflowState({
// [Workflow UUID]: boolean
"7b516f0f-2581-470f-a26d-72dfa7b9b554": true,
});
```