> ## Documentation Index
> Fetch the complete documentation index at: https://docs.useparagon.com/llms.txt
> Use this file to discover all available pages before exploring further.
# Field Mapping
> Use a Field Mapping User Setting to allow your users to define a mapping between objects in your application and their integration.
## Overview
A **Field Mapping** is a type of User Setting that allows your users to define a mapping between an object in your application (an "Application Object") and an object in their connected integration account (an "Integration Object").
For example: let's say your integration needs to sync your user's Task records from your application to their Tasks in a Salesforce account.
To do that, you'll need to build up a **Mapping** between fields in your application's Tasks and fields for a Task in a connected Salesforce account, as illustrated below:
.png?fit=max&auto=format&n=jCM_Y_j0HttScr1R&q=85&s=0e6afb5d0827964ff1aaad7badd45728) To enable your user to provide this Mapping, you can use the Connect Portal to provide a User Setting that displays each field of a Task (Title, Description, Completed) and prompts them to select a matching field of a Salesforce Task.
To enable your user to provide this Mapping, you can use the Connect Portal to provide a User Setting that displays each field of a Task (Title, Description, Completed) and prompts them to select a matching field of a Salesforce Task.
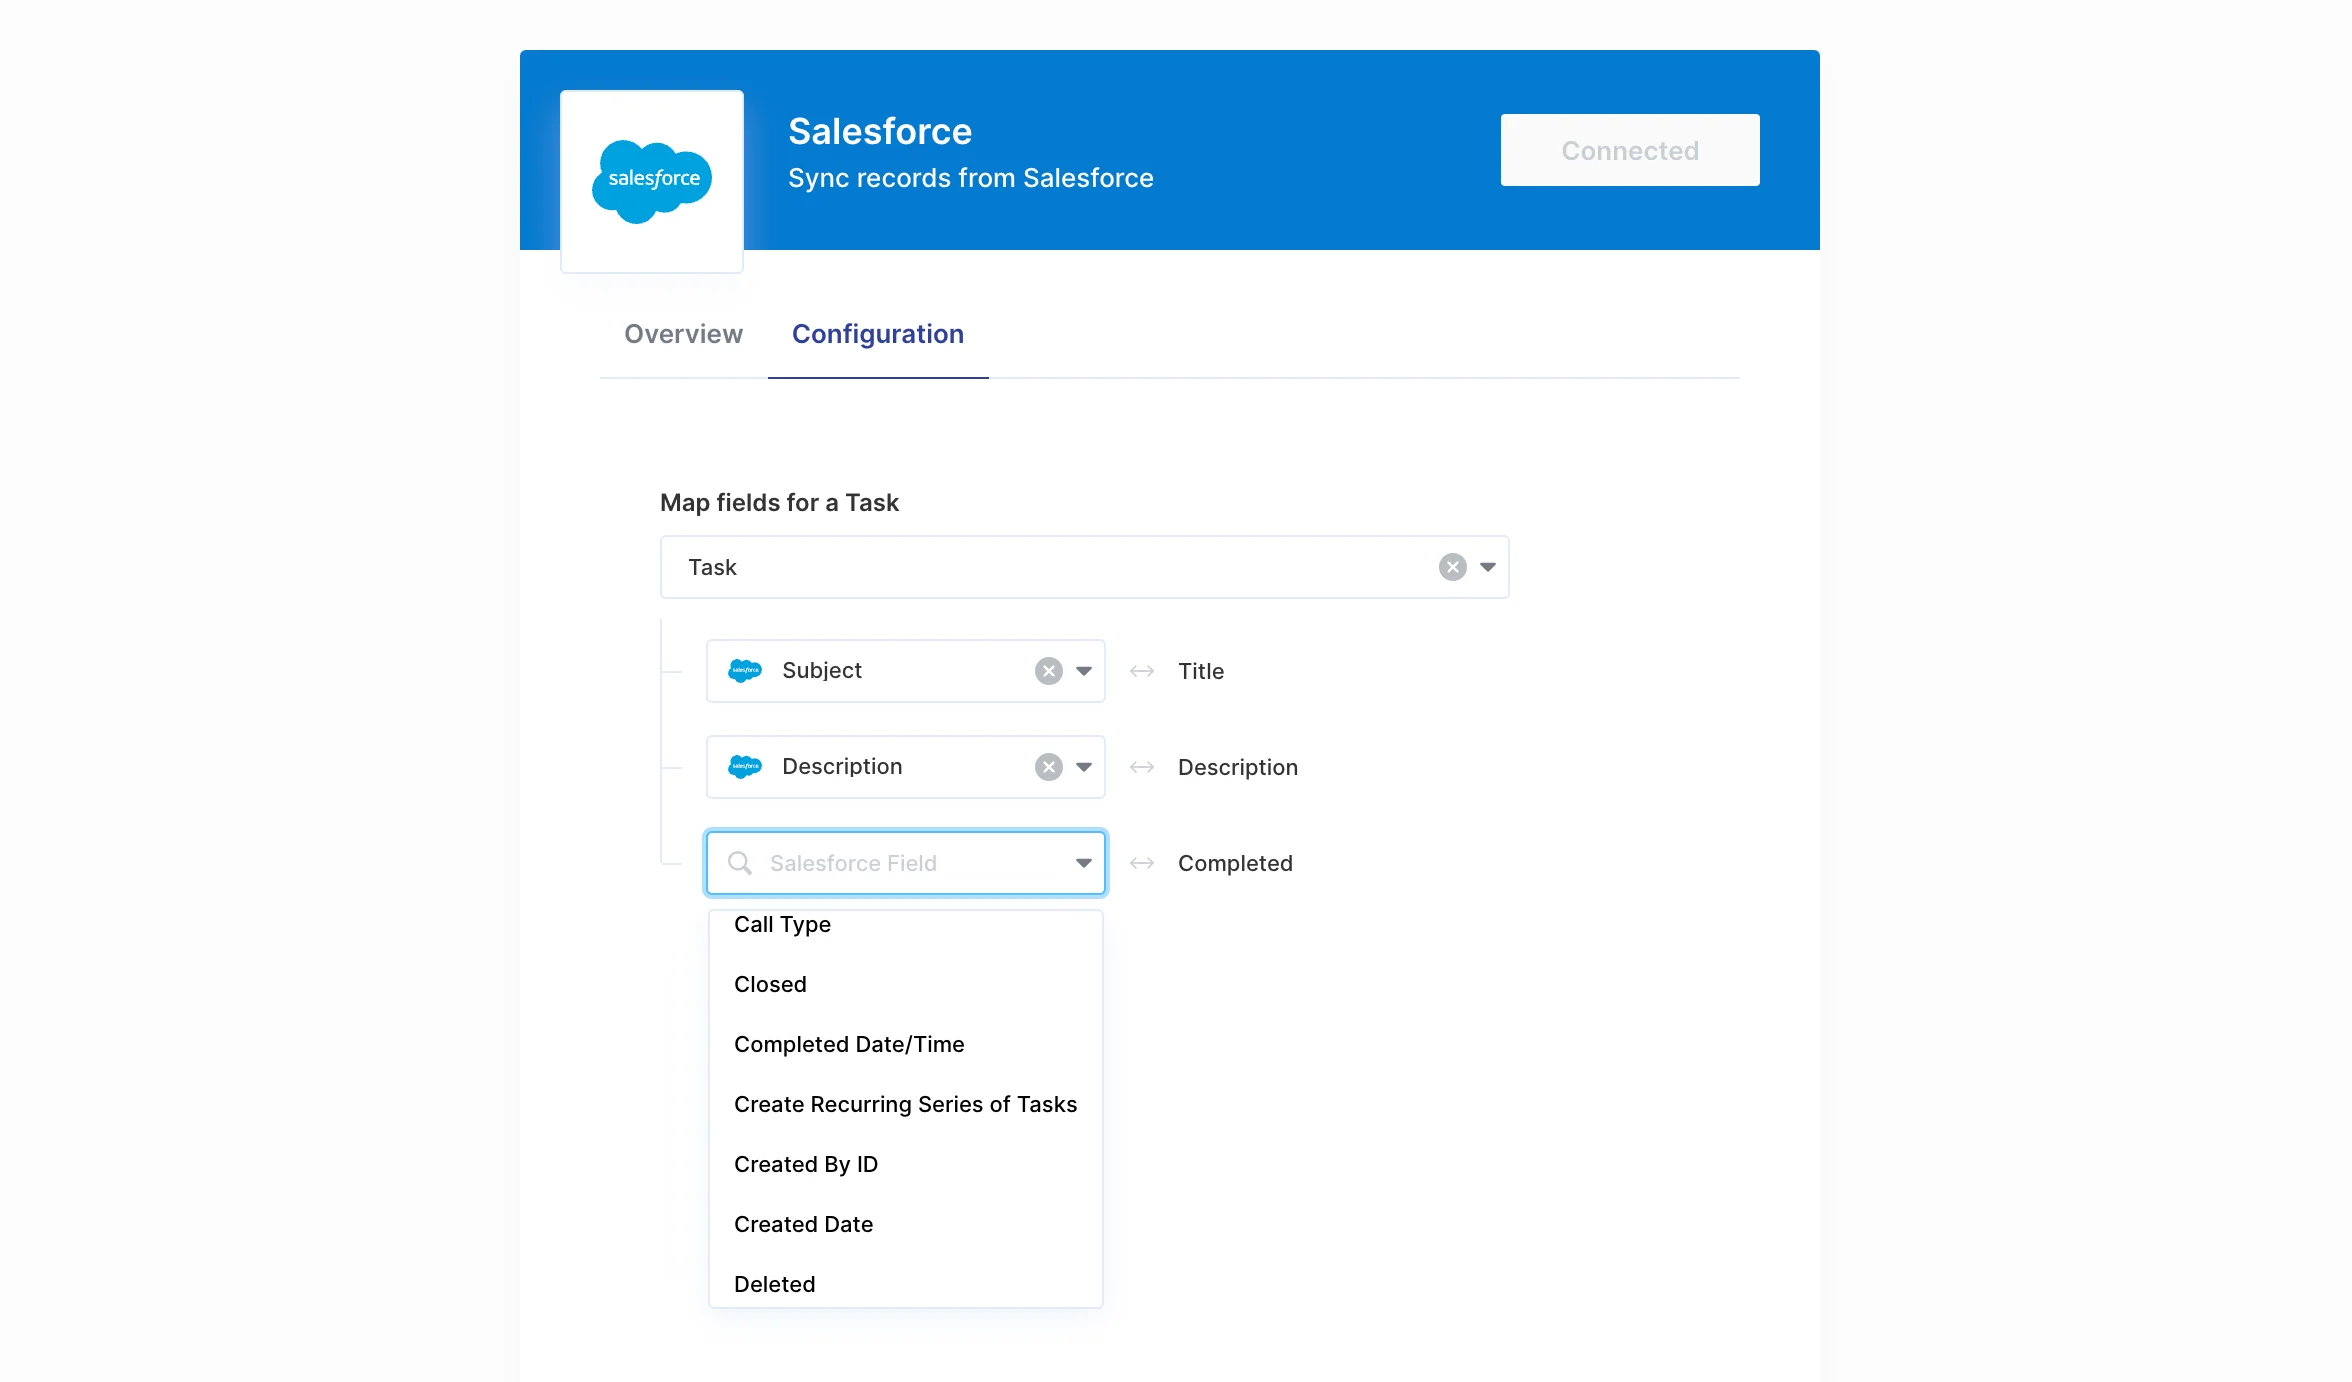 Once this Mapping is completed, you're able to use the Mapping like any other [User Setting](/connect-portal/workflow-user-settings/workflow-user-settings#user-settings) in the [Workflow Editor](/connect-portal/field-mapping#usage-in-workflows) to transform objects in either direction (from Application Object to Integration Object **or** from Integration Object to Application Object).
## Adding Field Mapping to the Connect Portal
Once this Mapping is completed, you're able to use the Mapping like any other [User Setting](/connect-portal/workflow-user-settings/workflow-user-settings#user-settings) in the [Workflow Editor](/connect-portal/field-mapping#usage-in-workflows) to transform objects in either direction (from Application Object to Integration Object **or** from Integration Object to Application Object).
## Adding Field Mapping to the Connect Portal
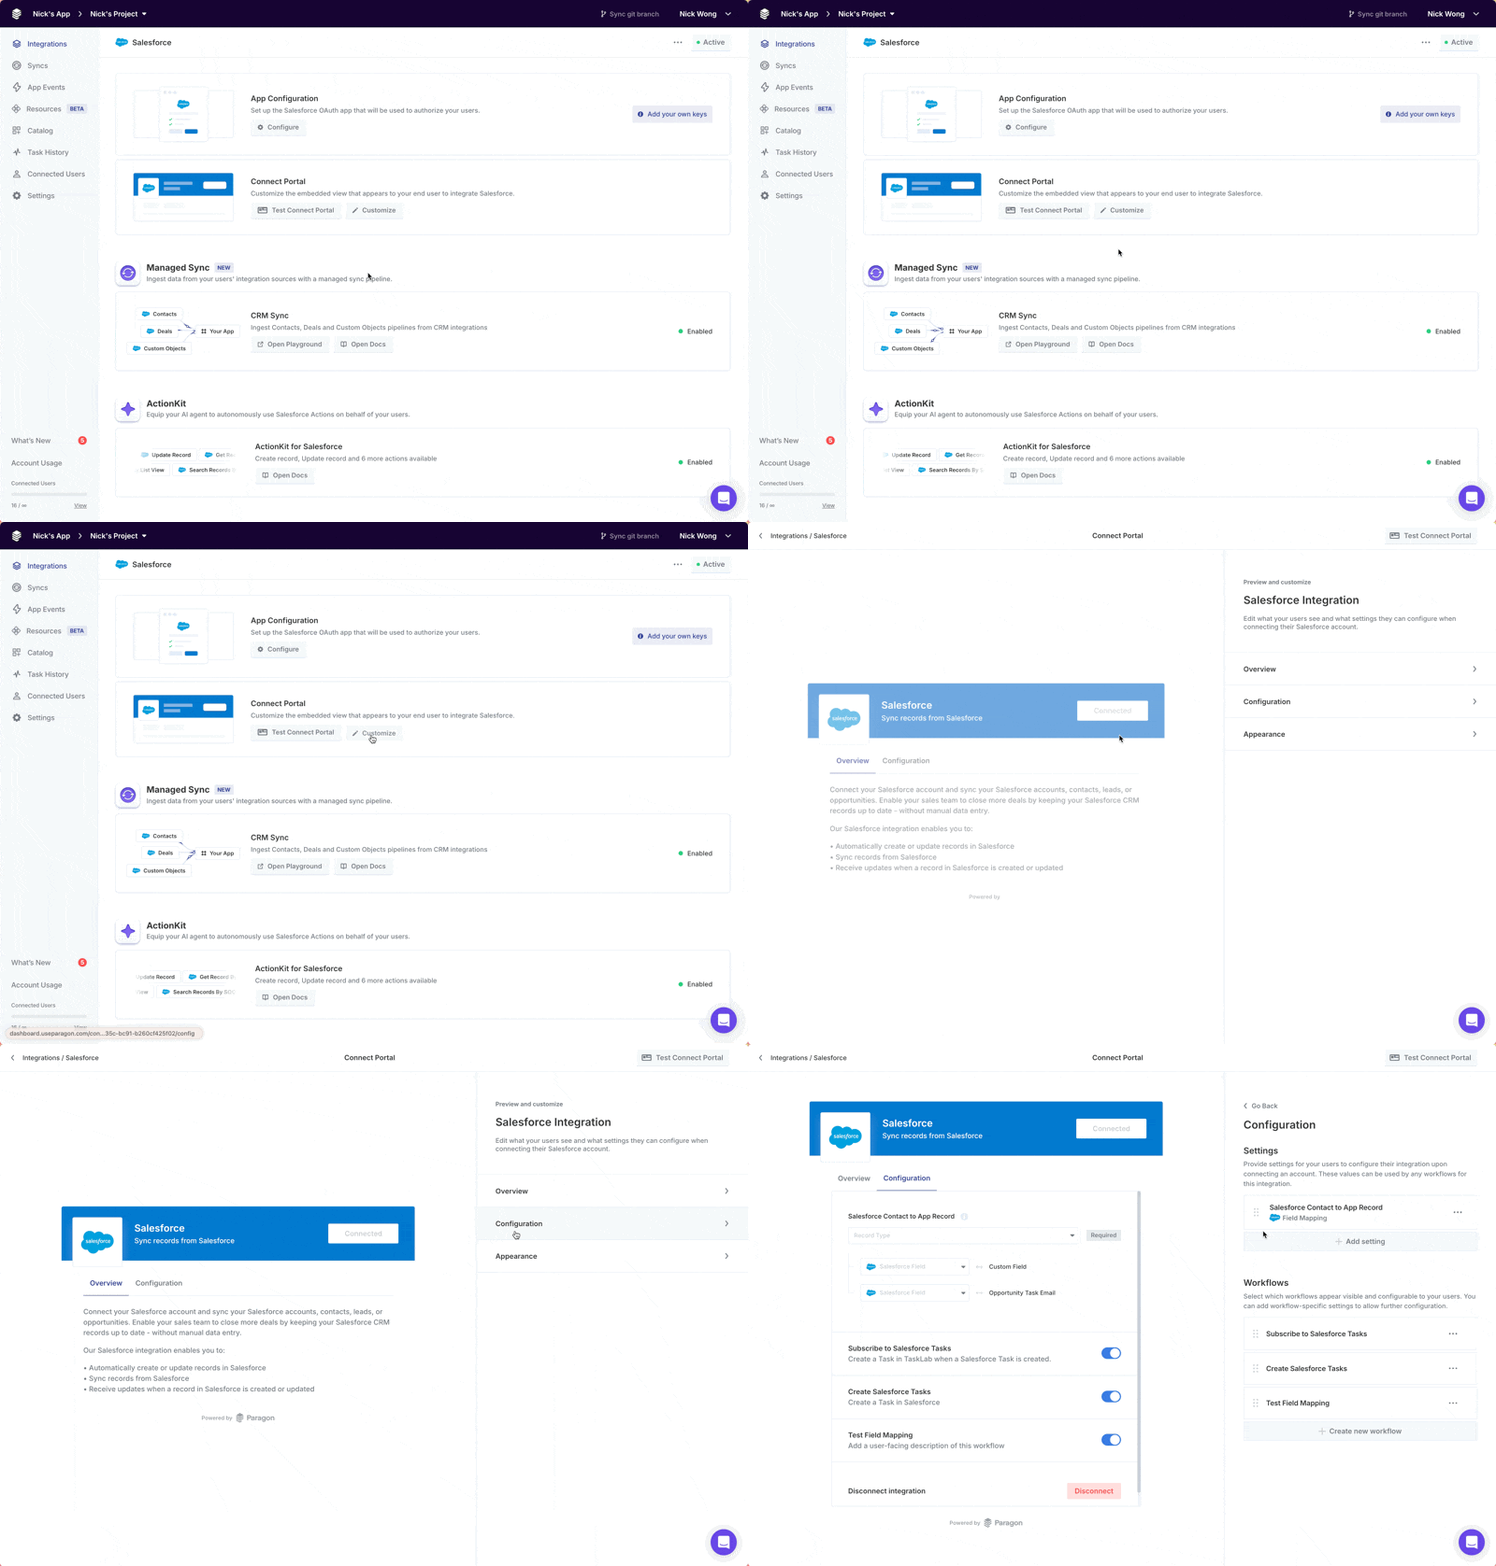 In an integration in your project, click on **Customize** from the Connect Portal section in the dashboard.
Select **Configuration**, add a **Setting**, and then select **Field Mapping** as the type of User Setting.
Give this setting a descriptive name that explains what this Mapping represents for your integration. For example, if Contacts is your intended Application Object to be mapped to a Salesforce Object, you might title this input "*Map Contacts to this object*".
Add a label for each property that should be mapped from your Application Object to a Salesforce Object. You might add labels for "First Name", "Last Name", and "Email", if the schema for Contacts in your app includes these properties.
In your [Connect Portal](/getting-started/displaying-the-connect-portal), your users will be prompted to select an object from their Salesforce instance when enabling this workflow. For each of the Application Object properties you labeled, your users will be prompted to select which Integration Object field that property should be mapped to.
By this stage, you have configured a static Field Mapping in the dashboard and can call `paragon.connect` to render the Field Mapping in the Connect Portal in your frontend application.
## Configuring Field Mapping
Many implementations of Field Mapping will warrant additional configuration options. Start by using the Paragon Dashboard to enable additional configuration options for your Field Mapping like [Dynamic Application Fields](#dynamic-application-fields). Then, learn how to [pass dynamic fields through the Paragon SDK](#passing-dynamic-fields-through-the-sdk) in your frontend to render dynamic Field Mapping elements in the Connect Portal.
### Configuring your Field Mapping setting in the Dashboard
#### Dynamic Application Fields
If your Application Fields may vary between your users for a particular Mapping, you are able to provide those options from your frontend application, through the SDK, using **Dynamic Application Fields**.
**Dynamic Application Fields is available for Paragon Enterprise customers and as an add-on for Paragon Pro customers.**
To learn more, contact your Customer Success Manager or [sales@useparagon.com](mailto:sales@useparagon.com).
Enable and configure Dynamic Application Fields by adding a Field Mapping input to your Connect Portal as described above. Configuration for Dynamic Application Fields will have a different interface depending on the integration.
In an integration in your project, click on **Customize** from the Connect Portal section in the dashboard.
Select **Configuration**, add a **Setting**, and then select **Field Mapping** as the type of User Setting.
Give this setting a descriptive name that explains what this Mapping represents for your integration. For example, if Contacts is your intended Application Object to be mapped to a Salesforce Object, you might title this input "*Map Contacts to this object*".
Add a label for each property that should be mapped from your Application Object to a Salesforce Object. You might add labels for "First Name", "Last Name", and "Email", if the schema for Contacts in your app includes these properties.
In your [Connect Portal](/getting-started/displaying-the-connect-portal), your users will be prompted to select an object from their Salesforce instance when enabling this workflow. For each of the Application Object properties you labeled, your users will be prompted to select which Integration Object field that property should be mapped to.
By this stage, you have configured a static Field Mapping in the dashboard and can call `paragon.connect` to render the Field Mapping in the Connect Portal in your frontend application.
## Configuring Field Mapping
Many implementations of Field Mapping will warrant additional configuration options. Start by using the Paragon Dashboard to enable additional configuration options for your Field Mapping like [Dynamic Application Fields](#dynamic-application-fields). Then, learn how to [pass dynamic fields through the Paragon SDK](#passing-dynamic-fields-through-the-sdk) in your frontend to render dynamic Field Mapping elements in the Connect Portal.
### Configuring your Field Mapping setting in the Dashboard
#### Dynamic Application Fields
If your Application Fields may vary between your users for a particular Mapping, you are able to provide those options from your frontend application, through the SDK, using **Dynamic Application Fields**.
**Dynamic Application Fields is available for Paragon Enterprise customers and as an add-on for Paragon Pro customers.**
To learn more, contact your Customer Success Manager or [sales@useparagon.com](mailto:sales@useparagon.com).
Enable and configure Dynamic Application Fields by adding a Field Mapping input to your Connect Portal as described above. Configuration for Dynamic Application Fields will have a different interface depending on the integration.
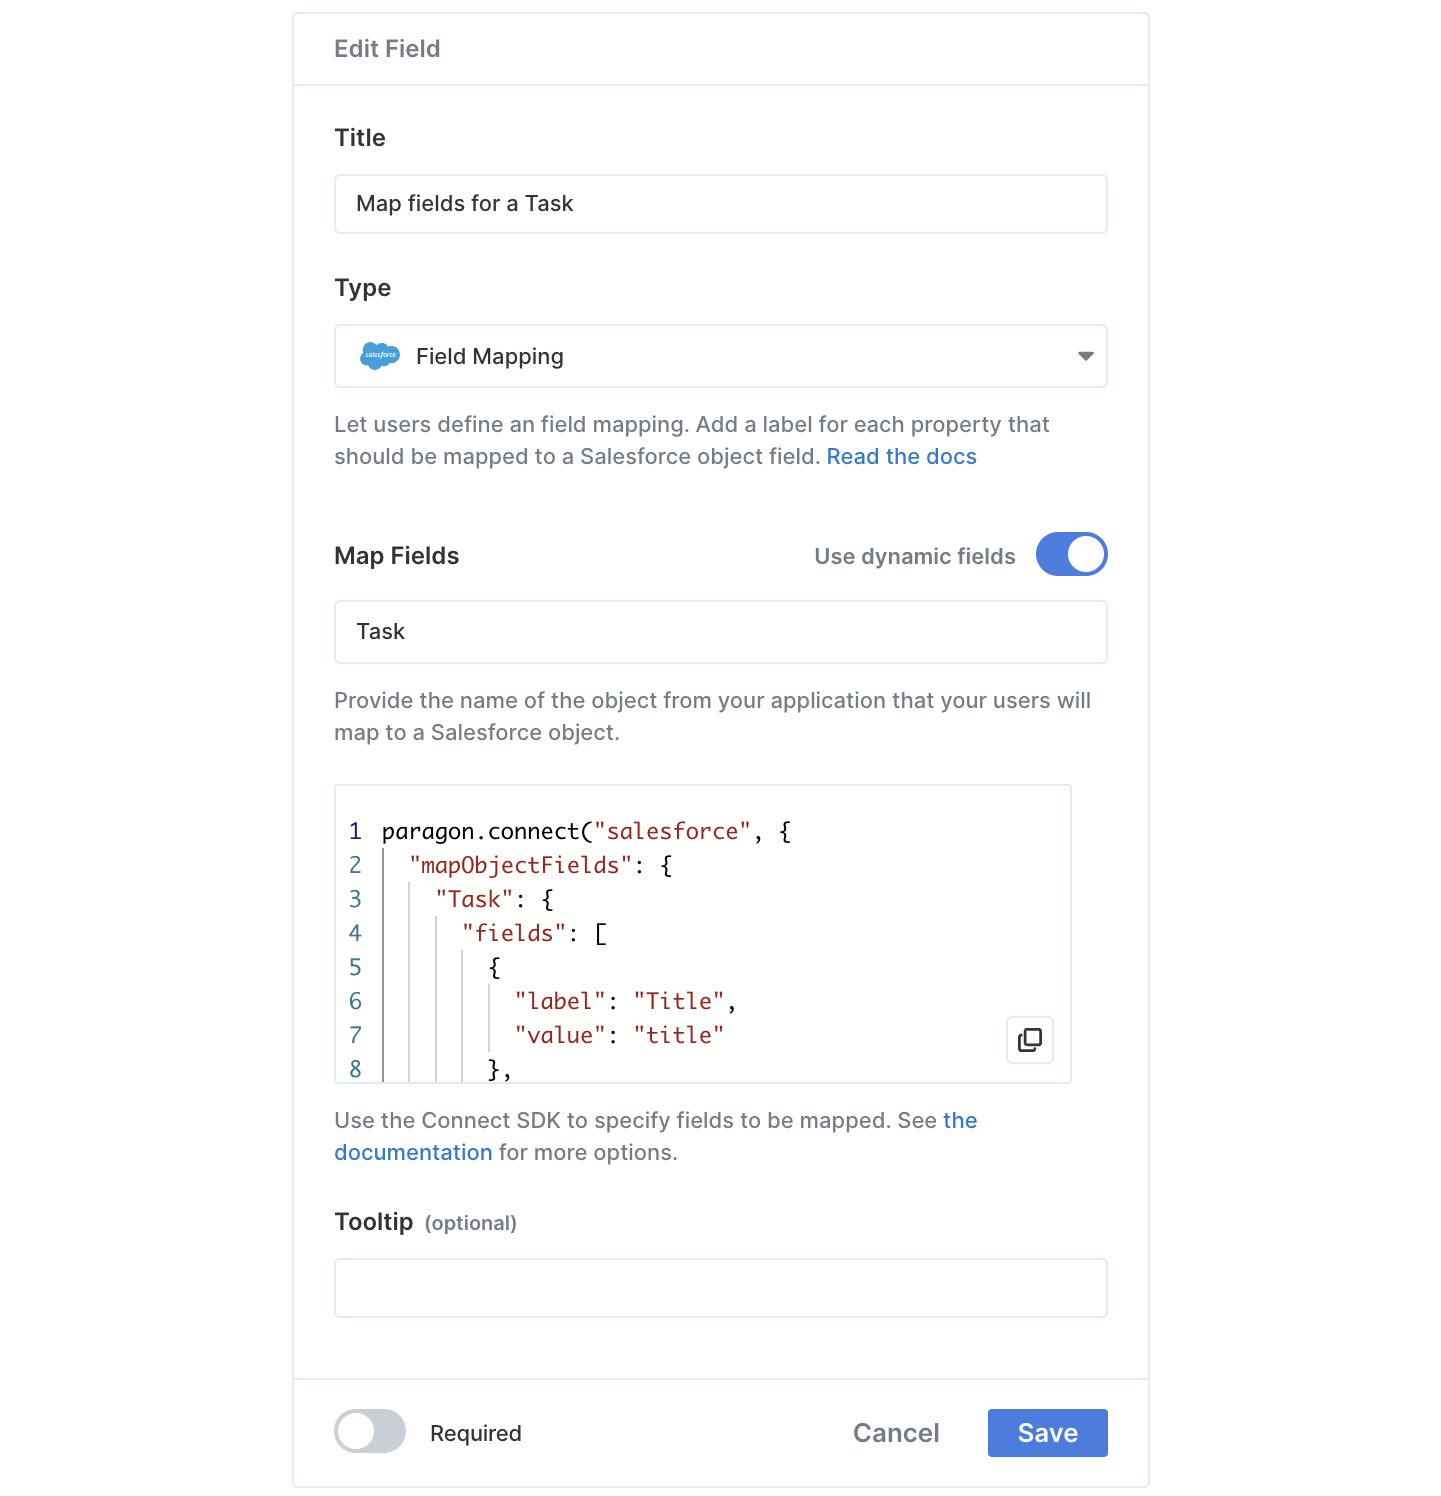
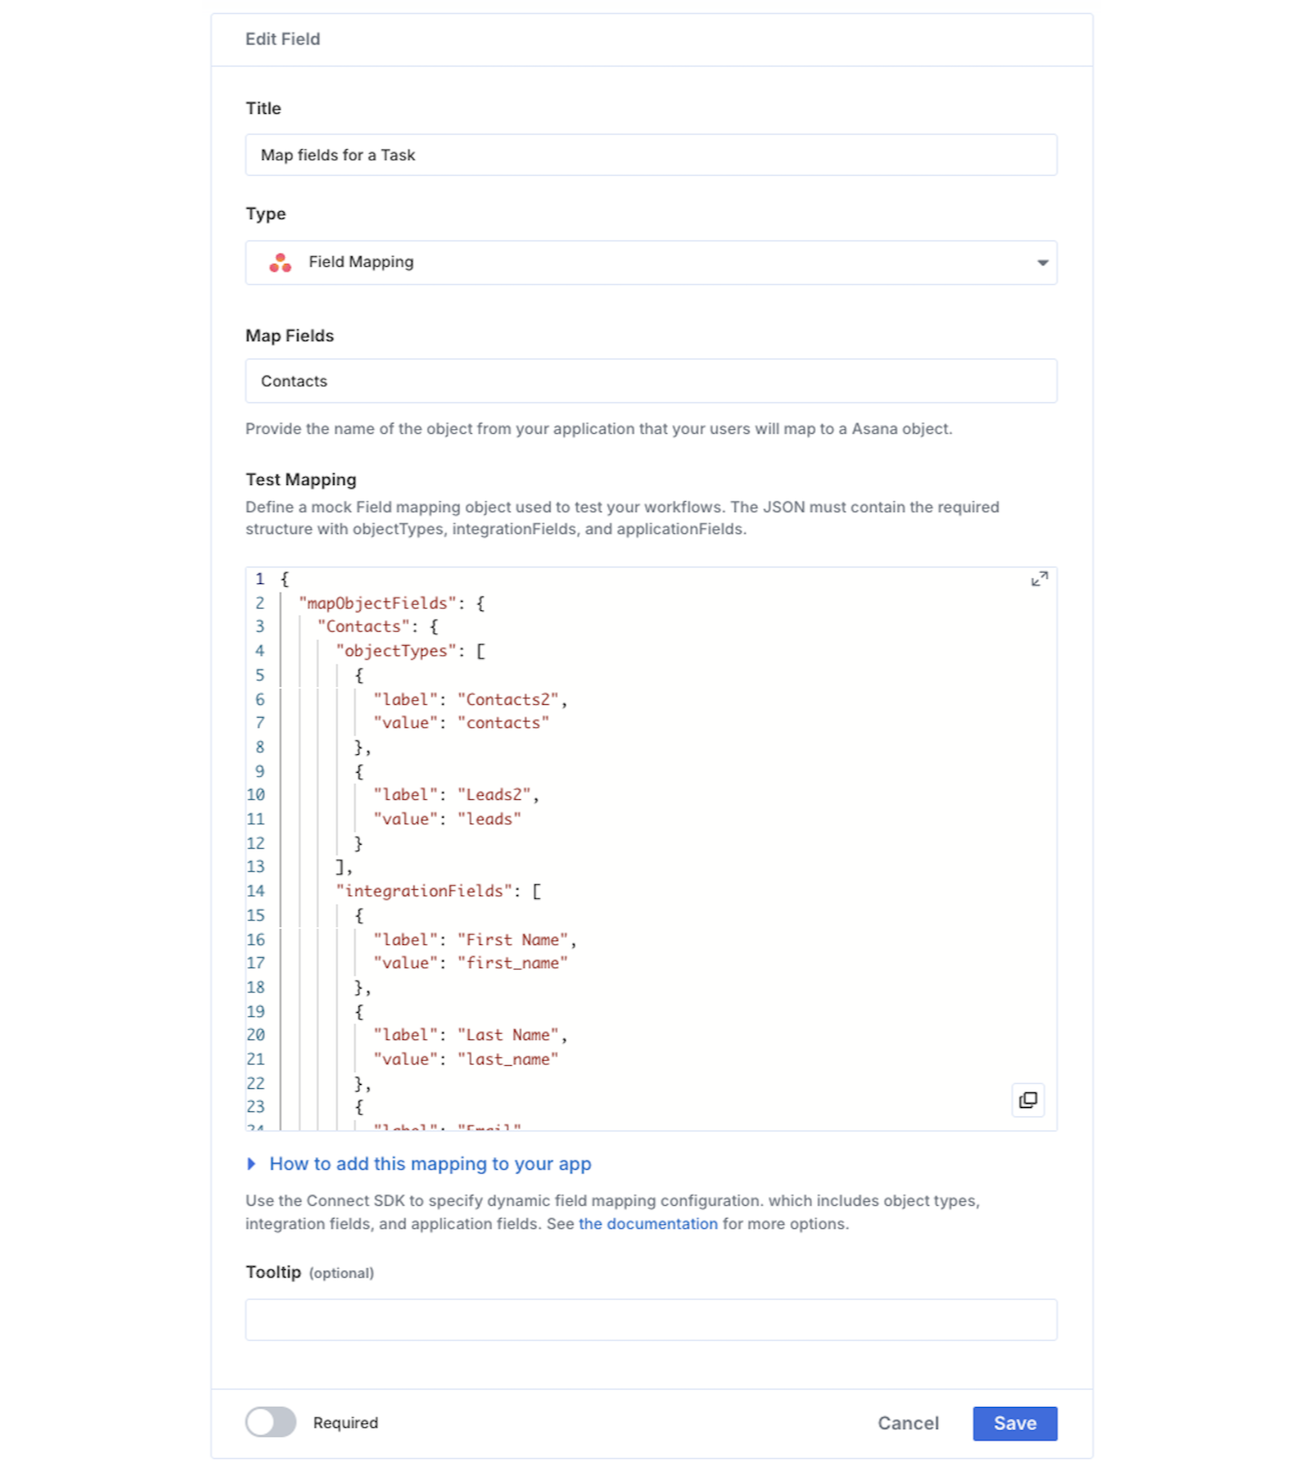 Complete the dashboard configuration for Dynamic Application Fields using the following steps, depending on the interface you see:
Pre-configured Field Mappings simplify the `paragon.connect` call by rendering pre-built dropdowns for the most common object types and fields for you.
Toggle on the "**Use dynamic fields**" slider option in your Field Mapping setting configuration.
Provide an Object Name that represents the name of your Application Object. This name will be used as an identifier to provide dynamic application fields through the SDK, as demonstrated in the code example to `paragon.connect` in the [Passing Dynamic Fields through the SDK](#passing-dynamic-fields-through-the-sdk) section.
Edit the example fields included in the code snippet to represent realistic values that will be passed from your application. These values will be used for testing in the Workflow Editor, and will not affect the live configuration for your users.
Learn more about testing your Field Mapping in the [Testing Field Mapping in the Workflow Editor](#testing-field-mapping-in-the-workflow-editor) section.
Click **Save** to apply your changes.
By default, the Field Mapping Input will have Dynamic Field Mapping enabled.
Provide an Object Name that represents the name of your Application Object. This name will be used as an identifier to provide dynamic fields through the SDK, as demonstrated in the code example to `paragon.connect`.
Edit the example `objectTypes` and `integrationFields` included in the code snippet to represent realistic values that will be passed from your application. This will not affect the live configuration for your users, since values must be passed from your frontend application through the SDK, but use this to test example field values while building workflows.
Learn more about testing your Field Mapping in the [Testing Field Mapping in the Workflow Editor](#testing-field-mapping-in-the-workflow-editor) section.
Click **Save** to apply your changes.
### Passing Dynamic Fields Through the SDK
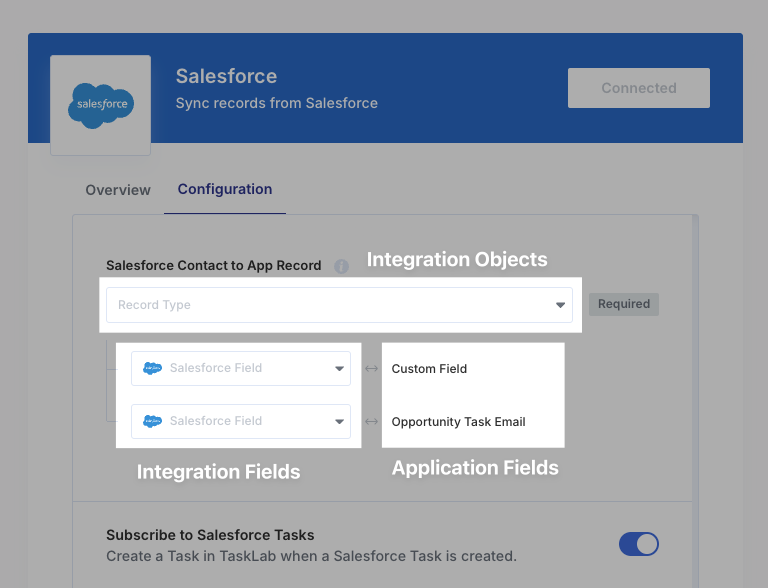
For all Field Mapping inputs configured in the Dashboard to use Dynamic Application Fields, use the `paragon.connect` method in your frontend to fully configure the **Integration Objects**, **Integration Fields**, and **Application Fields** that are rendered dynamically in the Connect Portal.
[Pre-configured Field Mappings](#pre-configured-field-mapping-support) simplify the SDK call by pre-building dropdowns for the most common object types and fields for you and minimally require you to specify your *Application Fields* in the SDK. You can think of this as the *right-hand-side* of the Field Mapping input.
For all other integrations, you must define the Integration Objects, their Integration Fields (the *left-hand-side* of the Field Mapping input), and your Application Fields.
Complete the dashboard configuration for Dynamic Application Fields using the following steps, depending on the interface you see:
Pre-configured Field Mappings simplify the `paragon.connect` call by rendering pre-built dropdowns for the most common object types and fields for you.
Toggle on the "**Use dynamic fields**" slider option in your Field Mapping setting configuration.
Provide an Object Name that represents the name of your Application Object. This name will be used as an identifier to provide dynamic application fields through the SDK, as demonstrated in the code example to `paragon.connect` in the [Passing Dynamic Fields through the SDK](#passing-dynamic-fields-through-the-sdk) section.
Edit the example fields included in the code snippet to represent realistic values that will be passed from your application. These values will be used for testing in the Workflow Editor, and will not affect the live configuration for your users.
Learn more about testing your Field Mapping in the [Testing Field Mapping in the Workflow Editor](#testing-field-mapping-in-the-workflow-editor) section.
Click **Save** to apply your changes.
By default, the Field Mapping Input will have Dynamic Field Mapping enabled.
Provide an Object Name that represents the name of your Application Object. This name will be used as an identifier to provide dynamic fields through the SDK, as demonstrated in the code example to `paragon.connect`.
Edit the example `objectTypes` and `integrationFields` included in the code snippet to represent realistic values that will be passed from your application. This will not affect the live configuration for your users, since values must be passed from your frontend application through the SDK, but use this to test example field values while building workflows.
Learn more about testing your Field Mapping in the [Testing Field Mapping in the Workflow Editor](#testing-field-mapping-in-the-workflow-editor) section.
Click **Save** to apply your changes.
### Passing Dynamic Fields Through the SDK
For all Field Mapping inputs configured in the Dashboard to use Dynamic Application Fields, use the `paragon.connect` method in your frontend to fully configure the **Integration Objects**, **Integration Fields**, and **Application Fields** that are rendered dynamically in the Connect Portal.
[Pre-configured Field Mappings](#pre-configured-field-mapping-support) simplify the SDK call by pre-building dropdowns for the most common object types and fields for you and minimally require you to specify your *Application Fields* in the SDK. You can think of this as the *right-hand-side* of the Field Mapping input.
For all other integrations, you must define the Integration Objects, their Integration Fields (the *left-hand-side* of the Field Mapping input), and your Application Fields.
 #### Passing Application Fields for a Pre-configured Field Mapping
Pass your Application Fields by specifying the `mapObjectFields` option, with an object keyed by the name you specified in the "Object Name" field when configuring your setting:
```js Open a pre-configured Field Mapping with Dynamic Application Fields theme={null}
paragon.connect("salesforce", {
mapObjectFields: {
"Task": {
fields: [
{ label: "Title", value: "title" },
{ label: "Description", value: "description" },
{ label: "Completed?", value: "isCompleted" }
]
}
}
});
```
For each field passed, two values are specified:
* `label`: The human-readable description for the field. This will be shown to the user in the Field Mapping input.
* `value`: The field key used by the object as it exists in your application. *This key does not yet support nested properties.*
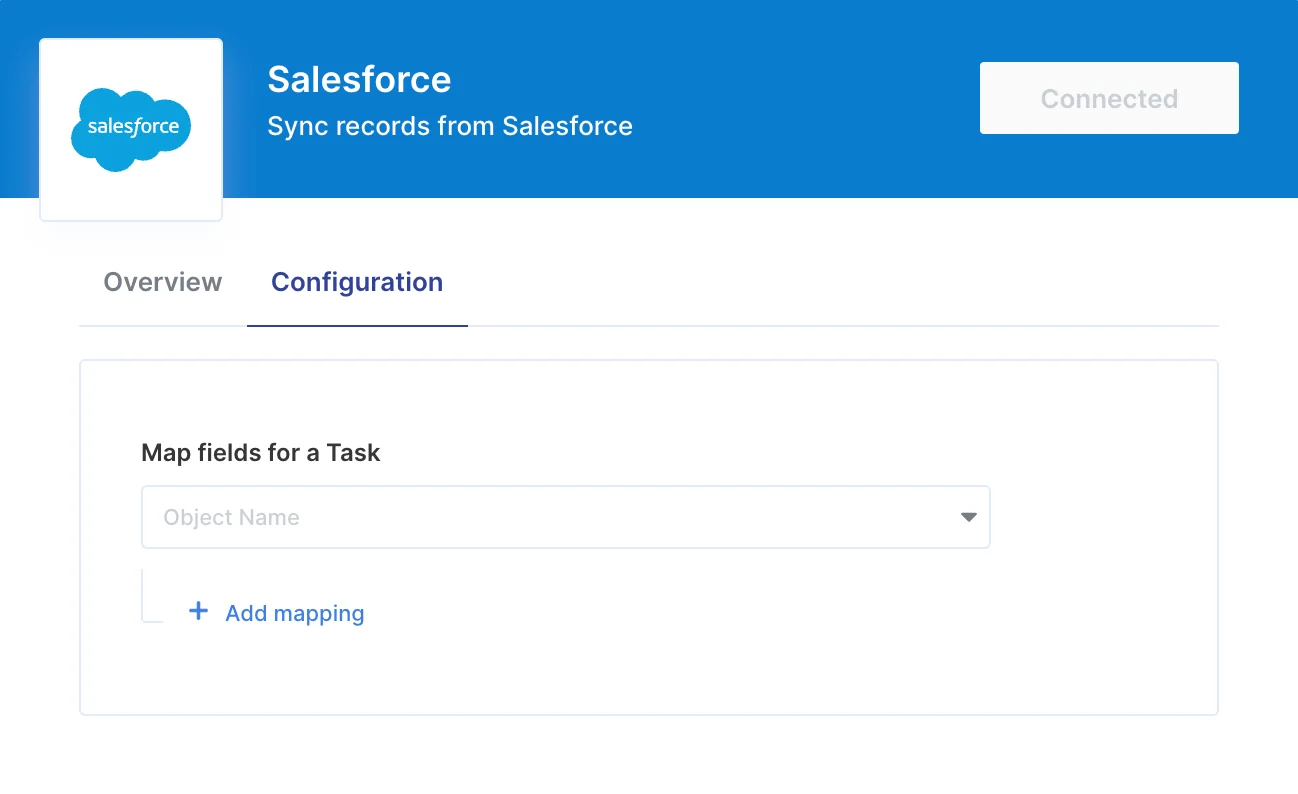
Calling the above would result in the Connect Portal appearing like below:
#### Passing Application Fields for a Pre-configured Field Mapping
Pass your Application Fields by specifying the `mapObjectFields` option, with an object keyed by the name you specified in the "Object Name" field when configuring your setting:
```js Open a pre-configured Field Mapping with Dynamic Application Fields theme={null}
paragon.connect("salesforce", {
mapObjectFields: {
"Task": {
fields: [
{ label: "Title", value: "title" },
{ label: "Description", value: "description" },
{ label: "Completed?", value: "isCompleted" }
]
}
}
});
```
For each field passed, two values are specified:
* `label`: The human-readable description for the field. This will be shown to the user in the Field Mapping input.
* `value`: The field key used by the object as it exists in your application. *This key does not yet support nested properties.*
Calling the above would result in the Connect Portal appearing like below:
.png?fit=max&auto=format&n=jCM_Y_j0HttScr1R&q=85&s=dcead569446d1acfb3093cadcd55a007) #### Passing Your Own Integration Objects and Fields
For all integrations, you can fetch and render any object type and its fields that are available in the user's connected integration.
Define the `objectTypes` and `integrationFields` properties and their `get` methods to render either a static list of objects and their fields, or a paginated list of objects and their fields via an API request.
* `objectTypes` — defines the list of record types available in the user’s integration (e.g. “Contact”, “Deal”, “Opportunity”).
* `integrationFields` — defines the fields available for the selected record type.
The both properties require a `get` method that must return either:
* A Promise that resolves to an array of dropdown options, where each is a `{ label, value }` pair as defined above in [Passing Application Fields for a Pre-configured Field Mapping](#passing-application-fields-for-a-pre-configured-field-mapping) example, or
* An object containing both the dropdown options and a pagination cursor
```ts objectTypes: Array of Dropdown Options theme={null}
// objectTypes
{
get: async (cursor, search) => {
return [
{ label: "Contact", value: "contact" },
{ label: "Deal", value: "deal" },
{ label: "Opportunity", value: "opportunity" }
]
}
}
```
```ts objectTypes: Paginated Dropdown theme={null}
// objectTypes
{
get: async (cursor, search) => {
return {
options: [
{ label: "Contact", value: "contact" },
{ label: "Deal", value: "deal" },
{ label: "Opportunity", value: "opportunity" }
],
nextPageCursor: "123"
}
}
}
```
**applicationFields**
When passing your own object types and fields, you must alter your `paragon.connect` call to explicitly define the `applicationFields` property.
`applicationFields` defines the list of fields from your application. It should contain a `fields` array containing `{ label, value }` pairs identical to the `fields` array in the [Passing Application Fields for a Pre-configured Field Mapping](#passing-application-fields-for-a-pre-configured-field-mapping) example.
The following are examples of how to fully configure `objectTypes`, `integrationFields`, and `applicationFields` when passing your own object types and fields:
```ts theme={null}
paragon.connect("salesforce", {
mapObjectFields: {
// Replace "CustomObjectMapping" with your Application Object Name as specified in
// Field Mapping input options
CustomObjectMapping: {
objectTypes: {
get: async (cursor, search) => {
const res = await paragon.request("salesforce", "/v1/objects", { method: "GET" });
return res.data.map((obj) => ({
label: obj.name,
value: obj.id
}));
}
},
// Integration fields from the selected objectTypes (Contacts' schema / field types)
// @returns Promise resolving to Integration Fields to display.
// Each item: { label: string, value: string }
integrationFields: {
get: async ({ objectType }) => {
const res = await paragon.request("salesforce",
`v1/objects/${objectType}/fields`,
{ method: "GET" });
return res.fields.map((field) => ({
label: field.label,
value: field.id
}));
}
},
// Fields from your application that will be displayed in the Connect Portal
applicationFields: {
fields: [
{ label: "Title", value: "title" },
{ label: "Email", value: "email" }
],
defaultFields: [],
userCanRemoveMappings: true
}
}
}
});
```
```ts theme={null}
paragon.connect("slack", {
mapObjectFields: {
// Replace "SlackObjectMapping" with your Application Object Name as specified in
// Field Mapping input options
SlackObjectMapping: {
objectTypes: {
get: async (cursor, search) => {
const url = `/conversations.list${cursor ? `?cursor=${encodeURIComponent(cursor)}` : ''}`;
const res = await paragon.request("slack", url, { method: "GET" });
// Optional search filter (case-insensitive)
const filteredChannels = (res.channels || []).filter(ch =>
!search || ch.name.toLowerCase().includes(search.toLowerCase())
);
const channels = filteredChannels.map(ch => ({
label: ch.name,
value: ch.id,
}));
return {
options: channels,
nextPageCursor: res.response_metadata?.next_cursor || null,
};
},
},
// Integration fields from the selected objectTypes (Conversations' schema / field types)
// @returns Promise resolving to Integration Fields to display.
// Each item: { label: string, value: string }
integrationFields: {
get: async () => {
const res = await paragon.request("slack", "/conversations.list", { method: "GET" });
const options = (res.channels || []).map(ch => ({
label: ch.name,
value: ch.id,
}));
return { options };
},
},
applicationFields: {
fields: [
{ label: "Channel Name", value: "name" },
{ label: "Channel ID", value: "id" },
],
},
},
},
});
```
#### User-Configurable Mappings
If your use case requires it, you can allow users to control the *number* of Field Mappings that are set by adding the `userCanRemoveMappings` option alongside the `fields` array in your `paragon.connect` call.
```js theme={null}
paragon.connect("salesforce", {
mapObjectFields: {
// Replace "Task" with your Application Object Name as specified in
// Field Mapping input options
"Task": {
fields: [
{ label: "Title", value: "title" },
{ label: "Description", value: "description" },
{ label: "Completed?", value: "isCompleted" }
],
userCanRemoveMappings: true
}
}
});
```
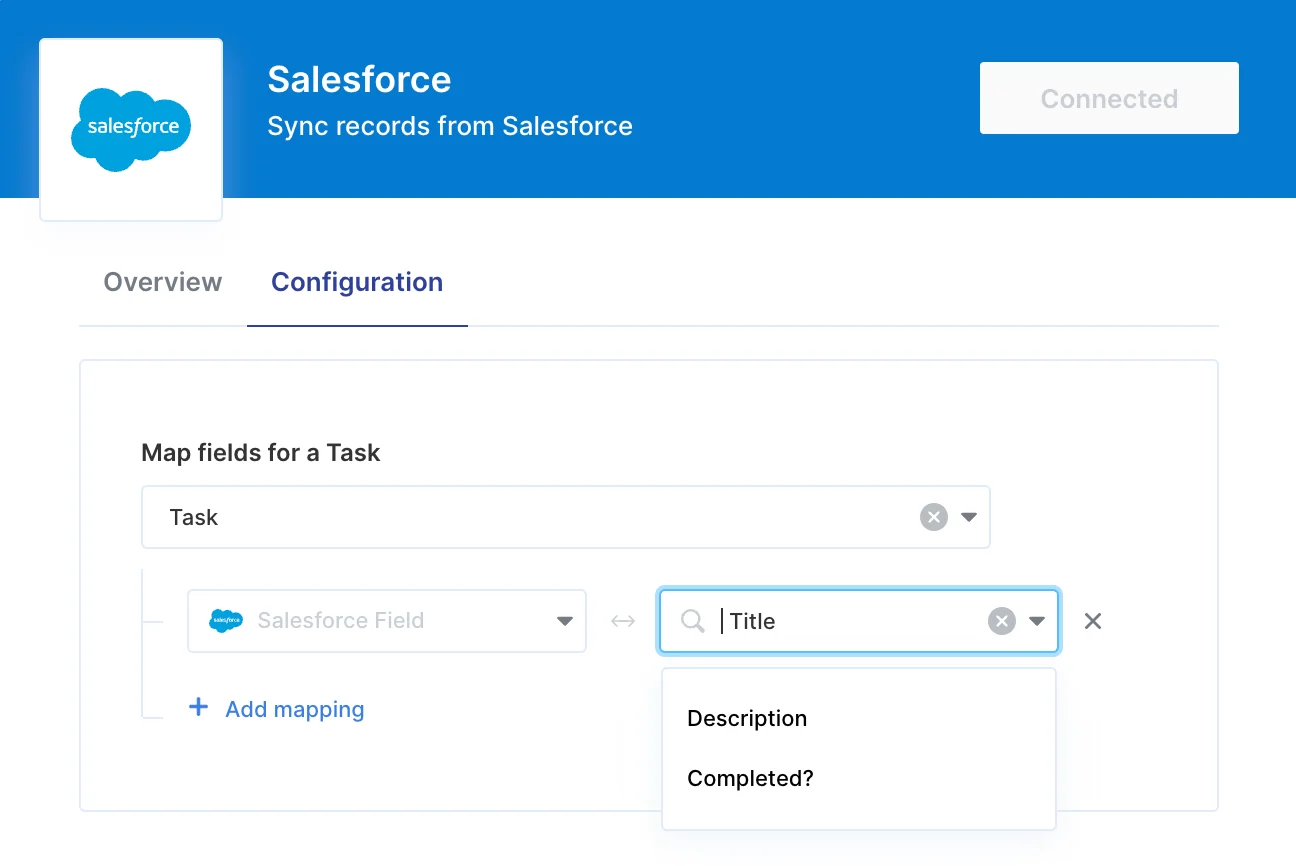
Setting this option will result in the Connect Portal appearing like below:
#### Passing Your Own Integration Objects and Fields
For all integrations, you can fetch and render any object type and its fields that are available in the user's connected integration.
Define the `objectTypes` and `integrationFields` properties and their `get` methods to render either a static list of objects and their fields, or a paginated list of objects and their fields via an API request.
* `objectTypes` — defines the list of record types available in the user’s integration (e.g. “Contact”, “Deal”, “Opportunity”).
* `integrationFields` — defines the fields available for the selected record type.
The both properties require a `get` method that must return either:
* A Promise that resolves to an array of dropdown options, where each is a `{ label, value }` pair as defined above in [Passing Application Fields for a Pre-configured Field Mapping](#passing-application-fields-for-a-pre-configured-field-mapping) example, or
* An object containing both the dropdown options and a pagination cursor
```ts objectTypes: Array of Dropdown Options theme={null}
// objectTypes
{
get: async (cursor, search) => {
return [
{ label: "Contact", value: "contact" },
{ label: "Deal", value: "deal" },
{ label: "Opportunity", value: "opportunity" }
]
}
}
```
```ts objectTypes: Paginated Dropdown theme={null}
// objectTypes
{
get: async (cursor, search) => {
return {
options: [
{ label: "Contact", value: "contact" },
{ label: "Deal", value: "deal" },
{ label: "Opportunity", value: "opportunity" }
],
nextPageCursor: "123"
}
}
}
```
**applicationFields**
When passing your own object types and fields, you must alter your `paragon.connect` call to explicitly define the `applicationFields` property.
`applicationFields` defines the list of fields from your application. It should contain a `fields` array containing `{ label, value }` pairs identical to the `fields` array in the [Passing Application Fields for a Pre-configured Field Mapping](#passing-application-fields-for-a-pre-configured-field-mapping) example.
The following are examples of how to fully configure `objectTypes`, `integrationFields`, and `applicationFields` when passing your own object types and fields:
```ts theme={null}
paragon.connect("salesforce", {
mapObjectFields: {
// Replace "CustomObjectMapping" with your Application Object Name as specified in
// Field Mapping input options
CustomObjectMapping: {
objectTypes: {
get: async (cursor, search) => {
const res = await paragon.request("salesforce", "/v1/objects", { method: "GET" });
return res.data.map((obj) => ({
label: obj.name,
value: obj.id
}));
}
},
// Integration fields from the selected objectTypes (Contacts' schema / field types)
// @returns Promise resolving to Integration Fields to display.
// Each item: { label: string, value: string }
integrationFields: {
get: async ({ objectType }) => {
const res = await paragon.request("salesforce",
`v1/objects/${objectType}/fields`,
{ method: "GET" });
return res.fields.map((field) => ({
label: field.label,
value: field.id
}));
}
},
// Fields from your application that will be displayed in the Connect Portal
applicationFields: {
fields: [
{ label: "Title", value: "title" },
{ label: "Email", value: "email" }
],
defaultFields: [],
userCanRemoveMappings: true
}
}
}
});
```
```ts theme={null}
paragon.connect("slack", {
mapObjectFields: {
// Replace "SlackObjectMapping" with your Application Object Name as specified in
// Field Mapping input options
SlackObjectMapping: {
objectTypes: {
get: async (cursor, search) => {
const url = `/conversations.list${cursor ? `?cursor=${encodeURIComponent(cursor)}` : ''}`;
const res = await paragon.request("slack", url, { method: "GET" });
// Optional search filter (case-insensitive)
const filteredChannels = (res.channels || []).filter(ch =>
!search || ch.name.toLowerCase().includes(search.toLowerCase())
);
const channels = filteredChannels.map(ch => ({
label: ch.name,
value: ch.id,
}));
return {
options: channels,
nextPageCursor: res.response_metadata?.next_cursor || null,
};
},
},
// Integration fields from the selected objectTypes (Conversations' schema / field types)
// @returns Promise resolving to Integration Fields to display.
// Each item: { label: string, value: string }
integrationFields: {
get: async () => {
const res = await paragon.request("slack", "/conversations.list", { method: "GET" });
const options = (res.channels || []).map(ch => ({
label: ch.name,
value: ch.id,
}));
return { options };
},
},
applicationFields: {
fields: [
{ label: "Channel Name", value: "name" },
{ label: "Channel ID", value: "id" },
],
},
},
},
});
```
#### User-Configurable Mappings
If your use case requires it, you can allow users to control the *number* of Field Mappings that are set by adding the `userCanRemoveMappings` option alongside the `fields` array in your `paragon.connect` call.
```js theme={null}
paragon.connect("salesforce", {
mapObjectFields: {
// Replace "Task" with your Application Object Name as specified in
// Field Mapping input options
"Task": {
fields: [
{ label: "Title", value: "title" },
{ label: "Description", value: "description" },
{ label: "Completed?", value: "isCompleted" }
],
userCanRemoveMappings: true
}
}
});
```
Setting this option will result in the Connect Portal appearing like below:
.png?fit=max&auto=format&n=jCM_Y_j0HttScr1R&q=85&s=c4579aba1994cb5c0a4b784c26a29348) With this option, your users will be able to remove, re-add, and change any of the Mappings that are passed through `fields`. This option can be combined with the `defaultFields` option to achieve different display configurations:
With this option, your users will be able to remove, re-add, and change any of the Mappings that are passed through `fields`. This option can be combined with the `defaultFields` option to achieve different display configurations:
 `defaultFields` is an array of strings matching the `value` property of your `fields`. Any fields with matching `value` keys will be included in the initial list of Field Mappings that your user sees, when viewing the Connect Portal for the first time.
If `defaultFields` is unspecified, *all* fields specified in the `fields` property will appear in the initial list of Field Mappings.
#### User-Creatable Fields
If your Application Object supports freeform fields or a flexible schema, you can allow users to create their own fields in the Field Mapping input.
```js theme={null}
paragon.connect("salesforce", {
mapObjectFields: {
// Replace "Task" with your Application Object Name as specified in
// Field Mapping input options
"Task": {
fields: [
{ label: "Title", value: "title" },
{ label: "Description", value: "description" },
{ label: "Completed?", value: "isCompleted" }
],
defaultFields: [],
userCanCreateFields: true
}
}
});
```
If this option is specified, the Connect Portal will appear with an option for users to create their own fields, if the field is not available in the list populated by `fields`:
`defaultFields` is an array of strings matching the `value` property of your `fields`. Any fields with matching `value` keys will be included in the initial list of Field Mappings that your user sees, when viewing the Connect Portal for the first time.
If `defaultFields` is unspecified, *all* fields specified in the `fields` property will appear in the initial list of Field Mappings.
#### User-Creatable Fields
If your Application Object supports freeform fields or a flexible schema, you can allow users to create their own fields in the Field Mapping input.
```js theme={null}
paragon.connect("salesforce", {
mapObjectFields: {
// Replace "Task" with your Application Object Name as specified in
// Field Mapping input options
"Task": {
fields: [
{ label: "Title", value: "title" },
{ label: "Description", value: "description" },
{ label: "Completed?", value: "isCompleted" }
],
defaultFields: [],
userCanCreateFields: true
}
}
});
```
If this option is specified, the Connect Portal will appear with an option for users to create their own fields, if the field is not available in the list populated by `fields`:
.png?fit=max&auto=format&n=jCM_Y_j0HttScr1R&q=85&s=8d73a1492e80e1407a19c3e95d8b5944) ## Testing Field Mapping in the Workflow Editor
When building workflows that use Field Mapping, you can test how your mappings work directly in the Workflow Editor. The mapping is applied based on what is configured for the Test User.
### Configuring Test User Mappings
To configure the Field Mapping for the Test User:
1. Return to the **Customize Connect Portal** section of your integration in the dashboard.
2. Select the **Field Mapping** Input Type setting.
3. Alter the **Test Mapping** code to change the static Integration Objects, Integration Fields, and Application Fields that are rendered in the preview Connect Portal. (This has no production impact.)
4. Click **Save** to apply your changes.
5. **Preview the Connect Portal** to see the updated mapping configuration and fill-in the inputs to mimic the mapping you want to test.
## Usage in Workflows
After your user specifies their desired mapping in the Connect Portal, you can use their chosen values within workflow actions.
A Field Mapping contains 2 pieces of information:
* The selected Integration Object type (for example, a Salesforce Task).
* The field-level mappings between your Application Object and the selected Integration Object type (for example, Title ⇄ Salesforce Task Subject, Description ⇄ Salesforce Task Description).
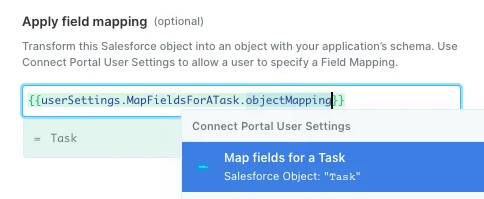
You can use the "**Apply field mapping**" option to transform Application Objects (from App Events or Request triggers) to Integration objects and vice versa.
### Transforming from Application Object → Integration Object
If you receive an Application Object in an App Event or Request payload, you can transform it into an Integration Object by selecting the **Field Mapping Object Type** in the "**Apply field mapping**" option for your App Event or Request trigger.
## Testing Field Mapping in the Workflow Editor
When building workflows that use Field Mapping, you can test how your mappings work directly in the Workflow Editor. The mapping is applied based on what is configured for the Test User.
### Configuring Test User Mappings
To configure the Field Mapping for the Test User:
1. Return to the **Customize Connect Portal** section of your integration in the dashboard.
2. Select the **Field Mapping** Input Type setting.
3. Alter the **Test Mapping** code to change the static Integration Objects, Integration Fields, and Application Fields that are rendered in the preview Connect Portal. (This has no production impact.)
4. Click **Save** to apply your changes.
5. **Preview the Connect Portal** to see the updated mapping configuration and fill-in the inputs to mimic the mapping you want to test.
## Usage in Workflows
After your user specifies their desired mapping in the Connect Portal, you can use their chosen values within workflow actions.
A Field Mapping contains 2 pieces of information:
* The selected Integration Object type (for example, a Salesforce Task).
* The field-level mappings between your Application Object and the selected Integration Object type (for example, Title ⇄ Salesforce Task Subject, Description ⇄ Salesforce Task Description).
You can use the "**Apply field mapping**" option to transform Application Objects (from App Events or Request triggers) to Integration objects and vice versa.
### Transforming from Application Object → Integration Object
If you receive an Application Object in an App Event or Request payload, you can transform it into an Integration Object by selecting the **Field Mapping Object Type** in the "**Apply field mapping**" option for your App Event or Request trigger.
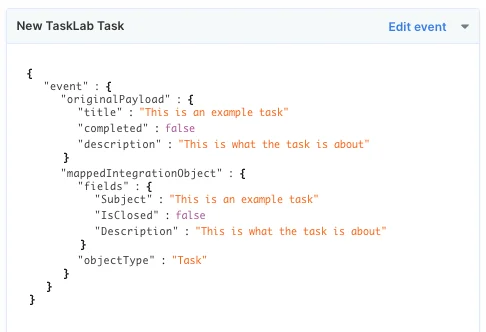
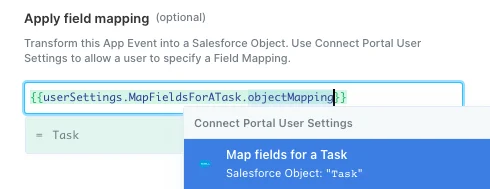 Once set, you will see the trigger output data update to show two objects:
* `originalPayload`: This is the original App Event or Request payload received by the trigger.
* `mappedIntegrationObject`: This is the Integration Object that was mapped based on the Field Mapping configured in the Connect Portal.
Once set, you will see the trigger output data update to show two objects:
* `originalPayload`: This is the original App Event or Request payload received by the trigger.
* `mappedIntegrationObject`: This is the Integration Object that was mapped based on the Field Mapping configured in the Connect Portal.
 **Note:** The mapped Integration Object only applies to the **root** of the original payload. If your field exists within a nested JSON, it will not work as expected.
### Transforming from Integration Object → Application Object
When receiving an Integration Object in an Integration trigger (for example, a Salesforce "New Record" trigger), you can transform it into an Application Object using the Field Mapping specified by your user.
In the trigger settings for your workflow, select the **Field Mapping Object Type** in the "**Apply field mapping**" option.
**Note:** The mapped Integration Object only applies to the **root** of the original payload. If your field exists within a nested JSON, it will not work as expected.
### Transforming from Integration Object → Application Object
When receiving an Integration Object in an Integration trigger (for example, a Salesforce "New Record" trigger), you can transform it into an Application Object using the Field Mapping specified by your user.
In the trigger settings for your workflow, select the **Field Mapping Object Type** in the "**Apply field mapping**" option.
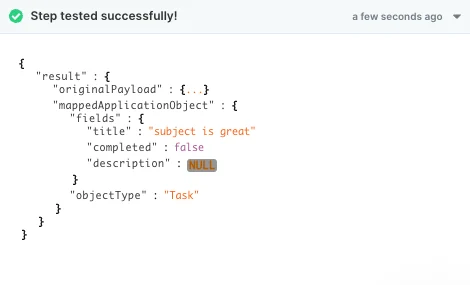
 Once set, you will see the trigger output data update to show two objects:
* `originalPayload`: This is the original Integration Object received by the trigger.
* `mappedApplicationObject`: This is the Application Object that was mapped based on the field mapping configured in the Connect Portal.
Once set, you will see the trigger output data update to show two objects:
* `originalPayload`: This is the original Integration Object received by the trigger.
* `mappedApplicationObject`: This is the Application Object that was mapped based on the field mapping configured in the Connect Portal.
 ### Using Field Mappings in Function Steps
For more advanced use cases, you can pass a Field Mapping configuration into a [Function step](/workflows/functions#using-field-mappings-in-functions) and use the `paragonUtils` library to programmatically transform data. This gives you full control over the transformation — for example, mapping arrays of objects, applying additional logic, or chaining mappings with other operations.
```js theme={null}
function yourFunction(parameters, libraries) {
const { paragonUtils } = libraries;
const { fieldMapping, records } = parameters;
return paragonUtils.mapIntegrationObjects(fieldMapping, records);
}
```
## Pre-configured Field Mapping Support
Paragon provides pre-configured Field Mapping support for most CRM integrations, along with select others. These integrations come with fully maintained dropdowns for common record types and fields — you only provide your application fields.
All pre-configured Field Mapping integrations can be overridden by using the SDK to define custom field mapping dropdowns as explained above. This gives you full control over record types, fields, and how they appear in the Connect Portal. (See [Passing Your Own Integration Objects and Fields](#passing-your-own-integration-objects-and-fields)).
* [Close](/resources/integrations/close)
* [Dynamics 365 Sales](/resources/integrations/microsoft-dynamics-365)
* [Dynamics 365 Business Central](/resources/integrations/dynamicsbusinesscentral)
* [HubSpot](/resources/integrations/hubspot)
* [Jira](/resources/integrations/jira)
* [Marketo](/resources/integrations/marketo)
* [Pipedrive](/resources/integrations/pipedrive)
* [QuickBooks](/resources/integrations/quickbooks)
* [Sage Intacct](/resources/integrations/sage-intacct)
* [Salesforce](/resources/integrations/salesforce)
* [Sharepoint](/resources/integrations/sharepoint)
* [ZohoCRM](/resources/integrations/zohocrm)
### Using Field Mappings in Function Steps
For more advanced use cases, you can pass a Field Mapping configuration into a [Function step](/workflows/functions#using-field-mappings-in-functions) and use the `paragonUtils` library to programmatically transform data. This gives you full control over the transformation — for example, mapping arrays of objects, applying additional logic, or chaining mappings with other operations.
```js theme={null}
function yourFunction(parameters, libraries) {
const { paragonUtils } = libraries;
const { fieldMapping, records } = parameters;
return paragonUtils.mapIntegrationObjects(fieldMapping, records);
}
```
## Pre-configured Field Mapping Support
Paragon provides pre-configured Field Mapping support for most CRM integrations, along with select others. These integrations come with fully maintained dropdowns for common record types and fields — you only provide your application fields.
All pre-configured Field Mapping integrations can be overridden by using the SDK to define custom field mapping dropdowns as explained above. This gives you full control over record types, fields, and how they appear in the Connect Portal. (See [Passing Your Own Integration Objects and Fields](#passing-your-own-integration-objects-and-fields)).
* [Close](/resources/integrations/close)
* [Dynamics 365 Sales](/resources/integrations/microsoft-dynamics-365)
* [Dynamics 365 Business Central](/resources/integrations/dynamicsbusinesscentral)
* [HubSpot](/resources/integrations/hubspot)
* [Jira](/resources/integrations/jira)
* [Marketo](/resources/integrations/marketo)
* [Pipedrive](/resources/integrations/pipedrive)
* [QuickBooks](/resources/integrations/quickbooks)
* [Sage Intacct](/resources/integrations/sage-intacct)
* [Salesforce](/resources/integrations/salesforce)
* [Sharepoint](/resources/integrations/sharepoint)
* [ZohoCRM](/resources/integrations/zohocrm)